
this tutorial is second chapter of series build fitness tracker this app use for track workouts, diets, or health activities and analyze data and display suggestion the ultimate goal is to create food and health recommendation using Machine learning we start with creating app that user wants to use and connect to google health and apple heath for gathering everything to create dataset that uses for train model later I start with ultimate goal but we will start with create react native app and set up screen navigation with React navigation. inspired by React native theme from instamobile
here the first screen of our app that should display choice for users to decide what screen that user goes to the next login or register screen. We using react native element for more comfortable work on UI
first, install react native element
yarn add react-native-elements
then open IntroScreen.js import necessary component
import {
  View,
  StyleSheet,
  ActivityIndicator,
  TouchableOpacity,
} from 'react-native';
import {Text, Icon, Image, Button} from 'react-native-elements';
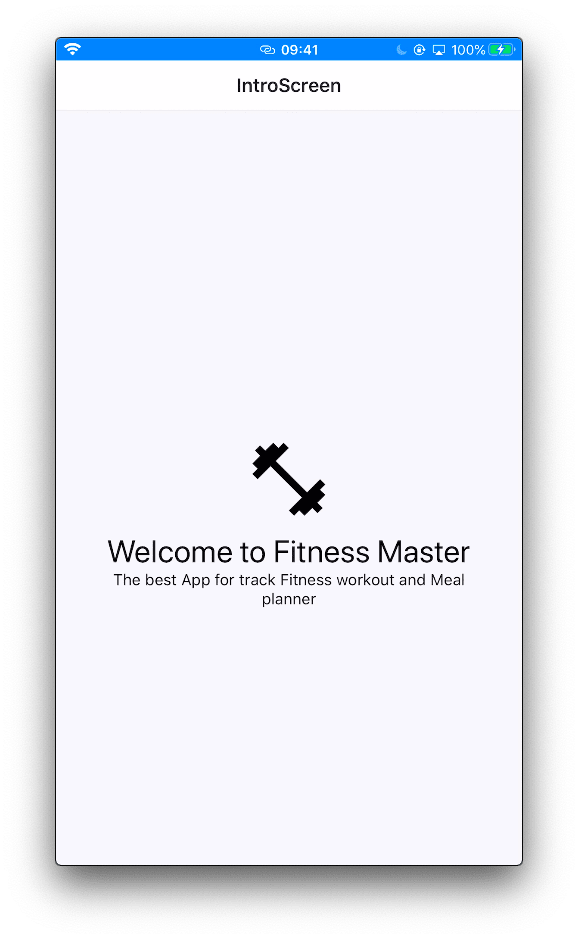
first, we create the main global wrapper and header section
<View style={styles.container}>
   <View style={styles.headerContainer}>
     <Icon name="md-fitness" size={80} type="ionicon" />
     <Text h4>Welcome to Fitness Master</Text>
     <Text h5 style={{textAlign: 'center'}}>
       The best App for track Fitness workout and Meal planner
     </Text>
   </View>
 </View>
then add stylesheet
const styles = StyleSheet.create({
    container: {
      backgroundColor: '#F4F6FA',height:'100%',
      flexDirection: 'column',
      justifyContent: 'center',
    },
    headerContainer: {
      top: 30,
      justifyContent: 'center',
      alignItems: 'center',
      padding: 40
    },
  });
later try close terminal and rebuild app again your will found this because we did not set up Font icon

we need to install react native vector icons
yarrn add react-native-vector-icons
for iOS install Cacoapod
cd ios ; pod install
then open Xcode open info.plist then register font
<key>UIAppFonts</key>
  <array>
    <string>AntDesign.ttf</string>
    <string>Entypo.ttf</string>
    <string>EvilIcons.ttf</string>
    <string>Feather.ttf</string>
    <string>FontAwesome.ttf</string>
    <string>FontAwesome5\_Brands.ttf</string>
    <string>FontAwesome5\_Regular.ttf</string>
    <string>FontAwesome5\_Solid.ttf</string>
    <string>Foundation.ttf</string>
    <string>Ionicons.ttf</string>
    <string>MaterialIcons.ttf</string>
    <string>MaterialCommunityIcons.ttf</string>
    <string>SimpleLineIcons.ttf</string>
    <string>Octicons.ttf</string>
    <string>Zocial.ttf</string>
  </array>
then rebuild the project again

you will see icon error because we did not activate font icon in Android project
open android/app/build.gradle add code below
project.ext.vectoricons = [
  iconFontNames: ['MaterialIcons.ttf','Ionicons.ttf','FontAwesome.ttf']
]
apply from: "../../node\_modules/react-native-vector-icons/fonts.gradle"
now run react-native run-android agian

next step we add image feature create a folder for containing an image

than add below the title
<Image
  source={require('../assets/image/onboard.jpg')}
  style={{width: '100%', height: 300}}
  PlaceholderContent={<ActivityIndicator />}
/>
your will see simple full-width image


next, we hide header bar
static navigationOptions = {
  headerShown: false,
};
and add button also touchable text
<View style={styles.contentView}>
          <Button
            onPress={() => this.props.navigation.navigate('EmailInputScreen')}
            title="Get started"
            loading={false}
            loadingProps={{size: 'small', color: 'white'}}
            buttonStyle={{
              backgroundColor: '#7265E3',
              borderRadius: 5,
            }}
            titleStyle={{fontWeight: 'bold', fontSize: 23}}
            containerStyle={{marginVertical: 10, height: 50, width: 300}}
            underlayColor="transparent"
          />
          <Text h4 style={{textAlign: 'center', color: 'grey'}}>
            Already have an account?
          </Text>
          <TouchableOpacity
            onPress={() => this.props.navigation.navigate('LoginScreen')}>
            <Text h4 style={{textAlign: 'center', color: 'blue'}}>
              Sign in
            </Text>
          </TouchableOpacity>
        </View>
then add some style
const styles = StyleSheet.create({
  container: {
    backgroundColor: '#F4F6FA',
    height: '100%',
    flexDirection: 'column',
    justifyContent: 'center',
  },
  headerContainer: {
    top: 30,
    justifyContent: 'center',
    alignItems: 'center',
    padding: 40,
  },
  heading: {
    color: 'white',
    marginTop: 10,
    fontSize: 22,
    fontWeight: 'bold',
  },
  contentView: {
    marginTop: 40,
    justifyContent: 'center',
    alignItems: 'center',
  },
});
that show properly on iOS

but android need fix

we reduce image height and margin
headerContainer: {
    // top: 30,
    justifyContent: 'center',
    alignItems: 'center',
    padding: 40,
  },
  heading: {
    color: 'white',
    marginTop: 10,
    fontSize: 22,
    fontWeight: 'bold',
  },
  contentView: {
    // marginTop: 40,
    justifyContent: 'center',
    alignItems: 'center',
  },
now we got the final result
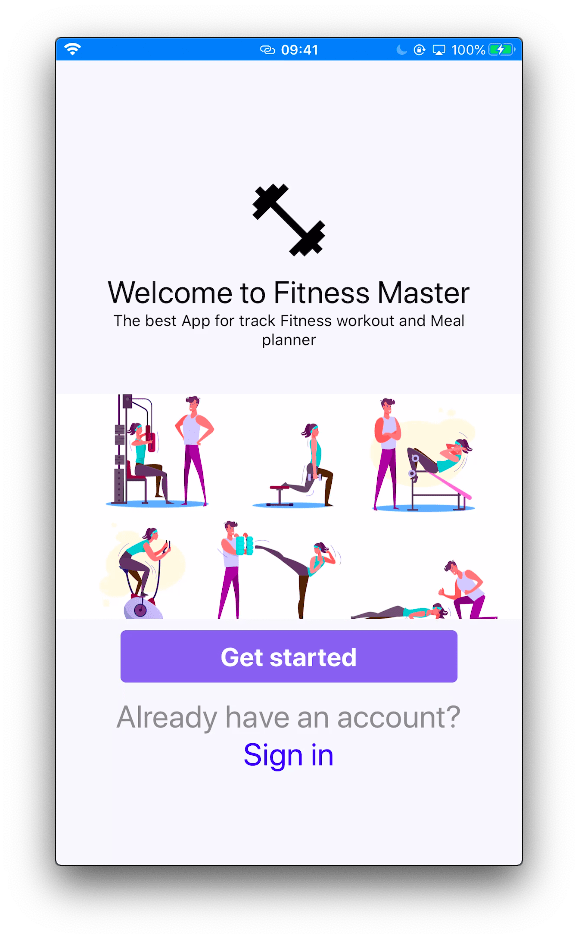
conclusion
here we just start and finish working on React native layout for simple style but require an amount of work but in the final, we got a beautiful screen that makes us feel better
Originally published at [_Kriss](https://kriss.io/build-react-native-fitness-app-2-onboard-screen/)._

Top comments (0)