
this tutorial is fourth chapter of series build fitness tracker this app use for track workouts, diets, or health activities and analyze data and display suggestion the ultimate goal is to create food and health recommendation using Machine learning we start with creating app that user wants to use and connect to google health and apple heath for gathering everything to create dataset that uses for train model later I start with ultimate goal but we will start with create react native app and set up screen navigation with React navigation. inspired by React native template from instamobile
this chapter we gonna build a register screen with a simple screen for the email input screen and a password input screen then add some package for mesure password strength also done in UI mode why we separate for two screens? because we want user familiar for the onboarding process
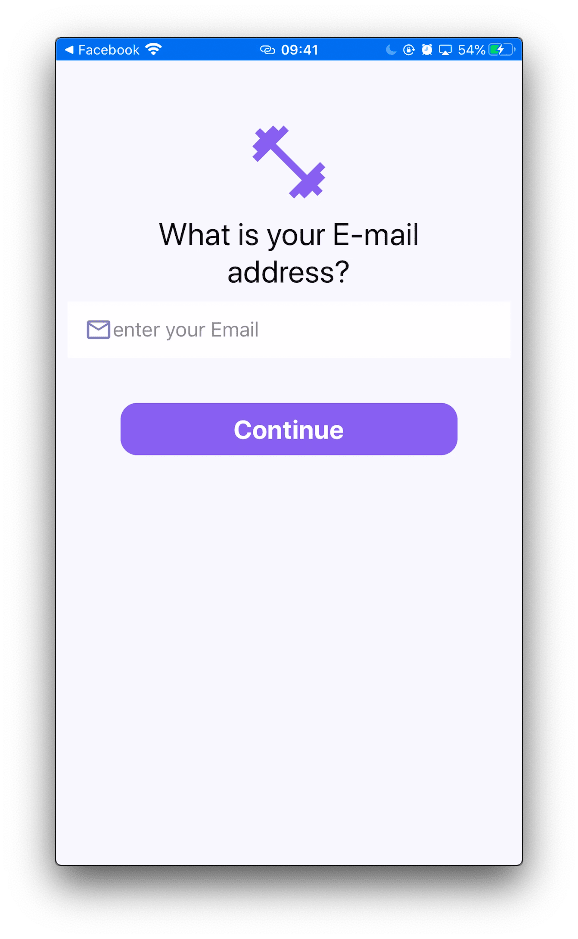
input email screen
let’s get started with to create view container for wrap and make global style for entries screen your can copy code from the login screen and make an update this pretty simple screen no need breakdown for explain just when press continued button we goto password input screen
import React, {Component} from 'react';
import {
  View,
  StyleSheet,
  KeyboardAvoidingView,
  ScrollView,
} from 'react-native';
import {Text, Icon, Input, Button, SocialIcon} from 'react-native-elements';
export class EmailInputScreen extends Component {
  static navigationOptions = {
    headerShown: false,
  };
  render() {
    return (
      <KeyboardAvoidingView
        style={styles.keyboardAvoidingView}
        behavior={'padding'}
        enabled
        keyboardVerticalOffset={Platform.OS === 'ios' ? 64 : 84}>
        <ScrollView
          style={styles.container}
          keyboardShouldPersistTaps="handled">
          <View style={styles.headerContainer}>
            <Icon name="md-fitness" size={80} type="ionicon" color={'#7265E2'} />
            <Text h4 style={{textAlign: 'center'}}>What is your E-mail address?</Text>
          </View>
          <Input
            leftIcon={
              <Icon
                name="email-outline"
                color="rgba(110, 120, 170, 1)"
                size={25}
              />
            }
            placeholder="enter your Email"
            inputContainerStyle={{
              borderWidth: 1,
              borderColor: 'white',
              borderLeftWidth: 0,
              height: 50,
              backgroundColor: 'white',
              marginBottom: 20,
            }}
            placeholderTextColor="grey"
            autoCapitalize="none"
            autoCorrect={false}
            keyboardType="email-address"
            returnKeyType="next"
            ref={input => (this.email2Input = input)}
            onSubmitEditing={() => {
              this.password2Input.focus();
            }}
          />
          <View style={styles.btnWrapper}>
             <Button
              title="Continue"
              loading={false}
              loadingProps={{size: 'small', color: 'white'}}
              buttonStyle={{
                backgroundColor: '#7265E3',
                borderRadius: 15,
              }}
              titleStyle={{fontWeight: 'bold', fontSize: 23}}
              containerStyle={{marginVertical: 10, height: 50, width: 300}}
              onPress={() => this.props.navigation.navigate('PasswordInputScreen')}
              underlayColor="transparent"
            />
          </View>
        </ScrollView>
      </KeyboardAvoidingView>
    );
  }
}
const styles = StyleSheet.create({
  container: {
    backgroundColor: '#F4F6FA',
    height: '100%',
  },
  headerContainer: {
    top: 30,
    justifyContent: 'center',
    alignItems: 'center',
    padding: 40,
  },
  heading: {
    color: 'white',
    marginTop: 10,
    fontSize: 22,
    fontWeight: 'bold',
  },
  btnWrapper: {
    marginTop: 10,
    justifyContent: 'center',
    alignItems: 'center',
  },
  socialLogin: {
    flexDirection: 'row',
    marginTop: 10,
    justifyContent: 'center',
    alignItems: 'center',
  },
  contentView: {
    // marginTop: 40,
    justifyContent: 'center',
    alignItems: 'center',
  },
  inputContainerStyle: {
    marginTop: 16,
    width: '90%',
  },
  keyboardAvoidingView: {
    flex: 1,
    flexDirection: 'column',
    justifyContent: 'center',
  },
});
export default EmailInputScreen;
here result

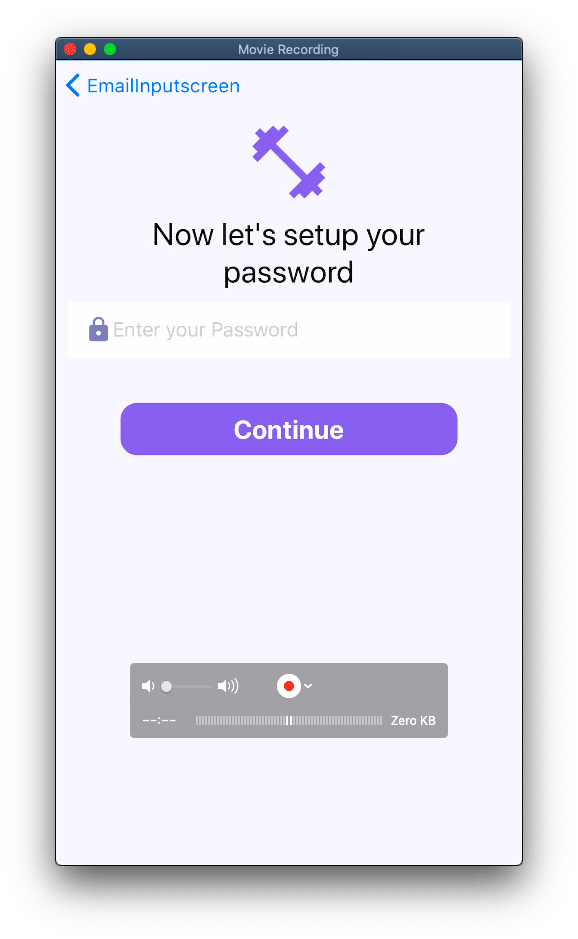
password input screen
same on email input screen password input screen is similar but change email input to password input and no need to breakdown again
import React, {Component} from 'react';
import {
  View,
  StyleSheet,
  ActivityIndicator,
  TouchableOpacity,
  KeyboardAvoidingView,
  ScrollView,
} from 'react-native';

import {BoxPasswordStrengthDisplay} from 'react-native-password-strength-meter';
import {Text, Icon, Input, Button, SocialIcon} from 'react-native-elements';

export class PasswordInputScreen extends Component {
  static navigationOptions = {
    headerTransparent: true,
    headerTitle: '',
  };
  state = {
    password: '',
  };

  onChange = password => this.setState({password});
  render() {
    return (
      <KeyboardAvoidingView
        style={styles.keyboardAvoidingView}
        behavior={'padding'}
        enabled
        keyboardVerticalOffset={Platform.OS === 'ios' ? 64 : 84}>
        <ScrollView
          style={styles.container}
          keyboardShouldPersistTaps="handled">
          <View style={styles.headerContainer}>
            <Icon
              name="md-fitness"
              size={80}
              type="ionicon"
              color={'#7265E2'}
            />
            <Text h4 style={{textAlign: 'center'}}>
              Now let's setup your password
            </Text>
          </View>
          <Input
            leftIcon={
              <Icon
                name="lock"
                color="rgba(110, 120, 170, 1)"
                size={25}
              />
            }
            placeholder="Email"
            inputContainerStyle={{
              borderWidth: 1,
              borderColor: 'white',
              borderLeftWidth: 0,
              height: 50,
              backgroundColor: 'white',
              marginBottom: 20,
            }}
            autoCapitalize="none"
            placeholder="Enter your Password"
            secureTextEntry={true}
            autoCorrect={false}
            returnKeyType="next"
            ref={input => (this.email2Input = input)}
            onChangeText={this.onChange}
          />
          <BoxPasswordStrengthDisplay password={this.state.password} />
          <View style={styles.btnWrapper}>
            <Button
              title="Continue"
              loading={false}
              loadingProps={{size: 'small', color: 'white'}}
              buttonStyle={{
                backgroundColor: '#7265E3',
                borderRadius: 15,
              }}
              titleStyle={{fontWeight: 'bold', fontSize: 23}}
              containerStyle={{marginVertical: 10, height: 50, width: 300}}
              onPress={() =>
                this.props.navigation.navigate('TouchAuthentication')
              }
              underlayColor="transparent"
            />
          </View>
        </ScrollView>
      </KeyboardAvoidingView>
    );
  }
}
const styles = StyleSheet.create({
  container: {
    backgroundColor: '#F4F6FA',
    height: '100%',
  },
  headerContainer: {
    top: 30,
    justifyContent: 'center',
    alignItems: 'center',
    padding: 40,
  },
  heading: {
    color: 'white',
    marginTop: 10,
    fontSize: 22,
    fontWeight: 'bold',
  },
  btnWrapper: {
    marginTop: 10,
    justifyContent: 'center',
    alignItems: 'center',
  },
  socialLogin: {
    flexDirection: 'row',
    marginTop: 10,
    justifyContent: 'center',
    alignItems: 'center',
  },
  contentView: {
    // marginTop: 40,
    justifyContent: 'center',
    alignItems: 'center',
  },
  inputContainerStyle: {
    marginTop: 16,
    width: '90%',
  },
  keyboardAvoidingView: {
    flex: 1,
    flexDirection: 'column',
    justifyContent: 'center',
  },
});
export default PasswordInputScreen;
here result

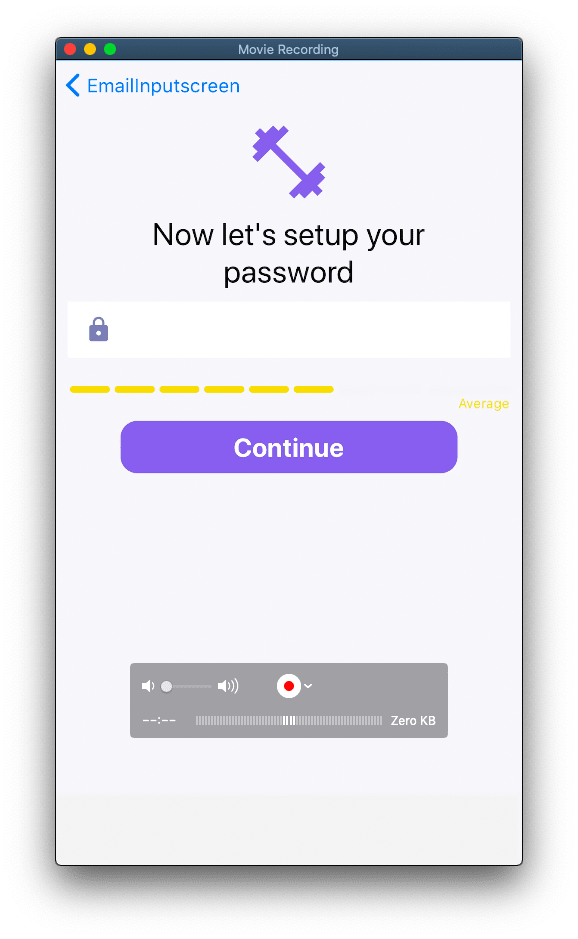
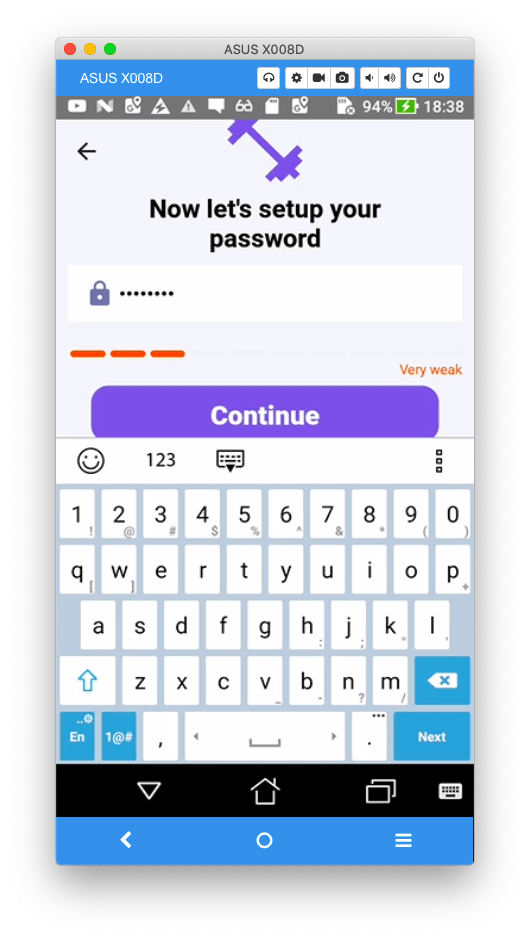
password strength mesure
we using package react-native-password-strength-meter help us measure password strength
using yarn add react-native-password-strength-meterthen import
import {BoxPasswordStrengthDisplay} from 'react-native-password-strength-meter';
then create state function for getting password
state = {
  password: '',
};
onChange = password => this.setState({password});
activate password strength tab
autoCapitalize="none"
  placeholder="Enter your Password"
  secureTextEntry={true}
  autoCorrect={false}
  returnKeyType="next"
  onChangeText={this.onChange}
/>
<BoxPasswordStrengthDisplay password={this.state.password} />
result here
for more info about this package check official document
conclusion
this chapter we learn how to create a simple form with react native and using password strength meter package next chapter we learn how to setup Firebase for both iOS and Android
Originally published at [_Kriss](https://kriss.io/build-react-native-fitness-app-4-register-screen/)._

Top comments (0)