
Hey there,
How is the weekend so far?

In the previous post, we saw how we can build and train a deep neural network to classify images of articles of clothing using the Fashion-MNIST dataset. The results we achieved were pretty impressive considering we only needed a few lines code to be able to do so. You also experimented with the impact that the number of units in each layer and the number of training epics had on the final training accuracy. But how do you make this model perform even better? One way is to use something called a Convolutional Neural Network, which are commonly abbreviated as CNNs. CNNs have proven to achieve higher accuracies when classifying images than the symbol period dense neural networks. For this reason, CNNs have become extremely useful and they're actually the primary reason for breakthroughs in computer vision applications using machine learning.In this lesson, we will see how easy it is to create a CNN-based image classifier from scratch using TensorFlow and Keras. The two main concepts in a Convolutional Neural Network are convolutions or maxpooling. So, let's start by taking a look at convolutions.
Let's take a greyscale image.
For simplicity, let's assume that this greyscale image was 6 pixels in height and 6 pixels in width. Our computer interprets this image as a 2D array of pixels. Since this image is greyscale, every pixel will have a value between 0 and 255, 0 being black and 255 corresponding to white. Here, we see an example of the pixel values for this six by six pixel image.
![]()
As you know, when we process this image in our neural network, the pixel values will be normalized to a value between 0 and 1. But let's get the original pixel value to keep our explanation simple. The idea of a convolutional layer is to create another grid of numbers called the kernel or filter, which can be seen here in this three by three matrix.
Then, we can scan this kernel across the image. Now, here we see the image pixel values and the kernel. The image size is 6 by 6 and the kernel size is three by three. A convolutional layer applies to kernel over the regions of the input image. For example, let's say, we like to begin by performing a kernel convolution on this pixel value of 25.
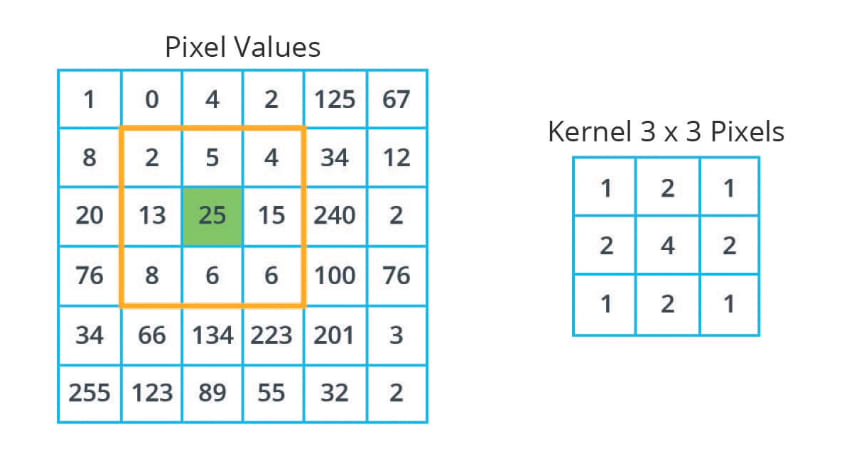
The first step is to center our kernel over the pixel that we want. In this case, we can see it here in green.So now, we're only going to look at the pixels within this 3 by 3 grid that is centered on the green pixel. The grid is three-by-three because this is the size of our kernel. So now, we take each corresponding image and kernel value, multiply them together and then we sum up the whole thing, and assign it to the green pixel in the convoluted image.

Let's see how this works step-by-step.
- So the first image pixel value in this grid is 2. So we multiply that by the corresponding kernel value which is 1 in this case.
- So two multiplied by one equals two. We do the same with the second image pixel value in the grid.
- We can see that it has a value of five. So we multiply that by the corresponding kernel value which is two in this case. So five multiplied by two equals 10.
- Now, we do the same with the third image pixel value in the grid. We can see that it has a value of four. So we multiply that by the corresponding kernel value which is 1 in this case. So 4 multiplied by 1 equals 4.
- We do this for all the remaining pixel values inside our blue three-by-three grid. Once we have the result of all of this operations, we sum all the numbers to get a total value of 198. So 198 will be the corresponding value in our new convoluted image, and now, we can do the same with all the other pixels in our image.

However, what happens to the pixels on the edges?
![]()
For example, what will be the corresponding value of this pixel?
We can see that when we center our kernel around this pixel, the grid lies outside the image. So what should we do in this case? There are a couple of options.
- is not to use this pixel in the convolution, so we'll just ignore them and pretend they don't exist. Sometimes this is done, but the downside is that you will lose information about the image, because the convoluted image will become much smaller than the original image.
- A more common option is to do something called
zero-padding.
In this case, we add pixels with zero around the original image as we can see here.
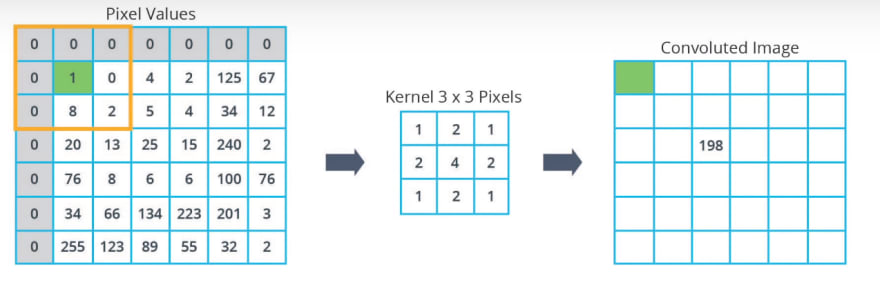
Now, that we have filled the missing pixel values in our grid, we can calculate the kernel convolution just as we did before. In this case, we get a value of 22.

Similarly, we can add zero padding to the entire image like we see here in order to calculate the current convolution of the entire image without losing information.

So a kernel convolution is just this process of applying the kernel or filter across different areas of the input image, and similarly to a dense layer, we'll see that convolutions are another type of keras layer we will use. Now, let's take a look at another essential concept, we need to understand convolutional neural networks. Max-pooling.

Top comments (0)