
This series intends to show how I build app to serve content from my WordPress blog by using react native. Since, my blog is talking about react-native, the series and the articles are interconnected. We will learn how to set-up many packages that make our lives comfortable and learn how to deal with WordPress APIs. Here, the most prominent features talked about in the book are the dark theme , offline mode, infinite scroll and many more. You can discover much more in this series.this inspiration to do this tutorial series came from the React Native Mobile Templates
In case of wanting to learn from the beginning, all the previous parts for this tutorial series are available below:
- Build WordPress Client App with React Native #1: Overview
- Build WordPress Client App with React Native #2: Setting Up Your Environment
- Build WordPress Client App with React Native #3: Handle Navigation with React navigation
- Build WordPress Client App with React Native #4: Add Font Icon
- Build WordPress Client App with React Native #5 : Home Screen with React native paper
- Build WordPress Client App with React Native #6 : Using Html renderer and Moment
- Build WordPress Client App with React Native #7: Add pull to refresh and Infinite scroll
- Build WordPress Client App with React Native #8: Implementing SinglePost Screen
- Build WordPress Client App with React Native #9: implement simple share
- Build WordPress Client App with React Native #10: Setup and save bookmark
- Build WordPress Client App with React Native #11: Remove and Render Bookmark
- Build WordPress Client App with React Native #12: Categories screen
- Build WordPress Client App with React Native #13: Configuring firebase in contact screen
- Build WordPress Client App with React Native #14 : Implementing Settings Screen
- Build WordPress Client App with React Native #15 : Forwarding message to inbox with Cloud function
In this chapter, we are going to implement a new feature in our app. The feature is called dark mode which is very prevalent in the app nowadays. The dark mode is configured into any app to make it night friendly or low light friendly. In order to implement the dark mode into our react native application, we are going to use the features of react-navigation and react-native-paper. This will make it easier to trigger the dark mode manually through the app itself.
We are going to implement the Settings screen in which there will be a switch to trigger on and off the dark mode. We are also going to make use of the react-native-dark-mode package. Finally, we are going to implement the configuration by which the app will automatically go into dark mode when switching into dark mode in the device itself.
Moving Navigation code
We might remember that we have all our navigation code in the App.js file. Keeping the navigation configuration in the App.js file is not suitable for large applications. So now, we are going to move the navigation code into different files.
First, we need to create a directory called ‘./components/’ in the ‘./src/’ folder. Then, we need to create a new file called Navigator.js in the ‘./src/components/’ folder. Then, we need to copy all the navigation codes from the App.js file to the Navigator.js file as shown in the code snippet below:
    import React from 'react';
    import {createAppContainer} from 'react-navigation';
    import {createBottomTabNavigator} from 'react-navigation-tabs';
    import {createStackNavigator} from 'react-navigation-stack';
    import Home from '../screens/Home';
    import Categories from '../screens/Categories';
    import Setting from '../screens/Setting';
    import About from '../screens/About';
    import SinglePost from '../screens/SinglePost';
    import CategorieList from '../screens/CategorieList';
    import Contact from '../screens/Contact';
    import Bookmark from '../screens/Bookmark';
    import Ionicons from 'react-native-vector-icons/Ionicons';
    const DashboardTabNavigator = createBottomTabNavigator(
      {
        HomePage: {
          screen: Home,
          navigationOptions: {
            tabBarLabel: 'Home',
            tabBarIcon: () => <Ionicons name="md-home" size={30} />,
          },
        },
        Categories: {
          screen: Categories,
          navigationOptions: {
            tabBarLabel: 'Categories',
            tabBarIcon: () => <Ionicons name="md-apps" size={30} />,
          },
        },
        Bookmark: {
          screen: Bookmark,
          navigationOptions: {
            tabBarLabel: 'BookMark',
            tabBarIcon: () => <Ionicons name="ios-bookmark" size={30} />,
          },
        },
        Setting: {
          screen: Setting,
          navigationOptions: {
            return {
              tabBarLabel: 'Setting',
              tabBarIcon: () => <Ionicons name="md-settings" size={30} />,
            };

        },
      },
      {
        navigationOptions: ({navigation}) => {
          const {routeName} = navigation.state.routes[navigation.state.index];
          return {
            headerTitle: routeName
          };
        },
      },
    );
    const StackNavigator = createStackNavigator({
      DashboardTabNavigator: DashboardTabNavigator,
      SinglePost: SinglePost,
      CategorieList: CategorieList,
      Contact: Contact,
    });
    export default createAppContainer(StackNavigator);
Now, we are going to include the navigator component back to App.js. For
that, we need to import the Navigator.js file into the App.js file as
Navigator and use it in the render() function as shown in the code snippet
below:
    import React, {Component} from 'react';
    import Navigator from './src/components/Navigator';
    class App extends Component {
      constructor(props) {
        super(props);
        this.state = {};
      }
      render() {
        return  <Navigator />
      }
    }
    export default App;
Activate dark mode in React navigation
Here, we are going to activate the dark mode in the** react-navigation**. The
react-navigation package provides us with a prop called theme through which we
can easily change into dark mode. For that, we need to use the theme prop in the
Navigation component that we are exporting from the Navigator.js file as shown
in the code snippet below:
    const Navigation = createAppContainer(StackNavigator);
    export default () =>  <Navigation theme={'dark'} />
Here, we integrated the theme prop to the component we are exporting from
Navigator.js file with theme as dark.
Hence, we will get the dark mode in the app interface as shown in the emulator
screenshots below on the next page:


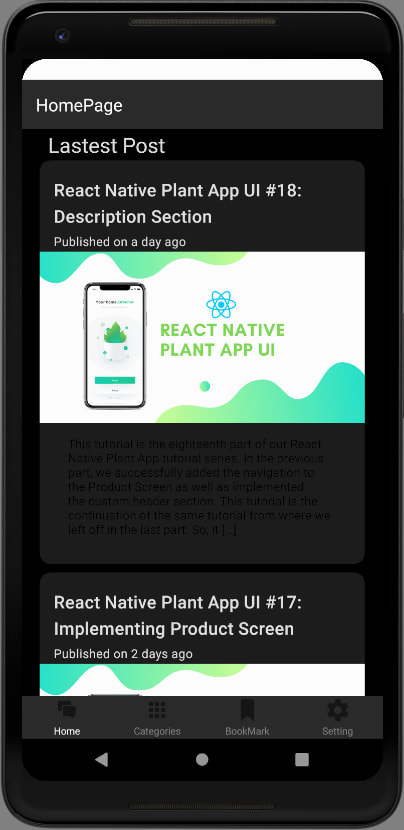
As we can see, we have activated the dark mode in the app interface but the
cards displaying the article posts are still in white theme. For that, we need
to configure the react-native-paper components as well.
Activate dark mode on React native paper
Here, we are going to activate the dark mode in the components from the
react-native-paper **package. We are going to make use of the Provider
component from react-native-paper as PaperProvider in the **Navigator.js file.
We are also going to import the DarkTheme and DefaultTheme from the
react-native-paper component as shown in the code snippet below:
    import {
      Provider as PaperProvider,
      DarkTheme,
      DefaultTheme
    } from 'react-native-paper';
Here, Provider component is the main Context class that makes the global config
of dark mode. The DarkTheme and DefaultTheme are set of configurations. Now, we
need to wrap the Navigation component that we are exporting from the
Navigator.js with the PaperProvider component. And then, integrate it with
the theme prop set to DarkTheme component as shown in the code snippet below:
    export default () => {
      return (
        <PaperProvider theme={DarkTheme}>
          <Navigation theme={'dark'} />
        </PaperProvider>
      );
    };
Hence, we will get the following result in our emulator screens on the next page:

As we can see, we now have the dark mode activated in the article post cards as well. But, we can also see that there is some issue with the excerpt of the article that is being displayed in the cards. All the letters in the excerpt are in black color style. This is because we used the component from react-native-render-html package.
Summary
In this chapter, we learned how to configure the dark mark to our react native app in both Android and iOS. First, we learned how to enable the dark mode theme in the project using the theme prop provided by the Navigation component.
The post Build WordPress Client App with React Native #16 : Dark theme appeared first on Kriss.

Top comments (0)