
This series intends to show how I build app to serve content from my WordPress blog by using react native. Since, my blog is talking about react-native, the series and the articles are interconnected. We will learn how to set-up many packages that make our lives comfortable and learn how to deal with WordPress APIs. Here, the most prominent features talked about in the book are the dark theme , offline mode, infinite scroll and many more. You can discover much more in this series.this inspiration to do this tutorial series came from the React Native Mobile Templates from instamobile
In case of wanting to learn from the beginning, all the previous parts for this tutorial series are available below:
- Build WordPress Client App with React Native #1: Overview
- Build WordPress Client App with React Native #2: Setting Up Your Environment
- Build WordPress Client App with React Native #3: Handle Navigation with React navigation
- Build WordPress Client App with React Native #4: Add Font Icon
- Build WordPress Client App with React Native #5 : Home Screen with React native paper
- Build WordPress Client App with React Native #6 : Using Html renderer and Moment
- Build WordPress Client App with React Native #7: Add pull to refresh and Infinite scroll
- Build WordPress Client App with React Native #8: Implementing SinglePost Screen
- Build WordPress Client App with React Native #9: implement simple share
- Build WordPress Client App with React Native #10: Setup and save bookmark
- Build WordPress Client App with React Native #11: Remove and Render Bookmark
- Build WordPress Client App with React Native #12: Categories screen
- Build WordPress Client App with React Native #13: Configuring firebase in contact screen
- Build WordPress Client App with React Native #14 : Implementing Settings Screen
- Build WordPress Client App with React Native #15 : Forwarding message to inbox with Cloud function
- Build WordPress Client App with React Native #16 : Dark theme
- Build WordPress Client App with React Native #17 : Fix react-native-render-html to change theme
- Build WordPress Client App with React Native #18 : changing Theme
- Build WordPress Client App with React Native #19 : Notify user when offline
- Build WordPress Client App with React Native #20 : Saving data to cache
- Build WordPress Client App with React Native #21 : Splash Screen on iOS
In this last chapter, we are going to implement the Splash Screen in iOS. this chapter we gonna implement in Android too.Major steps in this tutorial are going to take place in Android Studio as we need to configure the Android part of the app for displaying the Splash Screen. The idea is to add the required splash screen icons and configure the native android app directory in the Android. We are going to make use of the react-native-splash-screen package in the React Native part as well as the Android part to display the splash screen transition. Most of the work takes place in Android for configuring the splash screen and only some minor part is for the react-native side.
We can see that icons are of different sizes in order to match the screen size of the app. Now, we need to copy these icon files in the required project directory. Therefore. we need to navigate to ‘/splash/android/app/src/main/res’ directory of our project folder. Then, we need to copy the icon files to respective directories in the ‘./res’ as shown in the code snippet below:

Lastly, we need to rename all the icon files as ‘icon.png‘ in all the directories.
Now, we need to create a new directory called ‘drawable’ in the ‘./res/’ directory. Then, inside the ‘./res/drawable’ directory, we need to create a new Drawable Resource File named ‘background_splash.xml’. This ‘background_splash’ screen will allow us to draw a splash screen for our app. After we create the file, we will get the following result:
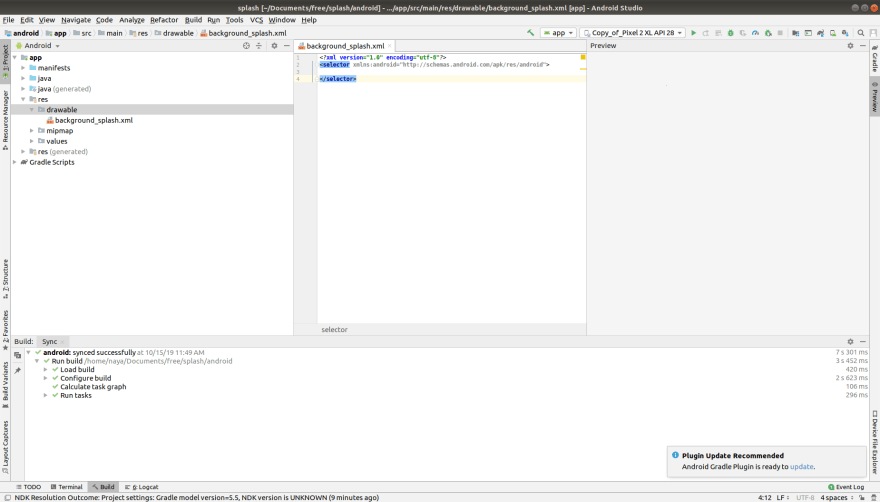
Here, we can see that we have not got any preview in the Preview section on the right side of the screenshot. We need to show the preview of the icon section in the Preview section. For that, we need to make use of the code in the following code snippet in the ‘background_splash.xml’ file:
Now, to solve this, we need to create a new Drawable Resource File named ‘colors.xml’ inside the ‘./res/values’ directory. Then, we need to add the following code to the ‘colors.xml’ file in order to define colors for our splash screen background:
\<?xml version="1.0" encoding="utf-8"?\> \<layer-list xmlns:android="http://schemas.android.com/apk/res/android"\> \<item android:drawable="@color/primary\_dark"/\> \<item android:width="200dp" android:height="200dp" android:drawable="@mipmap/icon" android:gravity="center" /\> \</layer-list\>
Here, we are going to configure some styles for our native phase. For that, we need to need to copy the code from following code snippet into the ‘./values/styles.xml’ file:
\<?xml version="1.0" encoding="utf-8"?\> \<resources\> \<color name="green"\>#ffffff\</color\> \<color name="primary\_dark"\>#ffffff\</color\> \</resources\>
Configuring AndroidManifest.xml file
Here, we need to open the AndroidManifest.xml file from the ‘./android/app/src/main’ directory. This file contains the MainActivity for our Native phase of the app. Now, we need to add an additional activity named SplashActivity with SplashTheme theme and intent-filter before the MainActivity as shown in the code snippet below:
\<resources\> \<!-- Base application theme. --\> \<style name="AppTheme" parent="Theme.AppCompat.Light.NoActionBar"\> \<!-- Customize your theme here. --\> \<item name="android:statusBarColor"\>@color/green\</item\> \</style\> \<style name="SplashTheme" parent="Theme.AppCompat.Light.NoActionBar"\> \<item name="android:windowBackground"\>@drawable/background\_splash\</item\> \<item name="android:statusBarColor"\>@color/green\</item\> \</style\> \</resources\>
Creating SplashActivity class
in order to create SplashActivity class, we need to create a new class file in the ‘./app/java/com.krissapp’ folder named ‘SplashActivity.java’
Now, we need to add the following code to the SplashActivity.java file in order to show the Splash screen activity in the app when it runs:
\<application android:name=".MainApplication" android:label="@string/app\_name" android:icon="@mipmap/ic\_launcher" android:roundIcon="@mipmap/ic\_launcher\_round" android:allowBackup="false" android:theme="@style/AppTheme"\> \<activity android:name=".SplashActivity" android:theme="@style/SplashTheme" android:label="@string/app\_name"\> \<intent-filter\> \<action android:name="android.intent.action.MAIN" /\> \<category android:name="android.intent.category.LAUNCHER" /\> \</intent-filter\> \</activity\> \<activity android:name=".MainActivity" android:configChanges="keyboard|keyboardHidden|orientation|screenSize" android:windowSoftInputMode="adjustResize" android:label="@string/app\_name" android:exported="true" /\> \<activity android:name="com.facebook.react.devsupport.DevSettingsActivity" /\> \</application\>
Resolving the White Screen Gap
In this step, we are going to close down the appearance of a white screen between the splash screen and app screen. We are going to do that by displaying the splash screen until the react-native part runs in the app.
For this, we need to include a package known as react-native-splash-screen. The react-native-splash-screen package provides us with a splash screen API for react-native which can programmatically hide and show the splash screen. This package works both on iOS as well as Android. All the configuration for the React Native part as well as the native part is provided in the documentation. Now, in order to install this package into our react native project, we need to run the following command:
>>> yarn add react-native-splash-screen //using yarn
    >>> react-native link react-native-splash-screen //To link the package to the react-native project
Running Splash Screen in MainActivity
Now, we need to go back to the Android Studio project and open ‘MainActivity.java’ file from the ‘./app/java/com.splash’ folder. And then, we need to copy the code from the following code snippet into it:
package com.ebook; import android.content.Intent; import android.os.Bundle; import androidx.appcompat.app.AppCompatActivity; public class SplashActivity extends AppCompatActivity { @Override protected void onCreate(Bundle savedInstanceState) { super.onCreate(savedInstanceState); Intent intent = new Intent(this, MainActivity.class); startActivity(intent); finish(); } }
Here, we have imported the SplashScreen package that we installed before. Then, we have used the show() method of SplashScreen module in our MainActivity in order to show the splash screen until the react-native part of the app runs in the emulator.
Now when we run the app, the SplashActivity that we created before will run first and display the splash screen. Then, the MainActivity that runs after the SplashActivity will also display the Splash screen.
Configuring layout of splash screen for MainActivity
We still need to create a layout of the splash screen that will run during the MainActivity. For that, we need to go back to the Android Studio project. Then in ‘./res’ directory, we need to create a ‘layout’ folder. Inside the ‘./res/layout’ folder, we need to create a new Layout Resource File called ‘launch_screen.xml’. This ‘launch_screen.xml’ file will include the splash screen template which will run during the white screen gap.
Now, we need to add the code to draw the splash screen template. The code is provided in the code snippet below:
\<?xml version="1.0" encoding="utf-8"?\> \<LinearLayout xmlns:android="http://schemas.android.com/apk/res/android" android:orientation="vertical" android:layout\_width="match\_parent" android:layout\_height="match\_parent" android:background="@color/green" android:gravity="center"\> \<ImageView android:layout\_width="200dp" android:layout\_height="200dp" android:layout\_marginTop="24dp" android:src="@mipmap/icon" /\> \</LinearLayout\>
Now, the layout in the Preview section will appear as a splash screen in the white screen gap to solve the white screen gap issue.
Hiding the Splash Screen
In this step, we are going to hide the splash screen after the react native app screen successfully mounts. For that, we need to go back to the App.js file of our React Native project and make use of the react-native-splash-screen package. First, we need to import the react-native-splash-screen package as a SplashScreen module in our App.js file as shown in the code snippet below:
import SplashScreen from 'react-native-splash-screen';
Then, we need to call the hide() function provided by SplashScreen module inside the componentDidMount function as shown in the code snippet below:
class App extends Component { constructor(props) { super(props); this.state = {}; } componentDidMount() { SplashScreen.hide(); }
This will help to hide the splash screen as soon as the app screen mounts.
Now, if we re-run our project in the emulator, we will get the following result:

Summary
In this chapter, we learned how to set up the splash screen to both the iOS and Android platforms. In the iOS platform, we got the step-wise guidance of how to set up the splash screen by using the Xcode tool. In the Android platform, we learned how to configure the react-native files as well as native android files in order to configure the splash screen. We also learned how to negate the white screen using the react-native-splash-screen package. Lastly, we learned how to hide the splash screen when the react-native app starts loading in the device using the react-native-splash-screen package.
The post Build WordPress Client App with React Native #23 : Splash Screen on Android appeared first on Kriss.

Top comments (0)