
Develop a Django + Celery App in Kubernetes
Django + Celery is probably the most popular solution to develop websites that require running tasks in the background. Developing a Django + Celery app locally is complex, as you need to run different services: Django, Celery worker, Celery beat, Redis, databases… docker-compose is a very convenient tool in this case. You can spin up your local environment with docker-compose in just one single command. And thanks to the use of volume mounts, you are able to hot reload your application in seconds.
In this blog post, we want to go a step forward and explain why you should develop your Django + Celery app directly in Kubernetes. The benefits are:
- Reduce integration issues by developing in a more production-like environment, consuming Kubernetes manifests, secrets, volumes or config maps from development.
- Overcome local development limitations. You will be able to develop against any Kubernetes cluster, local or remote. And having a lot of microservices makes it harder and harder to run the entire development environment locally.
But it is well-known that developing in Kubernetes is tedious. Let’s explore together how to develop in Kubernetes the Cloud Native way 💥💥💥💥.
Deploy the Django + Celery Sample App
Get a local version of the Django + Celery Sample App by executing the following commands in your local terminal:
$ git clone https://github.com/okteto/math
$ cd math
The Django + Celery Sample App is a multi-service application that calculates math operations in the background. It consists of a web view, a worker, a queue, a cache, and a database.
Execute the command below to deploy the application in your Kubernetes cluster:
$ kubectl apply -f manifests
statefulset.apps "cache" created
service "cache" created
statefulset.apps "db" created
service "db" created
statefulset.apps "queue" created
service "queue" created
deployment.apps "web" created
service "web" created
deployment.apps "worker" created
Wait for a few seconds for the app to be ready. Check that all pods are ready by executing the command below:
$ kubectl get pod
NAME READY STATUS RESTARTS AGE
cache-0 1/1 Running 0 2m
db-0 1/1 Running 0 2m
queue-0 1/1 Running 0 2m
web-7bccc4bc99-2nwtc 1/1 Running 0 2m
worker-654d7b8bd5-42rq2 1/1 Running 0 2m
Efficient Kubernetes Development with Okteto
Now that we have the Django + Celery Sample App running in a Kubernetes cluster, we can use it as our development environment. When working in Kubernetes, you would have to rebuild your docker images, push them to a registry and redeploy your application every time you want to test a code change. This cycle is complex and time-consuming. It sounds like a bad idea to kill your productivity this way.
If you are familiar with docker-compose, you know how useful is to mount local folders into your containers to avoid the docker build/push/redeploy cycle. Volume mounts are a game changer for developing Docker applications and they are the missing piece to speed up your Kubernetes development cycle.
We developed Okteto to solve this problem. To give you all the good parts of using docker-compose when developing while moving your development into your Kubernetes cluster. Okteto is open source, and the code is available in github. Feel free to check it out, contribute, and star it 🤗!
To install the Okteto CLI in your computer, follow the installation instructions and check that it is properly installed by running:
$ okteto version
okteto version 1.8.18
Okteto CLI >= 1.8.18 is required to follow this tutorial.
In order to start developing the Django + Celery Sample App, execute:
$ okteto up
✓ Files synchronized
✓ Okteto Environment activated
 Namespace: pchico83
 Name: web
 Forward: 8080 -> 8080

curl: (52) Empty reply from server
Database is ready
No changes detected in app ‘myproject’
Created migrations
Operations to perform:
Apply all migrations: auth, contenttypes, myproject, sites
Running migrations:
No migrations to apply.
Migrated DB to latest version
Performing system checks…
System check identified no issues (0 silenced).
June 26, 2019–11:00:02
Django version 1.11.21, using settings ‘myproject.settings’
Starting development server at http://0.0.0.0:8080/
Quit the server with CONTROL-C.
Let’s have a look at the okteto.yml file to understand what the okteto up command does:
name: web
command: ./run_web.sh
sync:
  - .:/app
services:
  - name: worker
    command: ./run_celery.sh
    sync:
      - .:/app
forward:
  - 8080:8080
okteto up synchronizes your local source code to the containers of the deployment web and worker. Your source code is synchronized to the container path /app. Also, the port 8080 is automatically forwarded between your development container and your computer. If you want to know more about how Okteto works, follow this link.
Let’s Write some Code and Fix a Bug
Verify that the application is up and running by opening your browser and navigating to http://localhost:8080/jobs/. Go ahead and calculate the fibonacci for the number 5:

Press the POST button to submit the operation. The response payload will include the url of the job. Go to http://localhost:8080/jobs/1/ and you will notice that the result is wrong (hint: the fibonacci number of 5 is not 32). This is because our worker has a bug 🙀!
Typically, fixing this would involve you running the app locally, fixing the bug, building a new container, pushing it and redeploying your app. Instead, we’re going to do it the Cloud Native way .
Open myproject/myproject/models.py in your favorite local IDE. Take a look at the value of the task variable in line 29. It looks like someone hard-coded the name of the operation instead of reading it from the job. Let's fix it by changing it to self.type , as shown below:
task = TASK_MAPPING[‘power’]
to
task = TASK_MAPPING[self.type]
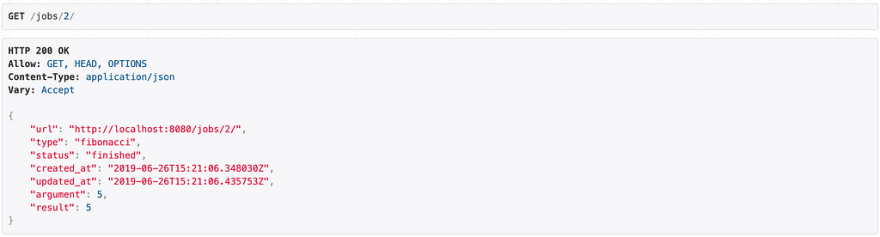
Save your file and go back to http://localhost:8080/jobs/. Submit a new fibonacci calculation for the same values as before. Go to http://localhost:8080/jobs/2/ and verify the result. The result looks correct this time, success!
How did this happen? With Okteto your changes were automatically applied to the remote containers as soon as you saved them. No commit, build, push or redeploy required 💪!
Okteto can be used in local Kubernetes installations, but why would you limit yourself to develop locally when you can develop at the speed of the cloud? Developing in the cloud have several advantages, among others:
- The cloud offers faster hardware.
- Your company might deploy a few services to make them available to every development environment, like a Kafka instance or a company Identity Service.
- Consume infrastructure services like Elasticsearch or Prometheus from development to boost debugging.
- Share your development environment endpoints with the rest of your team for fast validation.
Every developer should work in an isolated namespace, sharing the same Kubernetes cluster. Okteto Enterprise takes care of setting Roles, Network Policies, Pod Security Policies, Quotas, Limit Ranges and all the other tedious work needed to provide controlled access by several developers to the same Kubernetes cluster. If you want to give it a try, follow our getting started guide.
Cleanup
Cancel the okteto up command by pressing Ctrl + C and run the following commands to remove the resources created by this guide:
$ okteto down -v
✓ Okteto Environment deactivated

$ kubectl delete -f manifests
statefulset.apps "cache" deleted
service "cache" deleted
statefulset.apps "db" deleted
service "db" deleted
statefulset.apps "queue" deleted
service "queue" deleted
deployment.apps "web" deleted
service "web" deleted
deployment.apps "worker" deleted
Conclusions
We have shown the advantages of developing directly in Kubernetes while keeping the same developer experience than working on a local machine. Working on the Cloud is always better. You don’t work on your spreadsheets and listen to media files locally, do you? Stop dealing with local environments and become a Cloud Native Developer today!


Top comments (0)