
Welcome to Part-7 of the series. We will create the StreamShow component first. So, whenever the user clicks on a stream, it will show one.
So, first open App.js as we have to update our routes. The things in bold are changed. We use a Switch to wrap all routes because to solve the same type of route in StreamCreate and StreamShow.
    import React from 'react';
    import { Router, Route, Switch } from 'react-router-dom';
    …
    …

    const App = () => {
        return (
            <div>
                <Router history={history}>
                    <div>
                        <Header />
                        <Switch>
                            <Route path="/" exact component={StreamList} />
                            <Route path="/streams/create" exact component={StreamCreate} />
                            <Route path="/streams/edit/:id" exact component={StreamEdit} />
                            <Route path="/streams/delete/:id" exact component={StreamDelete} />
                            <Route path="/streams/:id" exact component={StreamShow} />
                        </Switch>
                    </div>
                </Router>
            </div>
        );
    }

    export default App;
Next, we will update our StreamList.js file’s renderList(). Here, we add a link to title of the stream.
    renderList() {
        return this.props.streams.map(stream => {
          return (
            <div className="item" key={stream.id}>
              <div className="content">
              <Link to={`/streams/${stream.id}`}>{stream.title}</Link>
              </div>
              <div className="description">{stream.description}</div>
              {this.renderAdmin(stream)}
              <hr />
            </div>
          )
        })
      }
So, now in homepage you have a Link on click of which will take to our StreamShow page.
 Title Link
Next, we will add the basic boilerplate for redux state in StreamShow.js file. It is similar to what we have been doing for StreamEdit and StreamDelete.
    import React, { Component } from 'react';
    import { connect } from 'react-redux';
    import { fetchStream } from '../../actions';

    class StreamShow extends Component {
      componentDidMount() {
        this.props.fetchStream(this.props.match.params.id);
      }

      render() {
        if (!this.props.stream) {
          return <div>Loading...</div>
        }

        return (
          <div>
            <h1>{this.props.stream.title}</h1>
            <h5>{this.props.stream.description}</h5>
          </div>
        )
      }
    }

    const mapStateToProps = (state, ownProps) => {
      return { stream: state.streams[ownProps.match.params.id] }
    }

    export default connect(mapStateToProps, { fetchStream })(StreamShow);
Now, if we click on any title it will show this basic page.
 The future
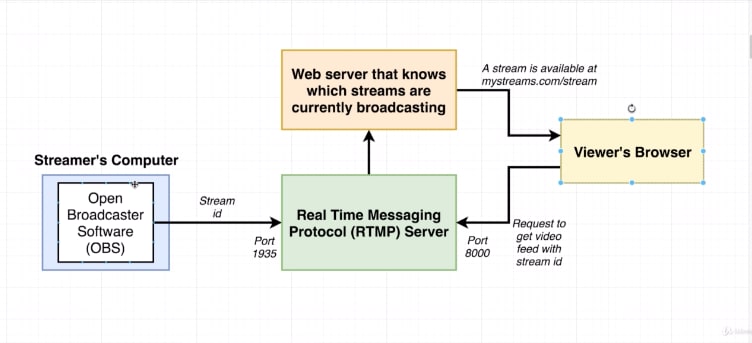
Now, it’s time to setup our RTMP(Real Time Messaging Protocol) Server. So, go inside our root directory containing our api and client folder. And make a directory rtmpserver and cd into it.
 mkdir
mkdir
Next do a npm init in to create a package.json file. Press enter for everything, so that it could take the defaults.
 npm init
Next, install the package node-media-server.
 node-media-server
Next, open this in your code editor and create an index.js file in it.
 rtmp server
Next, put this boilerplate code which we have got from the node-media-server github page.
    const NodeMediaServer = require('node-media-server');

    const config = {
      rtmp: {
        port: 1935,
        chunk_size: 60000,
        gop_cache: true,
        ping: 30,
        ping_timeout: 60
      },
      http: {
        port: 8000,
        allow_origin: '*'
      }
    };

    var nms = new NodeMediaServer(config)
    nms.run();
Next, in our package.json for rtmp server, we add a start script.
    {
      "name": "rtmpserver",
      "version": "1.0.0",
      "description": "",
      "main": "index.js",
      "scripts": {
        "start": "node index.js"
      },
      "author": "",
      "license": "ISC",
      "dependencies": {
        "node-media-server": "^2.1.0"
      }
    }
So, now we can do a npm start inside our rtmpserver directory.
 npm start
Next, we are going to set an OBS in our computer, to share video and audio. We are following the way in the below diagram.
 OBS
OBS
So, head over to https://obsproject.com/ and install the version accordint to your Operating System.
 The OBS
Next, open the OBS software on your machine.
 The OBS software
Now, we will start to setup the OBS Software. Click on the ‘+’ sign in the bottom right corner, in Scenes. This will open a pop-up, here enter any name you like.
 Name of scene
Next, click on the ‘+’ in Sources. Here click on Display Capture
 Sources
Now, it will open a pop-up. Just click ok.
 Just Click ok
Next, another pop-up will open. You can select the monitor you want to capture here.
 Display Capture pop-up
Again click on the ‘+’ in Sources and then click on Audio Input Capture.
 Audio Input Capture
Now, it will open a pop-up. Just click ok.
 Just click ok
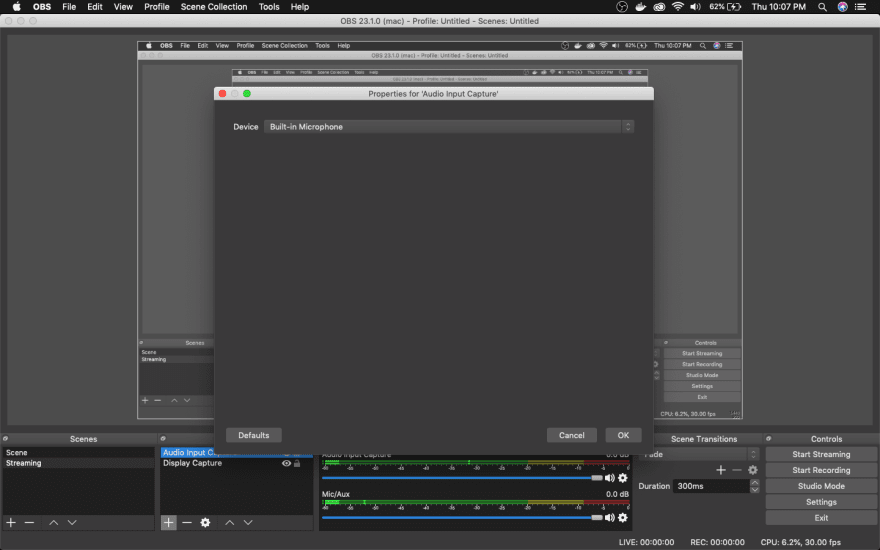
Next, pop-up you can choose your microphone which you will use for recording.
 Microphone for recording
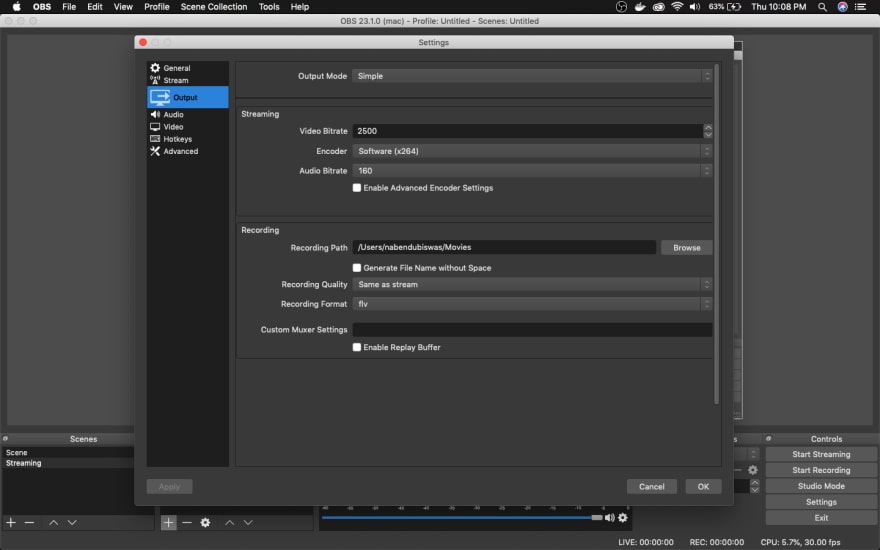
Now, it’s time to record. Click on Start Recording on the bottom left corner and record the screen and some audio. Now, click on Stop Recording. Now, to know where OBS saved the file, click on Settings and the Output in the pop-up. You will get the Recording Path here.
 Recording Path
Now, it’s time to create our media player. For this we will install flv.js in our client folder. So, go ahead and stop our React client and install it.
 flv.js
Don’t forget to start back our react client by npm start. Next open the StreamShow.js file and add logic to show the video player, through which streaming will be done. Most of this code is boilerplate found at node-media-server github page.
We are using the ref system of React because, we need to access the DOM element for fly.js
    import React, { Component } from 'react';
    import { connect } from 'react-redux';
    import { fetchStream } from '../../actions';
    import flv from 'flv.js';

    class StreamShow extends Component {
      constructor(props) {
        super(props);
        this.videoRef = React.createRef();
      }

      componentDidMount() {
        const id = this.props.match.params.id;
        this.props.fetchStream(id);
        this.buildPlayer();
      }

      componentDidUpdate() {
        this.buildPlayer();
      }

      componentWillUnmount() {
        this.player.destroy();
      }

      buildPlayer() {
        if (this.player || !this.props.stream)
          return;

        const id = this.props.match.params.id;

        this.player = flv.createPlayer({
          type: 'flv',
          url: `http://localhost:8000/live/${id}.flv`
        });
        this.player.attachMediaElement(this.videoRef.current);
        this.player.load();

      }

      render() {
        if (!this.props.stream) {
          return <div>Loading...</div>
        }

        return (
          <div>
           <video ref={this.videoRef} style={{ width: '100%' }} controls={true} />
            <h1>{this.props.stream.title}</h1>
            <h5>{this.props.stream.description}</h5>
          </div>
        )
      }
    }

    const mapStateToProps = (state, ownProps) => {
      return { stream: state.streams[ownProps.match.params.id] }
    }

    export default connect(mapStateToProps, { fetchStream })(StreamShow);
Next, we need the id of a stream. So, open any stream created by you and note the id.
 Note the id
Now, the final step of our project is to do setup in OBS software. Click on Settings and the Stream in the pop-up. Here choose the Service as Custom, then put the Server as rtmp://localhost/live and the Stream Key as the id from above step.
 Final Step
Now, it’s time for the Moment of Truth. Click on Start Streaming and move back to the React App and to that Stream. You will see and hear, whatever you do. There might be a delay of 2–3 sec, but that’s fine.
 The Final App
Hope you enjoyed building the Twitch clone with me. See you soon, till my next adventure.
You can find code till this point here.


Top comments (0)