![Cover image for Build React Native WordPress App [Expo way] #7 : Single Post screen](https://media2.dev.to/dynamic/image/width=1000,height=420,fit=cover,gravity=auto,format=auto/https%3A%2F%2Fcdn-images-1.medium.com%2Fmax%2F1024%2F0%2A_N94tO64uvOOHk-q.png)
This series intends to show how I build an app to serve content from my WordPress blog by using react-native. Since we successfully build an app on the React Native CLI path., for the next step, we try to develop this app again but using Expo. We will discover the Expo ecosystem that makes our lives comfortable and help us avoid dealing with Native modules to learn how to deal with WordPress APIs. Here, the most prominent features talked about in the book are the dark theme, offline mode, infinite scroll, in-app purchase, and many more. You can discover much more in this series. this inspiration to do this tutorial series came from the React Native Templates from instamobile
this chapter we wrap around card item with TouchableOpacity when user touch this post will navigate to single post with post id
<TouchableOpacity
 onPress={() =>
   this.props.navigation.navigate('SinglePost', {
     post\_id: item.id,
   })
 }>
 <Card
   style={{
     shadowOffset: {width: 5, height: 5},
     width: '90%',
     borderRadius: 12,
     alignSelf: 'center',
     marginBottom: 10,
   }}>
  .................................. // other code
 </Card>
 </TouchableOpacity>
for now, we already have blank scree that we create from the last chapter
React native paper
first, we import react-native-paper component and set
import React from 'react';
import {
    Avatar,
    Button,
    Card,
    Title,
    Paragraph,
    List,
} from 'react-native-paper';
import HTML from 'react-native-htmlview';
import {
    View,
    ScrollView,
    ActivityIndicator
} from 'react-native';
import moment from 'moment';
then add function for call data from API
export default class SinglePost extends React.Component {
    constructor(props) {
        super(props);

        this.state = {
            isloading: true,
            post: [],
        };
    }

    componentDidMount() {
        this.fetchPost();
    }
    async fetchPost() {
        let post\_id = this.props.route.params?.post\_id

        const response = await fetch(
            `https://kriss.io/wp-json/wp/v2/posts?_embed&include=${post_id}`
        );
        const post = await response.json();
        this.setState({
            post: post,
            isloading: false,
        });
    }
if you using react-navigation version 4 before will spot on params? is a new method for getting param
then we construct screen with react native paper component again
render() {
        let post = this.state.post;
        }
        return (
            <ScrollView>
                <Card>
                    <Card.Content>
                        <Title>{post[0].title.rendered} </Title>
                        <List.Item
                            title={`${post[0]._embedded.author[0].name}`}
                            description={`${post[0]._embedded.author[0].description}`}
                            left={props => {
                                return (
                                    <Avatar.Image
                                        size={55}
                                        source={{
                                            uri: `${post[0]._embedded.author[0].avatar_urls[96]}`,
                                        }}
                                    />
                                );
                            }}
                        />
                        <List.Item
                            title={`Published on ${moment(
                                post[0].date,
                                'YYYYMMDD'
                            ).fromNow()}`}
                        />
                        <Paragraph />
                    </Card.Content>
                    <Card.Cover source={{ uri: post[0].jetpack\_featured\_media\_url }} />
                    <Card.Content>
                        <HTML value={post[0].content.rendered} addLineBreaks={false} />
                    </Card.Content>
                </Card>
            </ScrollView>
        );
}
here for result
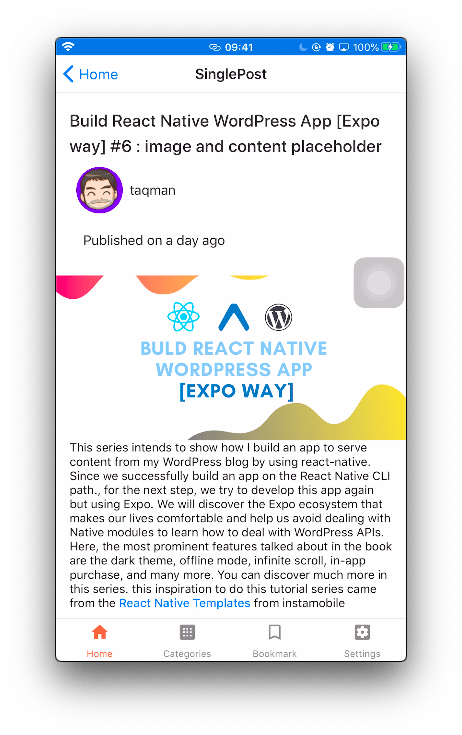
Add placeholder
for the last feature, we add placeholder like Home screen first import content placeholder component
render() {
    let post = this.state.post;
    if (this.state.isloading) {
        return <ContentPlaceholder />;
    }
    return (
        <ScrollView> .....
    );
}
here will see result same Home screen

summary
In this chapter, we learned how to implement the overall UI of the SinglePost screen. First, we learned how to set up the navigation to the SinglePost screen by clicking on any article post from the home screen list. The SinglePost screen displays the overall content of the single article. We used different components from react-native-paper in order to implement the UI. We also made use of the moment and react-native-htmlview package on this screen. Lastly, we learned how to fetch the data of the single article post from the WordPress API using the fetch function.last thing we wrap screen with Content placeholder same Home screen again
Originally published at [_Kriss](https://kriss.io/build-react-native-wordpress-app-expo-way-7-single-post-screen/)._


Top comments (0)