This article is written as part of the #beginner2advanced challenge as the tenth application where I aim to create all the apps in this repository.
The HTMLElement.style is the most important concept for me doing this challenge, though there are numerous ways you can go about this.
While HTMLElement.style is considered read-only, you can set an inline style by assigning a string to the property but it will override the inline style your element may already have.
To update or change a specific style, you can directly update the specific style properties, for instance:
HTMLElement.style.background = "#000"
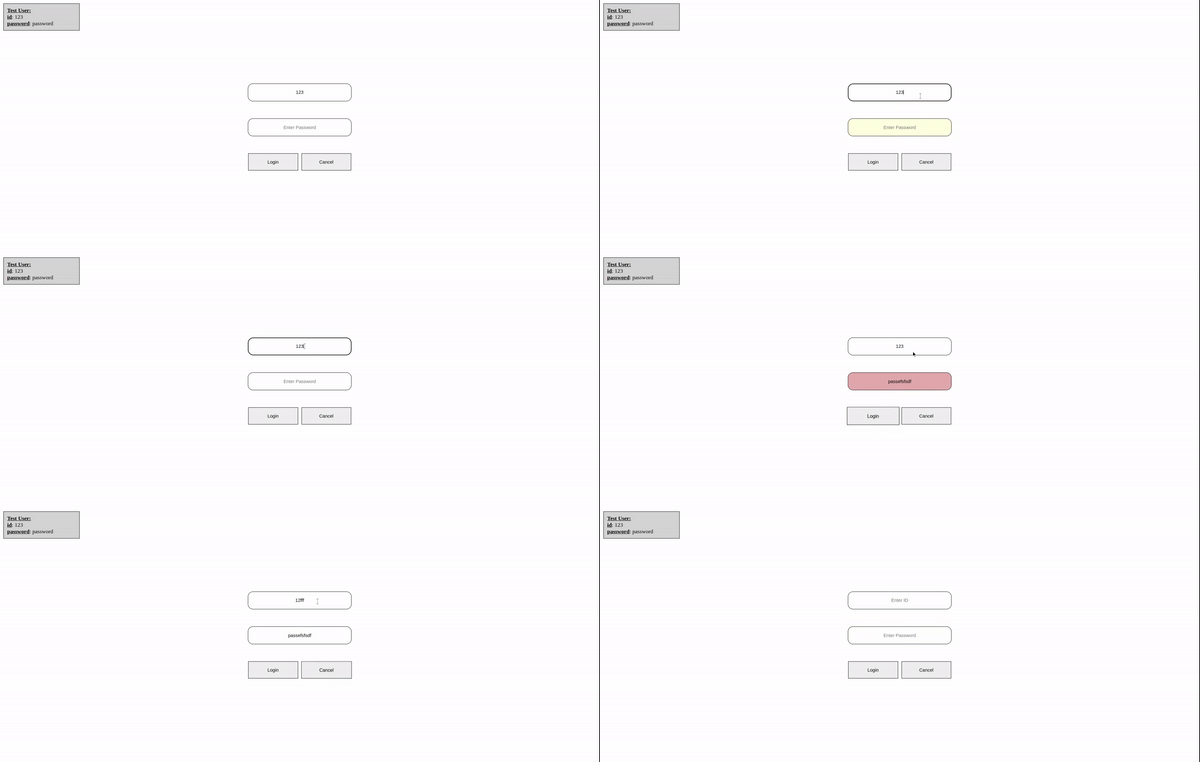
The end result of the application will look like this:
First, we’d create a simple HTML and CSS file:
<!DOCTYPE html>
<html lang="en">
<head>
  <title>Dynamic CSS variables</title>
  <link rel="stylesheet" href="style.css">
</head>
<body>
  <div class="testuser">
    <p class="bold">Test User:</p>
    <p><span class="bold">id</span>: 123</p>
    <p><span class="bold">password</span>: password</p>
  </div>
  <input id="id" type="text" placeholder="Enter ID" />
  <input id="password" type="text" placeholder="Enter Password" />
  <div class="buttons">
    <button id="login">Login</button>
    <button id="cancel">Cancel</button>
  </div>
  <script src="./main.js"></script>
</body>
</html>
And the CSS file:
* {
  margin: 0;
  padding: 0;
}

body {
  display: flex;
  justify-content: center;
  align-items: center;
  height: 100vh;
  width: 100vw;
  flex-direction: column;
  gap: 50px;
}

input {
  width: 300px;
  height: 50px;
  text-align: center;
  border-radius: 15px;
  border: 1px solid #000;
}

button {
  border: 1px solid #000;
  height: 50px;
  width: 145px;
  cursor: pointer;
  transition: 0.3s;
}

button:hover {
  transform: scale(1.1);
}

.buttons {
  width: 300px;
  display: flex;
  justify-content: space-between;
}

.testuser {
  position: absolute;
  top: 10px;
  left: 10px;
  border: 1px solid #000;
  background: rgba(0, 0, 0, 0.167);
  padding: 10px;
  width: 200px;
}

.bold {
  font-weight: bold;
  text-decoration: underline;
}
Then the JavaScript file:
const idInput = document.getElementById("id");
const passwordInput = document.getElementById("password");
const loginButton = document.getElementById("login");
const cancelButton = document.getElementById("cancel");
const testUser = {
    id: "123",
    password: "password",
};
loginButton === null || loginButton === void 0 ? void 0 : loginButton.addEventListener("click", (e) => {
    if (idInput.value.trim() === "") {
        idInput.style.background = "lightyellow";
    }
    else if (idInput.value !== testUser.id) {
        idInput.style.background = "#e6adad";
        console.log("here");
    }
    if (passwordInput.value.trim() === "") {
        passwordInput.style.background = "lightyellow";
    }
    else if (passwordInput.value !== testUser.password) {
        passwordInput.style.background = "#e6adad";
    }
});
cancelButton === null || cancelButton === void 0 ? void 0 : cancelButton.addEventListener("click", () => {
    passwordInput.style.background = "white";
    idInput.style.background = "white";
});
The link to the code can be found here: https://github.com/zt4ff/app-ideas/tree/main/beginners/dynamic-css-variable
Please leave a star in the repository so other people can find it and participate.


Top comments (3)
The more modern way of using style is to use the power of css variables
This way you only have to remember the css variables instead of the style document structure.
Thanks David
Sv_gravity 5
