
This post was originally written on DevOpStar. Check it out here
AWS IoT Greengrass is a managed service that allows you to easily manage and communicate with edge devices. It sells itself as a central way to deploy to huge fleets of devices in a repeatable way.
The irony of this is that deploying the foundation of AWS Greengrass can be quite complex and messy. In the official guide for Greengrass Core, AWS recommends using the Easy Creation button. This is perfectly fine for testing purposes, however if you are deploying production workloads then repeatability is really key.
NOTE: This post is a rehash of an existing post AWS IoT Greengrass CloudFormation – Raspberry Pi.
The goal of this post is to deploy a learning environment called Greener Grass that effectively boostraps all the AWS IoT and Greengrass configuration for you. This allows you to be able to learn about the advanced IoT features in a friendly & repeatable way.
Prerequisites
- AWS Account with AWS CLI Setup
- Edge Device, in the case of this post I'm using an Raspberry Pi
- Clone t04glovern/aws-greener-grass locally
- NodeJS installed for AWS CDK
Setting up a Device
Although this guide follows the setup of the Raspberry Pi, It is worth noting that the process is similar for just about any other system you'd like to run Greengrass on also.
To setup the device you are using with Greengrass, refer to one of the following guides before moving forward:
Deploying Greener Grass
With our device successfully ready with Greengrass installed, it is now time to create an AWS IoT Greengrass Core. While the process can definitely be done through the UI we will instead be using AWS CDK to deploy our Greengrass device so that management can be done entirely through code.
What is CDK?: CDK or Cloud Development Kit is a software development framework for defining cloud resources and provisioning through CloudFormation. It effectively means we can define things in the cloud through code!
Start by pulling down the repository that houses the CDK project from t04glovern/aws-greener-grass
git clone https://github.com/t04glovern/aws-greener-grass
Then install AWS CDK via NodeJS (if you haven't got NodeJS, install it via their downloads page).
npm install -g aws-cdk
Next change into the cdk folder of the project we just clone and install the project dependencies. At this stage we will also compile the CDK typescript.
cd cdk
npm install

# You might want to keep `watch` running in another terminal
npm run watch
Finally, deploy the Greener Grass stack by executing the ./deploy.sh script.
NOTE: If you would like to rename the device from the default lila, change the THING_NAME variable at the top of ./deploy.sh
Certificate Install on Device
Part of the deploy script above would have compressed all the certificates from the Greengrass device deploy and placed them into the cdk directory. We now need to install these in order to register our device with AWS IoT.
Ensure to replace:
- user - with your device login account
- device - with the hostname or IP of the device
# Change back into the cdk directory if you exited
cd cdk

# Copy the device certificate bundle
scp *-setup.tar.gz user@device:/home/user
# Copy a seervice script that will help us install things
scp deploy-service.sh user@device:/home/user
Extract Greengrass Files
SSH back onto the device and extract the bundles we just downloaded by running the following
sudo tar -xzvf <DEVICE_NAME>-setup.tar.gz -C /greengrass
Confirm everything copied across correctly by running the following
ls -al /greengrass
# drwxr-xr-x  6 root root 4096 Aug 31 04:40 .
# drwxr-xr-x 22 root root 4096 Aug 31 04:40 ..
# drwxrwxr-x  2 user user 4096 Oct  6 18:01 certs
# drwxrwxr-x  2 user user 4096 Oct  6 18:01 config
# drwxr-xr-x  3 root root 4096 Aug 31 04:40 ggc
# drwxr-xr-x  3 root root 4096 Aug 31 04:40 ota
Next we also need to download the ATS root CA certificate into /greengrass/certs
cd /greengrass/certs/
sudo wget -O root.ca.pem https://www.amazontrust.com/repository/AmazonRootCA1.pem
Greengrass Start
With all the files in the right places on the device, it's now time to try to start the service
cd /greengrass/ggc/core/
sudo ./greengrassd start
You should see a Greengrass successfully started message. Take note of the PID of the process so we can view the status of the daemon
ps aux | grep PID_NUMBER
# root       761  2.4  3.0 854472 13508 pts/0    Sl   18:18   0:01 /greengrass/ggc/packages/1.9.4/bin/daemon -core-dir /greengrass/ggc/packages/1.9.4 -greengrassdPid 757
To setup Greengrass on startup, run the following (note this will reboot your device). This assumes that you are using systemd.
sudo ./deploy-service.sh
Greengrass SDK
If you don't want to bundle the greengrasssdk in with your application, you can install it globally
NOTE: this step might be different depending on how your device had Python installed on it to begin with.
sudo pip install greengrasssdk
If you choose not to go down this route you can manually bundle greengrasssdk in with your lambda deployments in the future.
Greengrass Deploy [CLI]
To create our first deployment we first need to retrieve our Greengrass Group ID
aws greengrass list-groups
# {
#     "Groups": [
#         {
#             "Arn": "arn:aws:greengrass:us-east-1:123456789012:/greengrass/groups/..........",
#             "CreationTimestamp": "2019-10-06T10:31:53.950Z",
#             "Id": "41752ff2-54e5-49e9-8751-d489e3e6fa1f",
#             "LastUpdatedTimestamp": "2019-10-06T10:31:53.950Z",
#             "LatestVersion": "1c578332-44f7-411b-9ebb-1139fa1e453a",
#             "LatestVersionArn": "arn:aws:greengrass:us-east-1:123456789012:/greengrass/groups/..........",
#             "Name": "gg_cfn"
#         }
#     ]
# }
In my case the group ID and version can be seen above, simply substitute it into the following command to kick off your first deployment
aws greengrass create-deployment \
    --deployment-type NewDeployment \
    --group-id "41752ff2-54e5-49e9-8751-d489e3e6fa1f" \
    --group-version-id "1c578332-44f7-411b-9ebb-1139fa1e453a"
Greengrass Deployment [GUI]
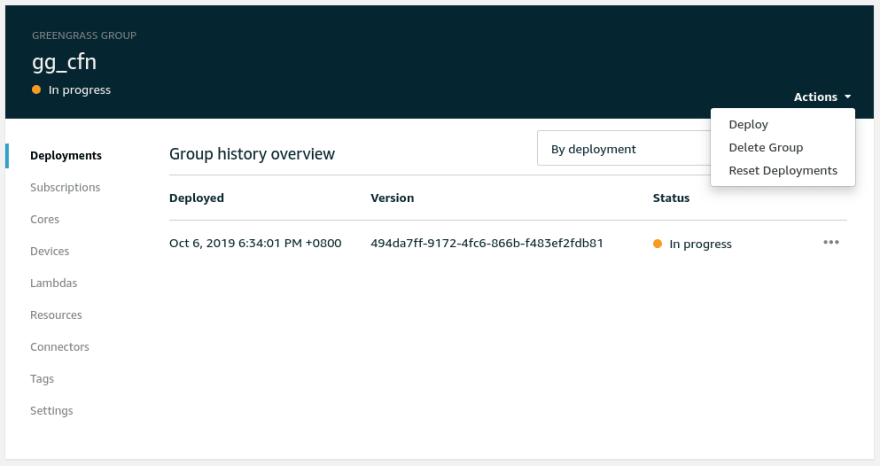
To deploy through the GUI, navigate to the AWS IoT Greengrass portal and kick off a new deployment under the Greengrass group we just created
Greengrass Cleanup
Once you're finished working with Greengrass it's really easy to cleanup the AWS resources we used. Run the following command to destroy the CDK stack
cdk destroy --context=device_name=${THING_NAME}


Top comments (0)