Table of Contents
- Introduction
- Starting the project
- Setting up initial code
-
Thinking about Components
- Chronometer - Component
- Formatting
- Chronometer - Styling
- Style Folder
- Timer Popup
- Navbar - Component
- Using React Router
- NavLink
- Navbar - Styling
- Logo
- Tasks - Components
- Starting
- Functions
- React Forms
- Passing Props Down
- Connecting TaskList to Timer
- Passing Props Up
- Statistics - Component
- Total Time
- Sorting Tasks
- Additional Feature
- Mobile Responsiveness
- Deployment
- Conclusion
Introduction
When you're a beginner, the most part of the time you spend learning new things and watching tutorials. Of course, that's a very important step in the process, but in order to really test your knowledge and see which aspects you need to improve, there's no better way than trying to do personal projects.
It doesn't need to be something big or fancy (mainly when you're a beginner), you just need to use what you've been learning. That's a good way to ensure that your study style is giving you results and that you're going in the right direction.
As a way to remember and document all the learnings from the project, also looking to help someone who is also trying to do their first project, I wrote this post explaining every step I took in details.
About the project
Click here to see the final result of the app.
I came up with this idea while using a Pomodoro website. In my mind, I would like to have something to count how much time I spent doing a task, so I can have an idea of how I'm spending my time over the day. That's the idea: a task chronometer. Yeah, nothing original or revolutionary. But it still a big challenge for me. Actually, there are plenty of functionalities on the project that I had no idea how to implement.
So, I thought it would be a good first project: something that can be useful, not too complicated, but with features that I would need to search and learn how to do.
Everything I used and every source that helped me I'll try to put here, to document the entire process. So, let's start!
Starting the project
To have a better idea of what I'll build, my first task was to make a wireframe of the application. I thought about use Figma, but it was too complex to me, and I would like to have something simpler. So I used Whimsical.

Prototyping
- Click here to go to my design.
The website is basically divided into three sections: Chronometer Page, Task Page and Statistics Page. Let's see them in details.
Chronometer Page

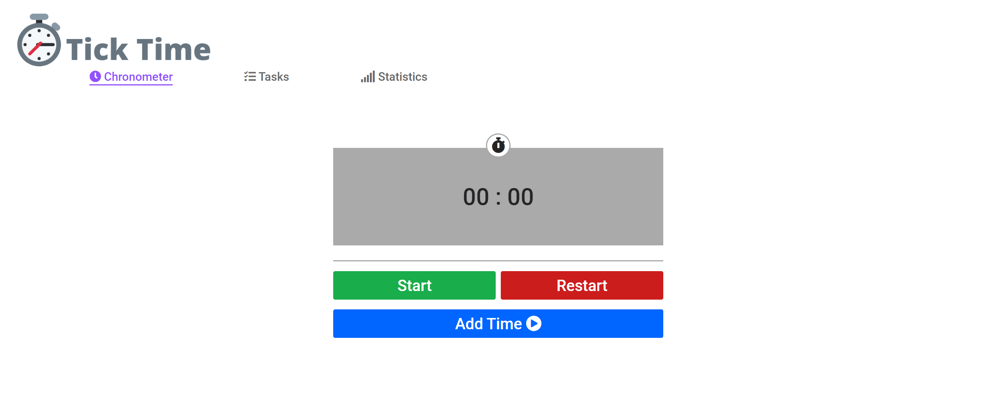
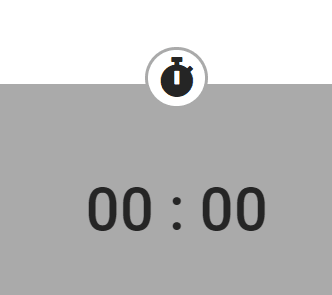
It's the main page of the site, that I decided to call Tick Time. There's a simple chronometer, with a Navbar at the top and a button to add time to Selected Task. When you click it, you'll have a pop-up to confirm the time added.
Task Page

Where you can add or delete tasks, see the task list, select one task and see Completed Tasks. You can also click a task and see details about it:
- Total time you spent in that task.
- Sub-tasks that you can add and delete (nested task system 🤯).
- An option to complete the task, sending it to Completed Task list.
- Another option to delete the task.
Statistics Page
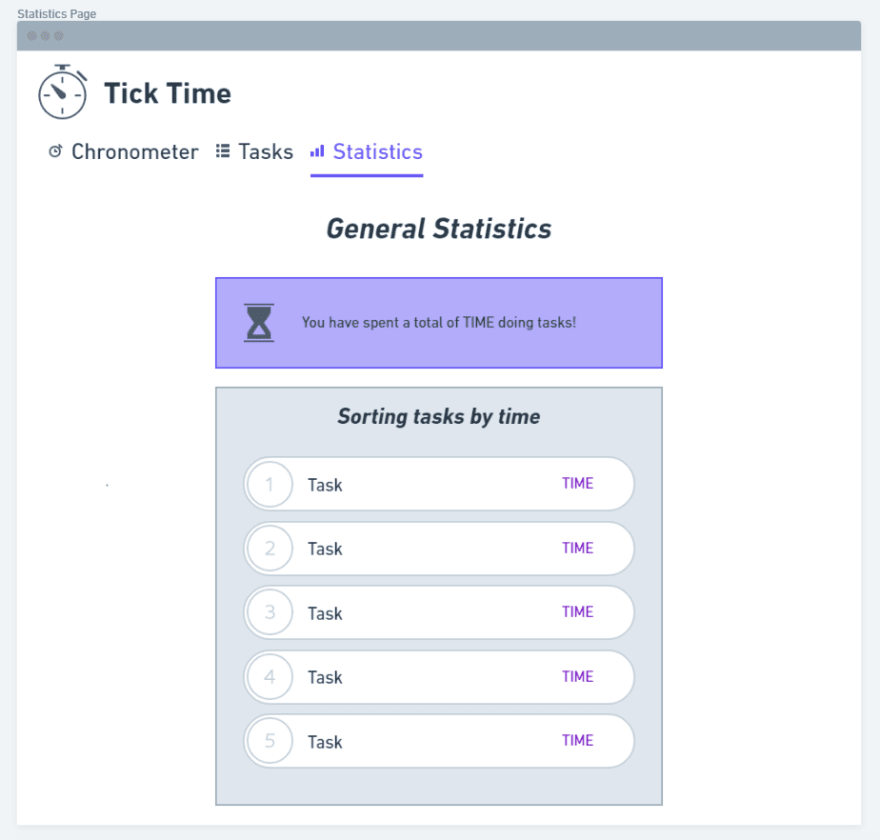
It shows the total time you spent doing tasks and it ranks every task by time.
Technologies
It will be mainly a front-end application. I'll use React, which is the library I'm current learning. Also, I have in mind that I'll need React Router and some other dependencies. As I move forward I'll comment on dependencies of the project.
Setting up initial code
I'll use Yarn as my package manager. That's the command to create a new react app folder using yarn.
Create React App
yarn create react-app tick-time
React Router
The project will need React Router to make client-side routing. So I'll install it:
yarn add react-router-dom
Font Awesome Icons
All the icons I'll use in the project are from Font Awesome. There are some ways to use font-awesome in your project. I just put this link in my index.html:
<link
      rel="stylesheet"
      href="https://cdnjs.cloudflare.com/ajax/libs/font-awesome/5.15.3/css/all.min.css"
    />
Google Fonts
I also imported Roboto fonts from Google Fonts to use.
GitHub
I created a repository in GitHub to save changes and keep the code.
Some commands
My knowledge with Git is very basic, but let me show you some commands:
git status
- This command will show all changes that you made
git add
- I use this command to add all updates I did in code
git commit -m 'commit name'
- This command is to make a commit and give it a name (describe what you changed in code)
git push -u origin main
- I'm making the changes to my repository in a branch called main.
That's basically all the commands I'm using to put my project in GitHub.
Thinking about Components
Components are one of the cores of React, so it's very important to have a sense of which components you'll need to create your application. At least, that was something that I often saw during courses, and I believe it helps me to get a better picture of what I need to do.
So I created the diagram below with what I imagine is necessary to make the app:
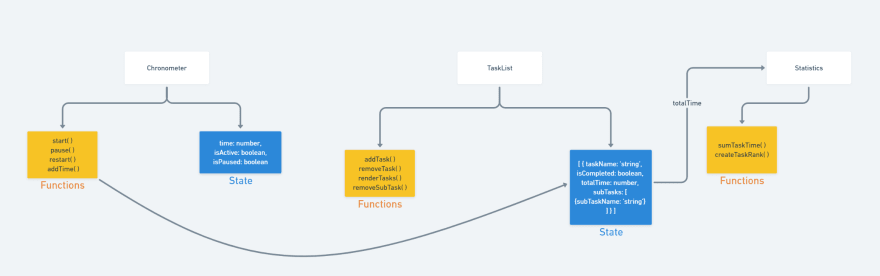
Click here to see my diagram.
With that in mind, I'll start the application!
All components will be in /components, inside /src.
Chronometer - Component

I used this post as a reference to make the timer. It's very detailed and it uses React too.
Basically a timer is made up with two things: a stored value that adds 1 to it each second (when it's not paused) and a formatted way to show this value. If this value is 120 for example, we want to display 02:00. If it's 3600 (1 hour), we want to display 01:00:00.
That's our initial code:
import { useRef, useState } from "react";

function Timer() {
  const [time, setTime] = useState(0);
  const [isActive, setIsActive] = useState(false);
  const increment = useRef(null);

  function start() {
    increment.current = setInterval(() => setTime((time) => time + 1), 1000);
    setIsActive(true);
  }

  function pause() {
    clearInterval(increment.current);
    setIsActive(false);
  }

  function restart() {
    clearInterval(increment.current)
    setTime(0);
    setIsActive(false);
  }

  function addTime() {}

  return (
    <div>
      {time}
      {isActive ? (
        <button onClick={pause}>Pause</button>
      ) : (
        <button onClick={start}>Start</button>
      )}

      <button onClick={restart}>Restart</button>
      <button onClick={addTime}>Add Time</button>
    </div>
  );
}

export default Timer;
- I'm using useState hook to create a state for time (stored in seconds) and for a variable isActive (that will do the conditional rendering of start/pause buttons).
- useRef give us an object that will persist until the end of component lifecycle. For more information, take a look here. We use setInterval to update the state with setTime each 1000ms (1 second).
- Add time function is empty for now, because it will need to interact with other component (Tasks) to work.
Formatting
Now I need to format the value that's being rendered. That's our format function:
function formatTime(time) {
    const seconds = `${time % 60}`.padStart(2, "0");
    const minutes = `${Math.floor((time / 60) % 60)}`.padStart(2, "0");
    const hours = `${Math.floor(time / 3600)}`.padStart(2, "0");

    if (time >= 3600) {
      return `${hours} : ${minutes} : ${seconds}`;
    } else {
      return `${minutes} : ${seconds}`;
    }
  }
- It takes a time as argument and convert it to a format mm:ss or hh:mm:ss depending on whether our time is greater or equal to 3600 seconds.
It's a function that can be used in any place, you just need to pass a time (in seconds) as an argument.
Chronometer - Styling
Style Folder
I created a folder inside /src called 'styles' to centralize everything related to styling.
Timer Popup
When you click to add time, there's a little window to confirm if you really want to do this. That's the way I did it:
<div
        className="Timer-popup"
        style={showPopup ? { display: "block" } : { display: "none" }}
      >
        <p>Time added to the TASK NAME</p>
        <button className="btn-popup-confirm" onClick={addTime}>
          OK
        </button>
        <button
          className="btn-popup-cancel"
          onClick={() => setShowPopup(false)}
        >
          Cancel
        </button>
      </div>
- I created a state showPopup with a initial value of false. When you click 'Add Time' button, showPopup is setted to true.
- Style attribute is dinamically setting display according to showPopup value.
- If you click Cancel, the popup is closed. If you click 'OK', then addTime() function is called.
I also applied a filter to the Timer. When popup is showing, opacity is setted to 0.5:
<div
        className="Timer"
        style={showPopup ? { filter: "opacity(0.5)" } : {}}
      >
Navbar - Component
Using React Router
To create the Navbar, I had to put React Router inside the application.
After you install it, you just need put BrowserRouter between App (in index.js)
import React from "react";
import ReactDOM from "react-dom";
import App from "./App";
import { BrowserRouter } from "react-router-dom";

ReactDOM.render(<App />, document.getElementById("root"));
ReactDOM.render(
  <BrowserRouter>
    <App />
  </BrowserRouter>,
  document.getElementById("root")
);
In App.js, I imported Route and Switch from react-router. That's how I configured the routes:
 <>
      <Navbar />
      <Switch>
        <Route exact path="/" render={() => <Timer />} />
        <Route exact path="/tasks" render={() => <Tasks />} />
        <Route exact path="/statistics" render={() => <Statistics />} />
      </Switch>
    </>
- exact is an attribute to ensure that our route will be exactly what we've putted in path.
- Switch is to ensure that only one route will be showed (the first that match).
NavLink
Instead of using Link to make the navigation, I used NavLink, that works the same way, with a difference in stylization: you can pass it an attribute activeClassName, with a class that will be activated when you're on the link.
That way, I can style to have a different color and a border-bottom, like this:

import React from "react";
import { NavLink } from "react-router-dom";

import "../styles/navbar.css";
import Logo from "../assets/logo.png";

function Navbar() {
  return (
    <div className="Navbar">
      <div className="Navbar-logo">
        <img src={Logo} alt="Logo" />
      </div>
      <div className="links">
        <NavLink activeClassName="active-link" exact to="/">
          <i className="fas fa-clock" /> Chronometer
        </NavLink>
        <NavLink activeClassName="active-link" exact to="/tasks">
          <i className="fas fa-tasks" /> Tasks
        </NavLink>
        <NavLink activeClassName="active-link" exact to="/statistics">
          <i className="fas fa-signal" /> Statistics
        </NavLink>
      </div>
    </div>
  );
}

export default Navbar;
Navbar - Styling
Logo
To make the logo, I used Canva. I just put a timer icon besides the name.

- That's the final result. Yeah, i's badly cutted, but as the application has a white background, there was not much problem.
Tasks - Components
Certainly the most challenging part of the whole application was doing the tasks functionality. But it was also something that helped me a lot to memorize all the information I learned.
I decided to create two components: a child stateless component rendering a single task (Task) and other containing all the state, rendering a list of tasks (TaskList).
Starting
Just remembering, that's how task data should look like:
[
{
      id: 1,
      taskName: "Study Javascript",
      totalTime: 3652,
      isCompleted: false,
      isSelected: true,
      subTasks: [{ subTaskName: "Learn about DOM", isCompleted: true }],
    },
    {
      id: 2,
      taskName: "Study CSS",
      totalTime: 2458,
      isCompleted: true,
      isSelected: false,
      subTasks: [{ subTaskName: "Study about flexbox", isCompleted: true }],
    },
]
So, I used useState to store this value (later I'll use local storage to have persistance of data).
const [tasks, setTasks] = useState([])
There's two different lists in the application: one for completed tasks, and other for tasks that need to be completed. So I created two functions to render them according to the value of isCompleted.
function renderTaskList() {
    const not_completed = tasks
      .filter((task) => task.isCompleted === false)
      .map((task) => (
        <Task
          key={task.id}
          id={task.id}
          name={task.taskName}
          isSelected={task.isSelected}
          isCompleted={task.isCompleted}
          toggleOne={toggleOne}
          remove={removeTask}
          renderWindow={renderWindow}
        />
      ));

    return not_completed;
  }

  function renderCompletedTasks() {
    const completed = tasks
      .filter((task) => task.isCompleted === true)
      .map((task) => (
        <Task
          key={task.id}
          id={task.id}
          name={task.taskName}
          isSelected={task.isSelected}
          isCompleted={task.isCompleted}
          toggleOne={toggleOne}
          remove={removeTask}
          renderWindow={renderWindow}
        />
      ));

    return completed;
  }

// In return()

<div className="Task-list">
        <h1>Task List</h1>
        <form onSubmit={submitTask}>
          <input
            className="task-input"
            type="text"
            placeholder="Add Task"
            value={inputTask}
            onChange={taskNameChange}
          />

          <button type="submit" className="submit-new">
            <i className="fas fa-plus-circle" />
          </button>
        </form>

        {renderTaskList()}

        <div className="divider" />

        <h1>Completed Tasks</h1>

        {renderCompletedTasks()}
      </div>
- .filter will return a array with tasks that match our condition. Then for each task in that array, I'll create a Task component passing down some props.
Functions
Functions are very good to perform actions and isolate the logics that belongs to an action. Sometimes they can seem like magic, you put a value in parenthesis, and then you have something back. Or they perform something in the application.
Let's start with a function to add task.
Adding Tasks
function addTask(name) {
    if (inputTask.length === 0) {
      setAlert("Please, enter a name");
    } else {
      setTasks([
        {
          id: uuidv4(),
          taskName: name,
          totalTime: 0,
          isSelected: false,
          isCompleted: false,
          subTasks: [],
        },
        ...tasks,
      ]);
    }
  }
- It's a function that receives a name as an argument, and set the tasks state to be the atual state (using spread operator) and a new task object.
- I'm using uuid as a dependency to generate unique ID's. That's important because there are some actions that we need to know about which task will be affected. We can use taskName, but name is not something unique. You can put whatever name you want in the task.
- inputTask is a state that stores the name user puts in input.
Creating a alert popup
The alert popup that appears when you enter the form without filling input with a name is based in a state.
const [alert, setAlert] = useState("");

// In return()

<div
        className="alert-popup"
        style={alert ? { display: "block" } : { display: "none" }}
      >
        {alert}
        <br />
        <button onClick={() => setAlert("")}>OK</button>
      </div>
- When alert is blank, display is setted to none. You can use it to create personalized alerts. You just pass the name inside the state. If you want the alert to go away, just use setAlert("").
Removing Tasks
Anyway, let's keep talking about the functions.
function removeTask(id) {
    setShowWindow(false);
    setSelectedTask({});

    const filteredTasks = tasks.filter((task) => task.id !== id);
    setTasks(filteredTasks);
  }
- Ignore setShowWindow and setSelectedTask for now.
- removeTask is a function that takes an ID as an argument, and then filter our task state selecting objects that have a different id. As I said, .filter() will return a new array.
- That value is assigned to a variable, and then we set tasks to be that new array.
React Forms
Now, let's see where I'm using those functions and learn a little about React Forms.
To add task, everything start in the form:
<div className="Task-list">
        <h1>Task List</h1>
        <form onSubmit={submitTask}>
          <input
            className="task-input"
            type="text"
            placeholder="Add Task"
            value={inputTask}
            onChange={taskNameChange}
          />

          <button type="submit" className="submit-new">
            <i className="fas fa-plus-circle" />
          </button>
        </form>
- We set the value of the input to be inputTask (a value stored in state).
- We have a event attribute 'onChange' that will call this function (taskNameChange) every time there's a change (we type something).
That's taskNameChange function:
function taskNameChange(event) {
    setInputTask(event.target.value);
  }
Simple, isn't it? Our function will receive from onChange a event object. So we use event.target.value to set the value of inputTask state.
Okay, but when we call the function to add our task? On submit, that we put on
tag as an attribute onSubmit. And then I put submitTask function, that again takes an event:function submitTask(event) {
event.preventDefault();
const taskName = inputTask;
addTask(taskName);
setInputTask("");
}
- event.preventDefault() will prevent our form to cause a reload in the page.
- And here we use addTask with inputTask value. After we set it to be empty
Too many steps, there aren't a easier way of doing it? Actually, it is. I fount that post showing how to create a hook that makes all the logic of React forms for you, so you don't need to keep repeating all this process.
Passing Props Down
Now about the remove function, it's being called in Task component. Just remembering, I'm passing it as a prop when I'm rendering each task.
.map((task) => (
        <Task
          key={task.id}
          id={task.id}
          name={task.taskName}
          isSelected={task.isSelected}
          isCompleted={task.isCompleted}
          toggleOne={toggleOne}
          remove={removeTask}
          renderWindow={renderWindow}
        />
Inside Task component things are really short, that's the whole code inside Task.js:
import React from "react";
import "../styles/task.css";

function Task({
  id,
  name,
  isSelected,
  isCompleted,
  remove,
  toggleOne,
  renderWindow,
}) {
  return (
    <div
      className={`Task ${isSelected && "Task-active"} ${
        isCompleted && "Task-completed"
      }`}
    >
      <div
        className={`Task-text ${isSelected && "Task-text-active"}`}
        onClick={() => renderWindow(id)}
      >
        {name}
      </div>

      {isCompleted === false &&
        (isSelected ? (
          <i
            className="Task-toggle fas fa-toggle-on"
            onClick={() => toggleOne(id, isSelected)}
          />
        ) : (
          <i
            className="Task-toggle fas fa-toggle-off"
            onClick={() => toggleOne(id, isSelected)}
          />
        ))}
      <i className="fas fa-times-circle" onClick={() => remove(id)} />
    </div>
  );
}

export default Task;
- I'm destructuring the props. Instead of doing 'Task(props)' and then have to write props.something everytime, I preferred to destructure it.
- When you click the icon, the remove function is called with the id of this Task.
- To select the task, I did a conditional rendering of a toggle-on icon (if isSelected is true) or a togge-off icon (if isSelected is false).
Selecting only one task
Now let me show you the toggleOne function:
function toggleOne(id, isSelected) {
    tasks.forEach((task) => {
      if (task.isSelected === true) {
        task.isSelected = false;
      }
    });

    const newObject = tasks.find((task) => task.id === id);
    newObject.isSelected = !isSelected;

    const filtered = tasks.filter((task) => task.id !== id);
    setTasks([newObject, ...filtered]);
  }
- At the beginning, I'm setting all selected tasks to be isSelected = false.
- .find will return the first object that matches the condition. In case of ID, there's only one.
- Now I'm inverting isSelected of this object.
- I'll make a new array without the old task version, and after that I set tasks to be that array with that new changed task (inverted value) at the beginning.
Task window
Each task when clicked should show a window containing the name of the task, the time you spent doing that task and show all subtasks related to this task.
In order to create this functionality, I made two states:
const [showWindow, setShowWindow] = useState(false);
const [selectedTask, setSelectedTask] = useState({});
- The first one is a boolean that is true when the window should be rendered.
- The second contains all the information necessary to display the window for a specific task.
That's the function responsible for render the window:
function renderWindow(id) {
    const selected = tasks.find((task) => task.id === id);
    setSelectedTask(selected);
    setShowWindow(true);
  }
And if you remember, inside Task.js that function is being called when you click on a div containing the task name. I'm setting selectedTask to be the id (that's a prop inside Task component). Then I set showWindow to be true.
If showWindow is true, that's rendered:
<div
        className={`Task-window ${
          selectedTask.isSelected && "window-selected"
        } ${selectedTask.isCompleted && "window-completed"}`}
        style={showWindow ? { display: "block" } : { display: "none" }}
      >
        <i
          className="fas fa-window-close"
          onClick={() => setShowWindow(false)}
        />
        <h1 className={`${selectedTask.isCompleted && "taskName-completed"}`}>
          {selectedTask.taskName}
        </h1>
        <p className="time-info">Total Time</p>
        <h3>{formatTime(selectedTask.totalTime)}</h3>
        <h4>List of Subtasks</h4>

        {selectedTask.isCompleted === false && (
          <form onSubmit={submitSubTask}>
            <input
              className="small-input"
              type="text"
              placeholder="Add Subtask"
              value={inputSubTask}
              onChange={subTaskNameChange}
            />

            <button type="submit" className="submit-new">
              <i className="fas fa-plus-circle" />
            </button>
          </form>
        )}

        <div
          className="subtasksList"
          style={selectedTask.subTasks?.length > 10 ? { overflow: "auto" } : {}}
        >
          {showWindow &&
            selectedTask.subTasks.map((subTask) => (
              <div key={subTask.id} className="single-subtask">
                {subTask.isCompleted ? (
                  <i
                    className="fas fa-check-square"
                    onClick={() => toggleCheck(subTask.id)}
                  />
                ) : (
                  <i
                    className="far fa-square"
                    onClick={() => toggleCheck(subTask.id)}
                  />
                )}
                <p
                  key={subTask.id}
                  className={`${
                    subTask.isCompleted ? "completed-task" : "uncompleted-task"
                  }`}
                >
                  {subTask.subTaskName}
                </p>
                <i
                  className="fas fa-times-circle"
                  onClick={() => removeSubTask(subTask.id)}
                />
              </div>
            ))}
        </div>
        {selectedTask.isCompleted ? (
          <button className="btn btn-undocomplete" onClick={undoComplete}>
            Undo Completed
          </button>
        ) : (
          <button className="btn btn-complete" onClick={completeTask}>
            Complete Task
          </button>
        )}

        <button
          className="btn btn-remove"
          onClick={() => removeTask(selectedTask.id)}
        >
          Delete Task
        </button>
      </div>
- I'm applying a different style to the window according to isSelected and isCompleted value.
- The usual conditional rendering using style attribute. Then we have a icon to close the window.
- We have the information about the task. Here I use again the formatTime function to display selectedTask.totalTime. I could have a separate file exporting this function, but I just copied it from Timer component
Subtasks
Okay, let's take a look now in subtasks part. First of all, something that may be new for some people (it was for me too). That specific line.
style={selectedTask.subTasks?.length > 10 ? { overflow: "auto" } : {}}
That '?' after selectedTask.subTasks is something called Optional Chaining. Basically it's checking if there's an object selectedTask with a key of subTasks before run the length method. That's because at the beginning of application, selectedTask is a empty object, so that would trigger an error while you're running.
After that, there's a map creating a div for each subtask in selectedTask. Just like toggle, I have two icons from font-awesome and a function to toggle based on subTask.id.
  function toggleCheck(id) {
    const filtered = selectedTask.subTasks.filter(
      (subtask) => subtask.id !== id
    );

    const newObject = selectedTask.subTasks.find(
      (subtask) => subtask.id === id
    );
    newObject.isCompleted = !newObject.isCompleted;

    selectedTask.subTasks = [...filtered, newObject];

    const filteredTasks = tasks.filter((task) => task.id !== selectedTask.id);
    setTasks([selectedTask, ...filteredTasks]);
  }
A little big for a simple functionality like toggle, no? Yes, and now I'm seeing that too. Whatever, that's the logic:
- I'm selecting with filter the subtasks with a different id.
- A new object is created using find, which return the first (and the only, in that case) subtask with the id passed to the function.
- isCompleted is inverted and then I set selectedTask.subTasks to be the filtered substasks + the new object with inverted isCompleted.
- I filter the tasks looking for tasks that are not being updated (in that case, tasks that have an id different than the selectedTask).
- Finally I set tasks to be selectedTask (that inside function with inverted value) and the filtered tasks.
We have also functions to add and to remove subtasks.
function addSubTask(name) {
    if (inputSubTask.length === 0) {
      setAlert("Please, enter a name");
    } else {
      selectedTask.subTasks.unshift({
        id: uuidv4(),
        subTaskName: name,
        isCompleted: false,
      });
    }
  }

function removeSubTask(id) {
    const filteredTasks = tasks.filter((task) => task.id !== selectedTask.id);
    const filteredSubTasks = selectedTask.subTasks.filter(
      (subtask) => subtask.id !== id
    );

    selectedTask.subTasks = filteredSubTasks;

    setTasks([selectedTask, ...filteredTasks]);
  }
- Same setAlert from Timer, just copied the code. We're checking if our new input for subtasks have something typed inside.
- Unshift is a function like .pop(), but instead of add something at the end of an array, it adds at the beginning.
- Removing a subtask is basically filter not updated tasks, filter not removed subtasks, update selectedTask value and then set tasks to be updated selectedTask + not updated tasks.
This function to add subtask was working without local storage, but because it doesn't use setTasks, when I used local storage it was not working. That's the new version:
const filteredTasks = tasks.filter((task) => task.id !== selectedTask.id);
    selectedTask.subTasks.unshift({
      id: uuidv4(),
      subTaskName: name,
      isCompleted: false,
    });

    setTasks([selectedTask, ...filteredTasks]);
- Now we're updating tasks state properly, setting tasks to be a new array.
Completing Tasks
To complete tasks, thing are simpler. There are two functions:
  function completeTask() {
    const filteredTasks = tasks.filter((task) => task.id !== selectedTask.id);
    selectedTask.isSelected = false;
    selectedTask.isCompleted = true;
    setTasks([selectedTask, ...filteredTasks]);
    setShowWindow(false);
  }

  function undoComplete() {
    const filteredTasks = tasks.filter((task) => task.id !== selectedTask.id);
    selectedTask.isCompleted = false;
    setTasks([selectedTask, ...filteredTasks]);
    setShowWindow(false);
  }
They're the same function, but completeTask() makes sure that we don't have a function that's selected and completed at the same time.
Connecting TaskList to Timer
We need to pass information from TaskList to Timer and vice versa, to have the selected task name showing in Timer and to have the time spent in selected task inside our task window.
First problem that you will face when trying to do something like this is that your data doesn't persist. When you refresh the site, you lose all data you made, states are setted to initial value.
To solve that problem, I knew that I would need local storage. The problem is: I thought it was easy to implement. After I tried by myself and failed miserably, I found that magical hook that can make all the job for you.
import { useEffect, useState } from "react";

function useStickyState(defaultValue, key) {
  const [value, setValue] = useState(() => {
    const stickyValue = window.localStorage.getItem(key);

    return stickyValue !== null ? JSON.parse(stickyValue) : defaultValue;
  });

  useEffect(() => {
    window.localStorage.setItem(key, JSON.stringify(value));
  }, [key, value]);

  return [value, setValue];
}

export default useStickyState;
You just need to pass a default value, like you would do with a useState hook and a key (as a string). Now we have fixed values for time and tasks to work with.
const [time, setTime] = useStickyState(0, "time");
const [tasks, setTasks] = useStickyState([], "tasks");
Passing Props Up
To pass props from child to parent you need to create a function in the parent component and pass it as a prop to child. Inside the child component you'll call that function passing the information that's inside the component.
Selected Task
Let's see how I passed the information about the task name to Timer:
In App.js
// At the top
const [toggledTask, setToggledTask] = useStickyState("", "toggledTask");

function getTask(name) {
    setToggledTask(name);
  }

// In return()
<Route
          exact
          path="/"
          render={() => <Timer
          //getTime={getTime}
          taskName={toggledTask} />}
        />
<Route
          exact
          path="/tasks"
          render={() => (
            <TaskList
              // haveTimeToAdd={haveTimeToAdd}
              // setHaveTimeToAdd={setHaveTimeToAdd}
              // timeToAdd={timeToAdd}
              // setTimeToAdd={setTimeToAdd}
              toggleTask={getTask}
            />
When we call the function in TaskList, we'll change the state in App, that's passing its value to Timer as a prop.
In TaskList.js
const updateTimer = tasks.map((task) => {
      if (task.isSelected === true) {
        return task.taskName;
      }
    });

    toggleTask(updateTimer);
Now that's inside toggleOne function, calling toggleTask function (that's getTask in App.js, I just passed with a different name).
In Timer.js
When I change the state in App, this state is passed as prop to Timer (taskName). And after destructure it, I can use this:
<h2>{taskName}</h2>
Total Time
Now how I'm adding time to selected task:
In App.js
// At the top

  const [timeToAdd, setTimeToAdd] = useState(0);
  const [haveTimeToAdd, setHaveTimeToAdd] = useState(false);

  function getTime(time) {
    setHaveTimeToAdd(true);
    setTimeToAdd(time);
  }

// In return()

   <Route
          exact
          path="/"
          render={() => <Timer
getTime={getTime}
// taskName={toggledTask} />}
        />
        <Route
          exact
          path="/tasks"
          render={() => (
            <TaskList
              haveTimeToAdd={haveTimeToAdd}
              setHaveTimeToAdd={setHaveTimeToAdd}
              timeToAdd={timeToAdd}
              setTimeToAdd={setTimeToAdd}
              // toggleTask={getTask}
            />
          )}
        />
A function getTime that receives a time as argument, setting two states: one telling that there is something to add and other containing time (in seconds) to add.
In Timer.js
function addTime() {
    getTime(time);
    setShowPopup(false);
    setTime(0);
  }
Now our addTime function is working properly. We run getTime, setting haveTimeToAdd to true and setting timeToAdd to be the time (a state inside Timer).
In TaskList.js
useEffect(() => {
    if (haveTimeToAdd) {
      const filteredTasks = tasks.filter((task) => task.isSelected === false);
      const taskToAdd = tasks.find((task) => task.isSelected === true);
      taskToAdd.totalTime = taskToAdd.totalTime + timeToAdd;

      setTasks([taskToAdd, ...filteredTasks]);
      setHaveTimeToAdd(false);
      setTimeToAdd(0);
    }
  });
- useEffect is a hook that runs every time our component render in screen. It's checking if there's time to add.
- If haveTimeToAdd === true, then we'll filter tasks that are not selected, and then find selected task (there's only one).
- Finally we add the time to the current time in selected task and setTasks to be a new array, haveTimeToAdd to false and timeToAdd to 0.
Statistics - Component
The last component in our application, very simple actually. It's a information containing the total time spent doing tasks and a list ranking tasks acording to the time.
Total Time
// In App component, at the top

const [totalTime, setTotalTime] = useStickyState(0, "totalTime");

function getTime(time) {
    setHaveTimeToAdd(true);
    setTimeToAdd(time);
    setTotalTime(totalTime + time);
  }

// In App component, in return()

  <Route
          exact
          path="/statistics"
          render={() => (
            <Statistics
// sortTasks={sortTasks}
totalTime={totalTime} />
          )}
        />

// In Statistics component, in return()

<div className="Statistics">
      <h1>General Statistics</h1>
      <div className="Statistics-totalTime">
        <i className="fas fa-hourglass-start" />
        <p>
          You have spent a total of {formatTime(totalTime)}{" "}
          {totalTime < 60
            ? "seconds"
            : totalTime > 60 && totalTime < 3600
            ? "minutes"
            : totalTime > 3600
            ? "hours"
            : ""}{" "}
          doing tasks!
        </p>
      </div>
- We have a state in App.js storing the totalTime. When we add time to a task, we're adding it to totalTime too.
- totalTime is being passed as a prop to Statistics component.
- We are using it to display the time formatted. I also make a conditional rendering of the word after the time (seconds, minutes or hours).
Sorting Tasks
To sort tasks, I found a useful function in Javascript, which is called (guess what?) .sort(). Inside App I created that function:
function sortTasks() {
    const taskListString = localStorage.getItem("tasks");
    const taskList = JSON.parse(taskListString);

    if (taskList?.length > 0) {
      const sortedArray = taskList.sort((a, b) =>
        a.totalTime > b.totalTime ? -1 : 1
      );

      return sortedArray;
    }
- From localStorage, I'll get the stored value of tasks. It will return a string value, so we need to parse it using JSON.pase().
- If there is a taskList and the length of that taskList is greater than 0, you generate a sorted array.
- In sort function we're comparing a specific value .totalTime from a single task. This will generate a new array, that will be returned from the function.
And I passed sortTasks function as a prop to Statistics. So now, I can have this:
// At the top of Statistics component
const sortedTasks = sortTasks();

// In return()

<h2>Sorting tasks by time</h2>
        {sortedTasks?.map((task, index) => {
          return (
            <div className="single-sorted-task">
              <div className="number-circle">{index + 1}</div>
              <p>{task.taskName}</p>
              <h3>{formatTime(task.totalTime)}</h3>
Additional Feature
Before finish the application, I decided to add another feature in Timer.
When you click that icon, I want to change between a stopwatch and a countdown.
Here's how I did it:
// New states

const [isStopwatch, setIsStopwatch] = useStickyState(true, "isStopwatch");

const [countDownStart, setCountDownStart] = useStickyState(
    false,
    "countDownStart"
  );

const [countSeconds, setCountSeconds] = useStickyState("", "countSeconds");
  const [countMinutes, setCountMinutes] = useStickyState("", "countMinutes");
  const [countHours, setCountHours] = useStickyState("", "countHours");
  const [countTime, setCountTime] = useStickyState(0, "countTime");
  const [originalCountTime, setOriginalCountTime] = useStickyState(
    0,
    "originalCountTime"
  );

// useRef and useEffect hooks

const decrement = useRef(countTime);

  useEffect(() => {
    if (countTime === 0 && countDownStart === true) {
      clearInterval(decrement.current);

      pause();
      setShowPopup(true);
    }
  });

// In return()

  <span className="circle" onClick={() => setIsStopwatch(!isStopwatch)}>
            <i
              className={
                isStopwatch ? `fas fa-stopwatch` : "fas fa-stopwatch-20"
              }
            />
          </span>

 {isStopwatch && countDownStart === false ? (
            formatTime(time)
          ) : isStopwatch === false && countDownStart === false ? (
            renderCountdow()
          ) : (
            <div>{formatTime(countTime)}</div>
          )}
- isStopwatch is setting if is in stopwatch or in countdown mode.
- countDownStart is looking if I started the countdown.
- countSeconds, countMinutes and countHours are just for the form.
- countTime is the actual time showed when countDownStart is true. originalCountTime is the time you submitted for the first time.
- In useEffect I'm checking if the countdown is over. If it is, we pause it and time is automatically added.
That's our function to render the countdown:
function renderCountdow() {
    return (
      <form id="count-form" className="count-down-form">
        <input
          value={countHours}
          type="number"
          placeholder="00"
          min="0"
          max="24"
          onChange={handleHourChange}
        />
        :
        <input
          value={countMinutes}
          type="number"
          placeholder="00"
          min="0"
          max="59"
          onChange={handleMinuteChange}
        />
        :
        <input
          value={countSeconds}
          type="number"
          placeholder="00"
          min="0"
          max="59"
          onChange={handleSecondChange}
        />
      </form>
    );
  }
And here we have the changes I made in other functions:
function start() {
    if (toggledTask || toggledTask !== "") {
      if (isStopwatch) {
        increment.current = setInterval(
          () => setTime((time) => time + 1),
          1000
        );
        setIsActive(true);
      } else {
        const seconds = formatString(
          `${countHours.padStart(2, "0")}:${countMinutes.padStart(
            2,
            "0"
          )}:${countSeconds.padStart(2, "0")}`
        );

        if (countTime === 0) {
          setCountTime(seconds);
          setOriginalCountTime(seconds);
        }

        decrement.current = setInterval(
          () => setCountTime((time) => time - 1),
          1000
        );

        setIsActive(true);
        setCountDownStart(true);
      }
    // } else {
    // setAlert("Before start, select a task");
    }
  }
- We're checking if toggledTask have a value or if it's empty.
- If it's not stopwatch, we're formatting the string that's being passed in inputs to seconds, and then setting countTime and originalCountTime to be that value.
If you're curious about the function to format string I used, click here and check the second answer.
function pause() {
    // clearInterval(increment.current);
    clearInterval(decrement.current);
    // setIsActive(false);
  }

  function restart() {
    // clearInterval(increment.current);
    clearInterval(decrement.current);
    // setTime(0);
    setCountTime(0);
    setCountDownStart(false);
    // setIsActive(false);
  }

  function addTime() {
    if (isStopwatch) {
      getTime(time);
      setShowPopup(false);
      setTime(0);
    } else {
      getTime(originalCountTime);
      setShowPopup(false);
      setCountDownStart(false);
    }
  }
- In pause, now we're clearing the interval of decrement.current too.
- In restart same thing, clearing decrement.current interval, setting countTime to 0 and setting countDownStart to false.
- In addTime, getTime is now using originalCountTime (when is not stopwatch) to pass it to Task component.
Mobile Responsiveness
In order to have something working also in mobile I decided to do some CSS work with media queries. I literally just used this:
@media screen and (max-width: 580px) {
/* Changes I want to apply when width is less than 580px */
}
- I was seeing in developer tools what was strange at certain width, and then I applied different styles to make it looks reasonable in smaller screens.
Deployment
I used Firebase Hosting to deploy my application. I followed this tutorial and everything is working fine.
Conclusion
Making this project, as I was expecting, was not a very easy task. But, despite all the difficulties, it was a pleasant experience. Seeing the idea that you thought and designed finally working gives you a sense of accomplishment.
Most of the project I went through trial and error, mainly in CSS. It took a while, but it helped me better understand what works and what doesn't.
If you have something in mind and really want to do it, try to get started. You may not be feeling prepared, but in the end you may end up being surprised by what you have learned and in addition you can learn new things in the process.
After finishing, see what points you still need to improve and try to better direct your efforts to study these aspects.


Top comments (2)
That was a very interesting read !
It makes me want to learn react and do a little side project too. (I'm a backend developer).
I like how you actually did a proper prototype despite the small size of your project, it seems like a good idea.
Thanks! In fact React is a very interesting tool, especially for someone who is just starting out. I think that you should give it a try.
And I must say that it helped me a lot to develop a prototype. I believe that even for a small project, it's something important to have a dimension of the project and what needs to be done. In addition, of course, you'll have a clear idea of the design.