Two years back i created a lot of firefox extensions(23 in total), also known as add-ons. Slowly, i moved to other side projects and forgot about them. Recently, i got some positive reviews of some of the extensions and received email notifications.
I wanted to practice some Vanilla JS next and as always i do, i want to make some projects in it. Since, the firefox extensions are created using HTML, CSS and Vanilla JS they are awesome way to practice Vanilla JS.
You can find all of my firefox extension here. So, go ahead and install them.
One more thing before we dig into coding, which i had to confess. I lost access to my mozilla account, in which two step authentication was enabled. I lost the authenticator app on my old phone and also the recovery keys.
So, i cannot update by existing extensions. I will add all of them again with some updates and blog the whole process.
The best place to learn about creating firefox extension is this link from mdn. Also, there is this awesome youtube series from The Coding Train.
We are going to create a Dynamic Travel Theme and publish it to Mozilla addons site. The entry point and the most important file in any extension is the manifest.json file. You can read more about it here. It mainly contains metadata about the extension and also provide pointers to other files in the extension.
So, open your code editor and create the manifest.json file. Put the below content in it.
The most important thing in the manifest.json file, is the background script. This script is very important for this plugin, as we need to run it forever in the background to check the user time and change the theme. You can read more about background scripts here.
So, create a file background.js in the folder. First just add some console log in it, as we need to check whether it is working.
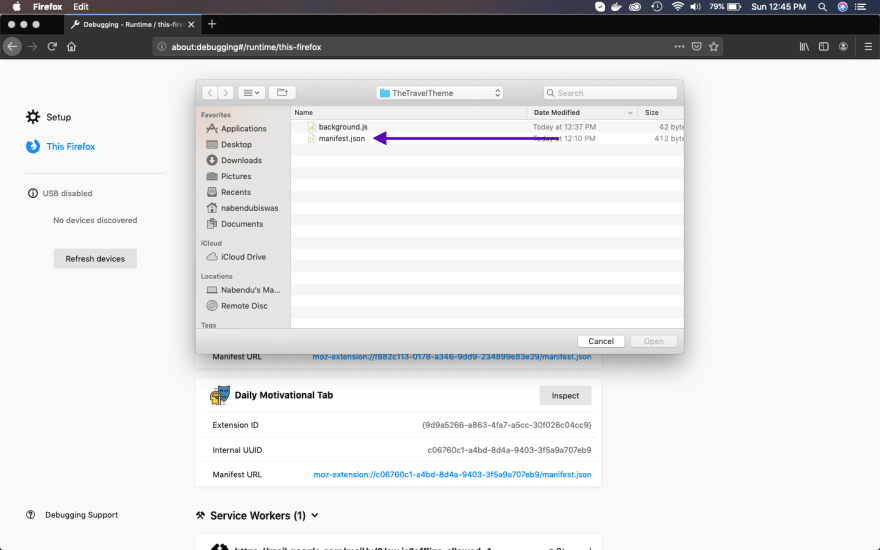
Next, open your firefox browser and go to type the below url. After that click on Load Temporary Add-on… button
about:debugging#/runtime/this-firefox
After that navigate to your folder and click on manifest.json file.
Next, our extension is loaded so click on the Inspect button.
And we will get the console log in the new tab. Note, that the background script doesn’t show the log in browser console.
Let’s update the background.js to add an eventlistener. We will do this by browser.alarms.onAlarm. You can read more about it here.
Now, we are firing the function checkTime() every 5 minutes with the help of browser.alarms.create. You can read more about it here.
We are also calling the function checkTime() initially once, as we need to show our theme when the extension starts for the first time.
Head over to the extension again and press the Reload button, for the new changes to update.
Now, click on Load Temporary Add-on… button and the Inside checkTime log will keep on increasing every 5 minutes.
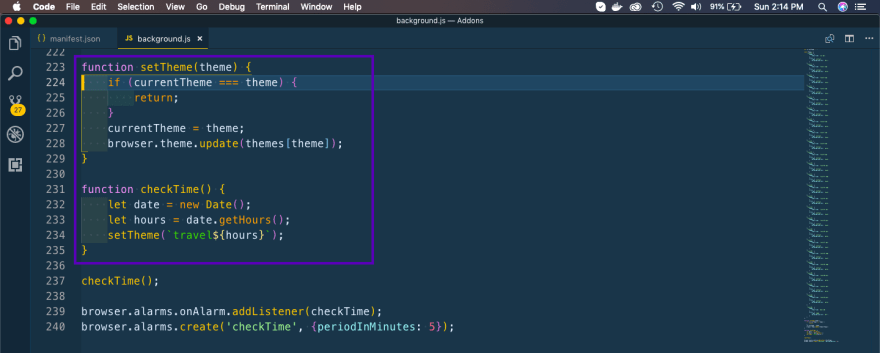
Next, let’s update our function checkTime() to get the hours, and then pass the hours to the new setTheme() function.
Now, the setTheme() function uses browser.theme to update the theme. You can read more about it here.
Next, we need to create the themes object, in which each theme will get passed.
    var currentTheme = '';

    const themes = {
        'travel0': {
            images: {
                theme_frame: 'sun.jpg',
            },
            colors: {
                frame: '#CF723F',
                tab_background_text: '#111',
            }
        },
        'travel1': {
            images: {
                theme_frame: 'travel1.jpg',
            },
            colors: {
                frame: '#CF723F',
                tab_background_text: 'white',
            }
        },
        'travel2': {
            images: {
                theme_frame: 'travel2.jpg',
            },
            colors: {
                frame: '#CF723F',
                tab_background_text: 'black',
            }
        },
        'travel3': {
            images: {
                theme_frame: 'travel3.jpg',
            },
            colors: {
                frame: '#CF723F',
                tab_background_text: 'black',
            }
        },
        'travel4': {
            images: {
                theme_frame: 'travel4.jpg',
            },
            colors: {
                frame: '#CF723F',
                tab_background_text: 'black',
            }
        },
        'travel5': {
            images: {
                theme_frame: 'travel5.jpg',
            },
            colors: {
                frame: '#CF723F',
                tab_background_text: 'black',
            }
        },
        'travel6': {
            images: {
                theme_frame: 'travel6.jpg',
            },
            colors: {
                frame: '#CF723F',
                tab_background_text: 'white',
            }
        },
        'travel7': {
            images: {
                theme_frame: 'travel7.jpg',
            },
            colors: {
                frame: '#CF723F',
                tab_background_text: 'black',
            }
        },
        'travel8': {
            images: {
                theme_frame: 'travel8.jpg',
            },
            colors: {
                frame: '#CF723F',
                tab_background_text: 'white',
            }
        },
        'travel9': {
            images: {
                theme_frame: 'travel9.jpg',
            },
            colors: {
                frame: '#CF723F',
                tab_background_text: 'black',
            }
        },
        'travel10': {
            images: {
                theme_frame: 'travel10.jpg',
            },
            colors: {
                frame: '#CF723F',
                tab_background_text: 'black',
            }
        },
        'travel11': {
            images: {
                theme_frame: 'travel11.jpeg',
            },
            colors: {
                frame: '#CF723F',
                tab_background_text: 'black',
            }
        },
        'travel12': {
            images: {
                theme_frame: 'travel12.jpeg',
            },
            colors: {
                frame: '#CF723F',
                tab_background_text: 'black',
            }
        },
        'travel13': {
            images: {
                theme_frame: 'travel13.jpg',
            },
            colors: {
                frame: '#CF723F',
                tab_background_text: 'white',
            }
        },
        'travel14': {
            images: {
                theme_frame: 'travel14.jpg',
            },
            colors: {
                frame: '#CF723F',
                tab_background_text: 'black',
            }
        },
        'travel15': {
            images: {
                theme_frame: 'travel15.png',
            },
            colors: {
                frame: '#CF723F',
                tab_background_text: 'black',
            }
        },
        'travel16': {
            images: {
                theme_frame: 'travel16.jpg',
            },
            colors: {
                frame: '#CF723F',
                tab_background_text: 'white',
            }
        },
        'travel17': {
            images: {
                theme_frame: 'travel17.jpg',
            },
            colors: {
                frame: '#CF723F',
                tab_background_text: 'black',
            }
        },
        'travel18': {
            images: {
                theme_frame: 'travel15.jpeg',
            },
            colors: {
                frame: '#CF723F',
                tab_background_text: 'black',
            }
        },
        'travel19': {
            images: {
                theme_frame: 'travel19.jpeg',
            },
            colors: {
                frame: '#CF723F',
                tab_background_text: 'white',
            }
        },
        'travel20': {
            images: {
                theme_frame: 'travel20.png',
            },
            colors: {
                frame: '#CF723F',
                tab_background_text: 'white',
            }
        },
        'travel21': {
            images: {
                theme_frame: 'travel21.jpg',
            },
            colors: {
                frame: '#CF723F',
                tab_background_text: 'white',
            }
        },
        'travel22': {
            images: {
                theme_frame: 'travel22.png',
            },
            colors: {
                frame: '#CF723F',
                tab_background_text: 'white',
            }
        },

    'travel23': {
            images: {
                theme_frame: 'moon.jpg',
            },
            colors: {
                frame: '#000',
                tab_background_text: '#fff',
            }
        }
    };
Next, add all the images to the folder.
Now, when you reload the extension the theme gets loaded depending on the hour.
We are done with the extension, but let’s add some icons before publishing to mozilla addons site. Update the below in manifest.json file and also add a folder icons containing those icons.
We need to publish this extension, but as this post is getting longer will do that in the next post.
You can find the code for this extension here.


Top comments (3)
Edit the MAINFEST.json to MANIFEST.json
I was about to warn about this same typo. I must add that, in my opinion, MAINFEST.json is a cooler name than MANIFEST.json. :)
Just saw the comments and rectified the mistake. I just wrote the first as mainfest and copied it all along.
Thanks both of you to point it out.