
This article is Lesson 14 of Andrew's book, Learn ClojureScript
Web applications are all about interaction. Whether it is a form to gather simple input or animated charts, almost everything that we as web developers do is about either getting data from users or displaying data to them. Considering how important i/o is to every web application, we will look at it as our next "building block."
In this lesson:
- Get user input from a webpage
- Manipulate the DOM with Google Closure libraries
Over the next couple of lessons, we will build an app that can convert temperatures between Fahrenheit and Celsius. It would probably be less than exciting if the app only converted a predefined temperature from one measurement system to the other. In order to do anything useful, we will need to interact with the user. Combining what we learn about i/o with our newfound knowledge of variables, control structures, and functions will help us build a this temperature converter.
First, let's use Leiningen to create a new project that uses the Figwheel template and start a REPL:
$ lein new figwheel doing-io
$ cd doing-io
$ lein figwheel
Now we can open a browser, navigate to http://localhost:3449, and start learning about doing I/O the ClojureScript way.
Manipulating The DOM
Since ClojureScript has the entirety of the native JavaScript DOM libraries at its disposal, there is nothing preventing us from using these to manipulate the DOM directly. However, we have access to the entire Google Closure library, we will opt to use that instead, since it smoothes over browser quirks and provides a nicer event system than raw JavaScript. For applications that need only support recent browsers (and thus, modern versions of JavaScript), this is not much of an issue, but for applications that need to support legacy browsers, a higher-level DOM library is very nice to have.
First things first - we will create an DOM element in the REPL and append it to the body of the page. Our browser window will reflect these changes as we make them. The result will look like the following:
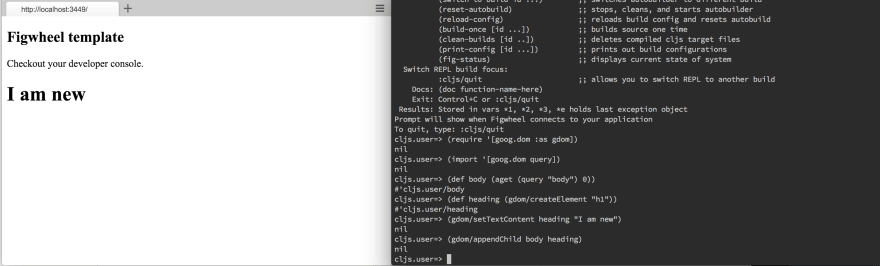
Dynamically Creating a DOM Element
In order to add an element to the DOM, we'll use Google Closure's DOM manipulation library to create an h1 element, set its text content, and append it to the end of the body. Let's walk through each of these steps in the REPL.
cljs.user=> (require '[goog.dom :as gdom])                 ;; <1>
nil

cljs.user=> (def body (.querySelector js/document "body")) ;; <2>
#'cljs.user/body

cljs.user=> (def heading (gdom/createElement "h1"))        ;; <3>
#'cljs.user/heading

cljs.user=> (gdom/setTextContent heading "I am new")
nil

cljs.user=> (gdom/appendChild body heading)                ;; <4>
nil
Creating a DOM Element from the REPL
- Pull in the Google Closure library that we need for DOM manipulation
- Use the native DOM library to get the HTMLElement for the
<body>tag and bind it to thebodyvar - Use Google Closure to create a new element and give it some content
- Append the element to the body of our page
Since we are in unfamiliar territory, let's take a quick step back to look at precisely what is going on, expression by expression.
(require '[goog.dom :as gdom])
This expression loads all of the code in the goog.dom namespace. This namespace contains a number of useful functions for manipulating the DOM, and we will generally use this library instead of vanilla JavaScript due to the fact that the Closure Library normalizes many browser quirks. This require makes the functions in this namespace available under the alias, gdom. When calling code that we have imported from another namespace, we use the form, (namespace/function args*) Thus, we could call the getDocument() function in this namespace as, (gdom/getDocument).
(def body (.querySelector js/document "body"))
Next, we user native JavaScript code to get a reference to the body element. We do this by way of example to demonstrate that DOM elements that we obtain with raw JavaScript are fully compatible with the Google Closure Library.
(def heading (gdom/createElement "h1"))
Next, we create an h1 element and bind it to the var, heading. At this point, the element is created but is not attached to the DOM.
(gdom/setTextContent heading "I am new")
Now we set the content of the detached h1 node that we created. Now that we have created the element and set its content appropriately, we can append it to the document's body.
(gdom/appendChild body heading)
This will append the DOM node that we have created as heading to the document body, which we have bound to the body var. At this point, the DOM is modified, and the web browser will reflect the changes that we have made.
You Try It
- Using the example above as a reference, create a
ptag with some content and append it to the body. - Use the
goog.dom.removeNode()function to remove both theh1andptags. Hint: this function takes the node to remove as its only parameter.
Experiment
Now that we have created an element, let's take the next step and manipulate something that is already onscreen. Since we already have a var containing the HTMLElement of the <h1> tag that we created, let's change the style on it and add a class. According to the documentation for goog.dom footnote:[Documentation for this Google Closure library can be found at https://google.github.io/closure-library/api/], the setProperties function takes an element and a JavaScript object mapping properties to values and applies the properties to the DOM element.
cljs.user=> (gdom/setProperties heading #js {"style" "color:red;"
                                             "class" "big-title"})
nil
We used the JavaScript object literal syntax that we learned about in the last lesson to create a properties object. Then we called the goog.dom.setProperties() function with the element whose properties we wished to set and the properties object.
So far the process of manipulating the DOM is not dramatically different from what we would do in JavaScript, albeit the parenthesis are in different places, and we're using def instead of var. Most of the time, we will not be working at a "low level" like this, but we will use libraries like React to manage the DOM for us. However, we need to build a solid foundational understanding before we can fully take advantage of the higher-level technologies. Next, we will briefly talk about getting user input and handling events before putting it all together in a temperature conversion app.
Getting User Input
So far we have looked at the "o" side of "i/o", now we will turn to getting user input. For now, we will look at extracting values from form controls, since this is the most basic way to get data from users. As an exercise, we will use a text input on the page and copy the value from this input into another element. Instead of creating the entire DOM from scratch, let's modify the project's index.html with the structure that we want to work with. Be sure to reload your browser after updating this file, since Figwheel cannot replace the entire html file on the fly.
<!DOCTYPE html>
<html>
  <head>                                                                         <1>
    <meta charset="UTF-8">
    <meta name="viewport" content="width=device-width, initial-scale=1">
    <link href="css/style.css" rel="stylesheet" type="text/css">
  </head>
  <body>
    <div id="app">                                                               <2>
      <div class="form-control">
        <label for="user-input">What do you say?</label>
        <input id="user-input" type="text" />
      </div>

      <p>You said, "<span id="copy-target"></span>". How mighty interesting.</p>
    </div>
    <script src="js/compiled/temp_converter.js" type="text/javascript"></script> <3>
  </body>
</html>
resources/public/index.html
- Keep the
headthat the Leiningen generated - Populate the
appdiv with markup we will use to test i/o - Load the compiled ClojureScript
Now the process for getting the text from the user-input element is fairly straightforward. Once again, we will show the entire REPL session then walk through each interesting piece of it. The result will look like the following:

Getting User Input
cljs.user=> (require '[goog.dom :as gdom])
nil

cljs.user=> (def input (gdom/getElement "user-input"))
#'cljs.user/input

cljs.user=> (def target (gdom/getElement "copy-target"))
#'cljs.user/target

cljs.user=> (aget input "value")                           ;; <1>
"ClojureScript is fun"

cljs.user=> (gdom/setTextContent target                    ;; <2>
              (aget input "value"))
nil
Reading the Value of an Input
-
inputis a JavaScript object, so we can get its properties withaget - Get the value of the input and update the target in one expression
We have already discussed how require is used in this instance, so we will move on to the next expression:
(def input (gdom/getElement "user-input"))
Here, we use the goog.dom.getElement() function to retrieve the input element by id. We could have accomplished the same thing with native JavaScript as, (.getElementById js/document "user-input"), but getElement is more succinct. We do the same to get a reference to the target element where we will output the text that we receive from the user.
(gdom/setTextContent target
  (aget input "value"))
In this expression, we get the value property of the input element, which will contain whatever text the user has typed into it, and update the text content of the target node with this value. This code performs both the input (reading the input's value) and output (writing the text content of the target).
Since we will not spend much time with low-level DOM manipulation, we will not linger on this subject. If we ever find ourselves having to do write DOM manipulation code, the Google Closure library has excellent documentation. Otherwise, do not be afraid to find a good ClojureScript DOM library and use it!
You Try It
Include the dommy library and go through the DOM manipulation examples again using Dommy instead of Google Closure. You will need to add dommy as a dependency to project.clj and restart figwheel in order to start using dommy. Is dommy easier to work with than goog.dom? Is there less boilerplate when working with a ClojureScript library directly?
Handling Events
Closely related to getting user inputs is the issue of handling events. We need triggers to tell us when something interesting has happened - the user clicked a button, changed the value of a text input, etc. Once again, we will use Google Closure libraries to create event handlers and bind them to the DOM. We will extend the example of copying the value from an input to another element, but this time, we will use an event to update the target element every time the user types in the input.
cljs.user=> (require '[goog.events :as gevents])
nil

cljs.user=> (defn update-target [evt]                      ;; <1>
              (gdom/setTextContent target
                (aget evt "currentTarget" "value")))
#'cljs.user/update-target

cljs.user=> (gevents/listen input                          ;; <2>
                            goog.events/EventType.KEYUP
                            update-target)
#object[Object [object Object]]
Using Events to Trigger Updates
- Define a callback function that will be called on every event
- Bind our event handler to the
keyupevent on the input
Once more, let's take a moment to walk through this code to make sure we can clearly grasp what is going on.
(defn update-target [evt]
  (gdom/setTextContent target
    (aget evt "currentTarget" "value")))
Here we create an event handler function that we intend to call on every keyup event from the input. Notice that the inner portion of this code looks very similar to the code that we manually entered in the REPL. They both had the form, (gdom/setTextContent target value). The difference here is that we are extracting the value from of a JavaScript event rather than a DOM element directly.
(gevents/listen input
                goog.events/EventType.KEYUP
                update-target)
Finally, we use the goog.events.listen() function to attach an event handler to the input element on the keyup event. We use the EventType.KEYUP constant from goog.events for clarity, but we could have just as easily used the string "keyup". Now when we type in the input, the target element should instantly be updated! We now have all of the pieces that we need to create the temperature conversion app in the next lesson.
Challenge
Using the goog.dom and goog.events libraries, write an app that does the
following:
- Creates 2 password inputs (for password and password confirmation)
- Creates a status text
- Attaches listeners to the inputs so that the input values are compared every time a key is pressed
- Sets the status text to "Matches" when the inputs are the same and "Do not match" when they differ.
Possible Solution:
(ns passwords.core
  (:require [goog.dom :as gdom]
            [goog.events :as gevents]))

(defn values-same? [field-1 field-2]
  (= (aget field-1 "value")
     (aget field-2 "value")))

(defn handle-change [password confirmation status]
  (gdom/setTextContent status
                       (if (values-same? password confirmation)
                         "Matches"
                         "Do not match")))

(let [password (gdom/createElement "input")
      confirmation (gdom/createElement "input")
      status (gdom/createElement "p")
      app (gdom/getElement "app")]
  (gdom/setProperties password #js {"type" "password"})
  (gdom/setProperties confirmation #js {"type" "password"})

  (gevents/listen password goog.events/EventType.KEYUP
                  #(handle-change password confirmation status))
  (gevents/listen confirmation goog.events/EventType.KEYUP
                  #(handle-change password confirmation status))

  (gdom/setTextContent app "")
  (gdom/appendChild app password)
  (gdom/appendChild app confirmation)
  (gdom/appendChild app status))
Summary
In this lesson, we used both native JavaScript and Google Closure Library code to get user input from a webpage and manipulate the DOM. We also learned how to attach an event handler to an element so that we can evaluate a callback in response to some action that the user takes. Now that we have a way to interact with the user, we can begin creating such more useful apps. We should now know how to:
- Require and use Google Closure library functions
- Create and manipulate DOM elements
- Retrieve user input from the DOM
- Attach event handlers to respond to user interactions

Top comments (0)