
We have seen the access token being generated and verified then stored in database, now let's generate an access token for the user when he hits the login route.
Login Route
Let's create a new route in src/app/users/routes.ts and create anew handler/controller for it (src/app/userss/controllers/auth/login.ts), notice that i added a new folder called auth to hold all the authentication related controllers to be in one folder like login, register, logout, forgot password, reset password etc.
// src/app/users/routes.ts
import login from './controllers/auth/login.ts';
// ...

router.post('/login', login);
// src/app/users/controllers/auth/login.ts
import { Request } from "core/http/request";
import { Response } from "core/http/response";

export default async function login(request: Request, response: Response) {
  // get the email and password from the request body
  const { email, password } = request.only(["email", "password"]);
}
Now let's get the user from the database using the email and check if the password is correct, if it is correct then we will generate a new access token for the user and store it in the database.
// src/app/users/controllers/auth/login.ts
import { Request } from "core/http/request";
import { Response } from "core/http/response";
import User from "app/users/models/user";

import User from "app/users/models/user";
import { Request } from "core/http/request";
import { Response } from "core/http/response";

export default async function login(request: Request, response: Response) {
  // get the email and password from the request body
  const { email, password } = request.only(["email", "password"]);

  const user = await User.attempt({ email, password });

  if (!user) {
    return response.badRequest({
      error: "Invalid credentials",
    });
  }

  console.log("Logged in successfully");

  // generate access token
  return response.success({
    user: user.data,
  });
}
Here we imported the user model and called a method called attempt which will check if the user exists and the password is correct, if it is correct then it will return the user, if not then it will return null.
So let's create this static method first.
As you see, we passed an object with the email and password, why its an object? because we may use another thing than the email, for example login by username or phone number, so we can pass the email or username or phone number in the object and check if the user exists and the password is correct.
// src/app/users/models/user.ts
import { verify } from "@mongez/password";
import { except } from "@mongez/reinforcements";
import { Model } from "core/database";
import castPassword from "core/database/casts/cast-password";
import { Casts, Document } from "core/database/model/types";

export default class User extends Model {
  /**
   * Collection name
   */
  public static collectionName = "users";

  /**
   * {@inheritDoc}
   */
  public defaultValue: Document = {
    isActive: true,
    isEmailVerified: false,
    isPhoneVerified: false,
  };

  protected casts: Casts = {
    isActive: "boolean",
    isPhoneVerified: "boolean",
    joinDate: "date",
    password: castPassword,
  };

  /**
   * Attempt to login the user
   */
  public static async attempt(data: any) {
    // find first user with the given data, but exclude from it the password
    const user = await this.first(except(data, ["password"]));

    if (!user) {
      return null;
    }

    // now verify the password

    if (!verify(user.get("password"), data.password)) {
      return null;
    }

    return user;
  }
}
Let's split the code into parts:
- First we created a static method called
attempt - This method receives an object contains the data that will be used for validation.
- As it is an object, then the best method to get a user for object of columns is
firstmethod, so we called it and passed the object to it, but we need to exclude thepasswordfrom the object because we don't want to search for the user by the password. - If the user exists then we will verify the password, if the password is correct then we will return the user, if not then we will return
null.
We're using verify function to verify the given password with the ciphered one in the database, if it is not verified return null, otherwise return the user model object.
Now let's create a new user with your email and password 123456 (Just only for testing), then let's test the attempt method.
// src/app/users/routes.tsimport { connection } from "core/database";
import router from "core/router";
import login from "./controllers/auth/login";
import createUser from "./controllers/create-user";
import getUser from "./controllers/get-user";
import usersList from "./controllers/users-list";
import User from "./models/user";

router.get("/users", usersList);
router.get("/users/:id", getUser);
router.post("/users", createUser);
router.post("/login", login);

connection.on("connected", async () => {
  const user = await User.create({
    email: "hassanzohdy@gmail.com",
    password: "123456",
  });

  console.log(user.data);
});
Now you should see in the console something similar to this:
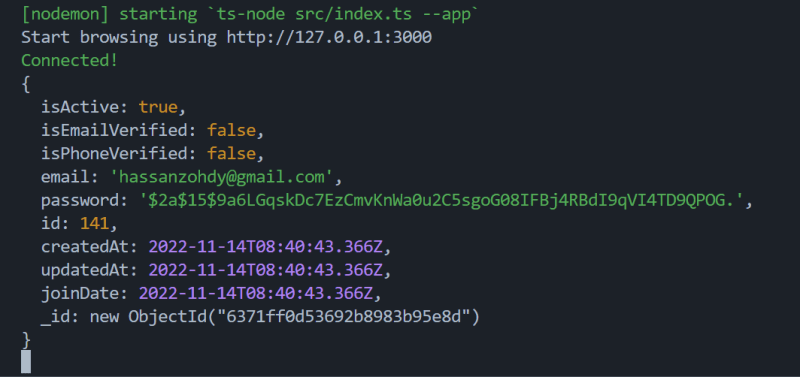
Thanks to our amazing casts property, the password is auto hashed and stored in the database.
Now let's test our attempt method:
Open postman and send a POST request to http://localhost:3000/login with the following body:
Don't forget to added the Authorization header with your Bearer {token}.
And in the Body tab, select form data or json, whatever you like, i prefer form data for ease of reading and use and put your email and password.
If you entered the data correctly, you should see in the console Logged in successfully and user data will be returned, if not you should see in the postman an error object with message Invalid credentials.
Generating Access Token
Now, we need to generate the access token for current user, but if you remember, generating the token was done in the registerAuthRoutes function, in that sense, we really need to pluck it form there, this is going to be our next article Inshaa Allah.
🎨 Conclusion
In this article, we saw the login workflow and how to use the attempt method to verify user credentials, and how we made it more flexible and dynamic.
🚀 Project Repository
You can find the latest updates of this project on Github
😍 Join our community
Join our community on Discord to get help and support (Node Js 2023 Channel).
🎞️ Video Course (Arabic Voice)
If you want to learn this course in video format, you can find it on Youtube, the course is in Arabic language.
📚 Bonus Content 📚
You may have a look at these articles, it will definitely boost your knowledge and productivity.
General Topics
- Event Driven Architecture: A Practical Guide in Javascript
- Best Practices For Case Styles: Camel, Pascal, Snake, and Kebab Case In Node And Javascript
- After 6 years of practicing MongoDB, Here are my thoughts on MongoDB vs MySQL
Packages & Libraries
- Collections: Your ultimate Javascript Arrays Manager
- Supportive Is: an elegant utility to check types of values in JavaScript
- Localization: An agnostic i18n package to manage localization in your project
React Js Packages
Courses (Articles)

Oldest comments (0)