
Now let's implement JWT concept in our Nodejs Application.
What is JWT?
Let's recap quickly what is JWT, JWT stands for JSON Web Token. It is a standard that defines a compact and self-contained way for securely transmitting information between parties as a JSON object. This information can be verified and trusted because it is digitally signed. JWTs can be signed using a secret (with the HMAC algorithm for example) or a public/private key pair using RSA.
Installation
We're going to use Fastify JWT plugin to implement JWT in our application. So let's install it.
yarn add @fastify/jwt
As mentioned in the docs, we need first to register the plugin, we also had a previous plugin to be used which is multiple plugin, so let's clean up this mess before it starts and make the plugins pluggable.
Create in src/core/http directory a file called plugins.ts and add the following code.
You know what, let's make it later in the next break article, we need to be more consistent in our code.
Now let's update the connectToServer function in src/core/http/connectToServer.ts file to use our new plugin.
// src/core/http/connectToServer.ts
import jwt from "@fastify/jwt";
import multipart from "@fastify/multipart";
import config from "@mongez/config";
import router from "core/router";
import Fastify from "fastify";
import response from "./response";

export default async function connectToServer() {
  const server = Fastify();

  server.register(multipart, {
    attachFieldsToBody: true,
  });

  // use the jwt plugin with your preferred secret key
  server.register(jwt, {
    secret: "my-secret",
  });

  // now let's add a guests route in our routes to generate a guest token to our guests.
  router.post("/guests", (_request, response) => {
    const token = server.jwt.sign({ userType: "guest" });

    return response.send({
      accessToken: token,
      userType: "guest",
    });
  });

  // now let's add an event to validate the request token
  server.addHook("onRequest", async (request, reply) => {
    if (request.url === "/guests") return;

    try {
      const user = await request.jwtVerify();

      console.log(user);
    } catch (err) {
      reply.send(err);
    }
  });

  // call reset method on response object to response its state
  server.addHook("onResponse", response.reset.bind(response));

  router.scan(server);

  try {
    // 👇🏻 We can use the url of the server
    const address = await server.listen({
      port: config.get("app.port"),
      host: config.get("app.baseUrl"),
    });

    console.log(`Start browsing using ${address}`);
  } catch (err) {
    console.log(err);

    server.log.error(err);
    process.exit(1); // stop the process, exit with error
  }
}
So basically we imported here the jwt plugin and registered it in Fastify server, then we created a /guests route to generate an access token for it and returned the token with userType to be guest, now the token generated will be used in any requests from now on, we'll see it in a bit.
Then we added onRequest event to validate the token, if the token is valid, it will be decoded and the decoded data will be available in the request object, if not, it will throw an error.
Now open postman and create a new request and name it Guest Login, it will be a POST request and the route will be /guests.
After generating the token, we are going to use it in every single request, even if in the create account or in the login step.
The new update here that we're going to use the Authorization header to send the token, so let's add it to the request.
The Authorization header will be Bearer and the value will be the token we got from the /guests route.
Let's see the postman request for generating a guest token.

Now let's update the /users route to use the token that we generated.
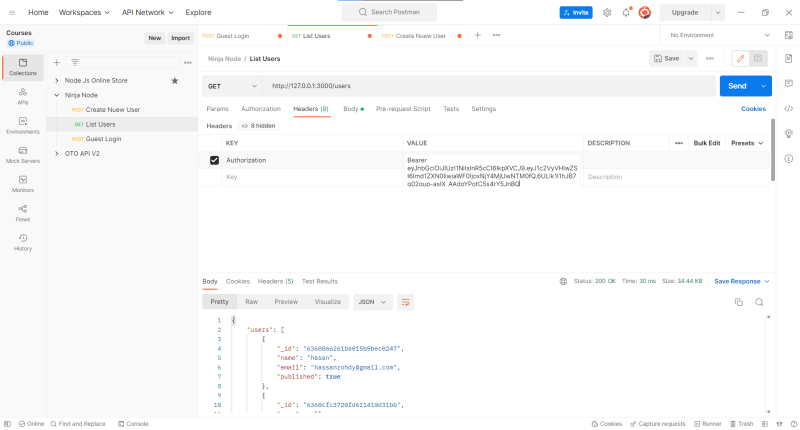
Here we added Authorization in the Header section and its value is Bearer {Token} Bearer is the type of the token and the token is the value of the token (Don't forget to add space between them).
If we didn't send the header or we send invalid token, we'll get an error.

Now we didn't pass the bearer token thus an error was blown up in our face.
Enhancing the error
Actually we don't want to tell the user what is the reason of being the token invalid, so we'll return an error with just Invalid token message.
// src/core/http/connectToServer.ts
// ...
  // now let's add an event to validate the request token
  server.addHook("onRequest", async (request, reply) => {
    if (request.url === "/guests") return;

    try {
      const user = await request.jwtVerify();

      console.log(user);
    } catch (err) {
      reply.status(401).send({
        error: "Unauthorized: Invalid Access Token",
      });
    }
  });
Now we've a more ambiguous error message.

And that's it!
🎨 Conclusion
In this article, we've learned how to implement JWT in our application, we've learned how to generate a token and how to validate it, we've also learned how to use the token in our requests.
In our next article, we'll enhance the generated token and also store it in the database.
🚀 Project Repository
You can find the latest updates of this project on Github
😍 Join our community
Join our community on Discord to get help and support (Node Js 2023 Channel).
🎞️ Video Course (Arabic Voice)
If you want to learn this course in video format, you can find it on Youtube, the course is in Arabic language.
📚 Bonus Content 📚
You may have a look at these articles, it will definitely boost your knowledge and productivity.
General Topics
- Event Driven Architecture: A Practical Guide in Javascript
- Best Practices For Case Styles: Camel, Pascal, Snake, and Kebab Case In Node And Javascript
- After 6 years of practicing MongoDB, Here are my thoughts on MongoDB vs MySQL
Packages & Libraries
- Collections: Your ultimate Javascript Arrays Manager
- Supportive Is: an elegant utility to check types of values in JavaScript
- Localization: An agnostic i18n package to manage localization in your project
React Js Packages
Courses (Articles)

Oldest comments (0)