
Electronics can certainly look intimidating for people who haven’t had the opportunity to play around with hardware before. But fear not: luckily for us, there’s a whole chunk of the electronics business all targeted at hobbyists and people who just want to have some fun with little inventions that blink, buzz or automate something in their homes.
Ultimately, by learning basic electronics you'll be leveraging your current software engineering skills, opening up a new dimension of possibilities for your hobby projects. Tinkering with electronics and hardware is also a great way to better understand how computers work.
This guide is a primer on basic electronics, targeted at developers alike who would like to experiment with Arduino and other prototyping platforms but don't know exactly where to start.
Let's start with something about electricity, circuits, components, and what exactly is a breadboard.
Electricity
In very basic terms, electricity is the flow of electrons. In certain ways, electricity looks similar to water: electrons will always try to “run” towards the path with least resistance, just like water does. You probably learned something about conductivity at school, some long time ago… Yeah, every thing, every object, and even living beings, they all have different levels of conductivity and resistance. When you stand shoeless on the floor, you are creating a path to the ground in which electricity could potentially flow. That’s why we are told to use shoes when using things that have a shocking hazard. If we don’t, our body can pose as a conductive path, closing a circuit to the ground (GND). But what is a circuit?
Circuits
A circuit is basically a path in which electricity can flow. Circuits require a power source and something to conduct the electric current. Components are connected to the circuit to harvest the electric current and do things, such as light up, buzz, collect information about the environment... You name it.
A tool like Fritzing can be used to design circuits and make them easier to share. Like this:
Components
Components are the building blocks of electronics. LEDs, resitors, diodes, buttons, capacitors… when put together the right way, they can create awesome stuff. Once you get the hang of one or two components, you’ll see that things follow a certain pattern and you will be able to use pretty much any component, given it’s well documented. Prototyping always requires a lot of research, but if you are a coder you are used to that. Using a new component is like using a new library: first you’ll research to see if it does what you think it does, and how complicated it is to get things up and running: if there are dependencies, what sort of input it expects and what is the output produced. From there, you will see if you need any other libraries (components) and how you connect it to the rest of the project.
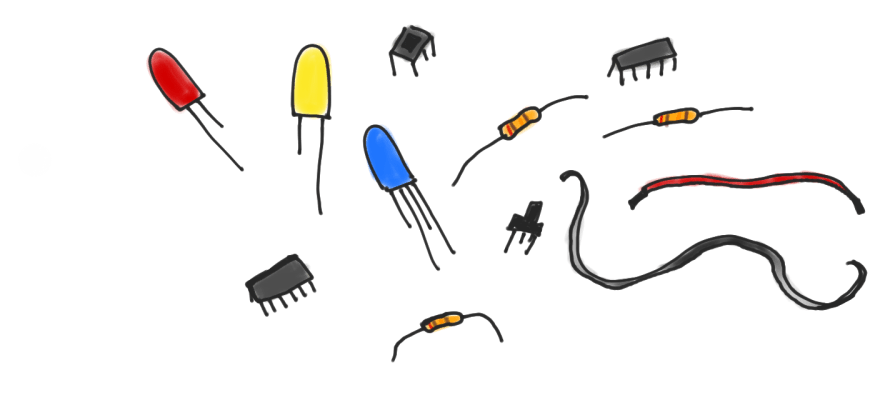
Most components will have at least two “legs”, one for the power source and the other one for GND (ground). Some components don’t care which “leg” is connected to power or gnd, which means current can flow thought it in any direction. Other components, like diodes and LEDs (which are in fact light emitting diodes), will require that current flows in a specific direction. In this case you’ll have to know which leg is which – this information will be available within the component specs. Common LEDs usually have a shorter leg indicating the GND pin.
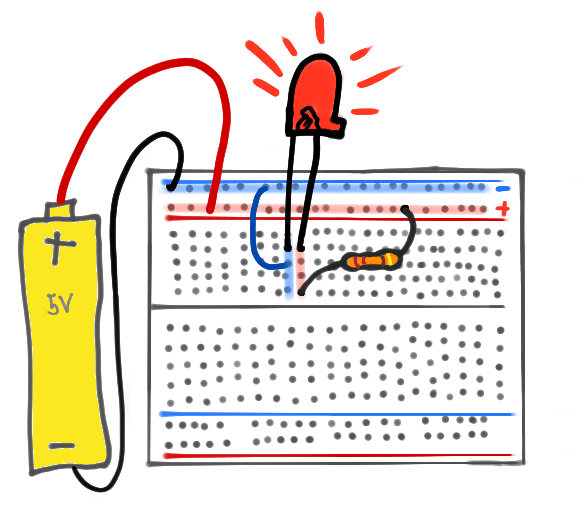
Using a Breadboard
The breadboard is your sandbox, the easiest way to play around with circuits and try out new components and boards. There’s no need for soldering, you only need to plug wires to connect the rows and build your circuit.

In the main breadboard area, the trails are horizontally disposed in numbered rows, each containing a number of perforations identified by letters. A current applied to A1 will flow through B1, C1, D1 and E1.
The sides of the breadboard usually have two vertical trails each, representing positive (current) and negative (GND). It is a common practice to use these rails to distribute power and GND to the whole board.
Further Reading
To get a more comprehensive view of the subjects discussed in this introductory guide, you can refer to the following resources from Sparkfun:
In the next part of this series, we'll learn a bit about the physical paraphernalia we need to create toy projects: LEDs, resistors, buttons, microcontrollers, boards, wires, soldering iron... so stay tuned ;)

Top comments (5)
Messing around with electronics is a blast, at least for the type of person who thinks problem solving is fun. Thanks for the intro!
Great introduction post, looking forward for the next tutorials.
P.S. In Further Reading block both links point to the same URL.
Thank you for pointing that out, Eugene! It is fixed now :)
Very excited about this series! Been learning this myself.
I got an Arduino kit, it's great fun.