
Two years ago, I found myself alone over the Fourth of July and a bit bored. So, of course, I did the reasonable thing and conducted a performance comparison of a few of the cooling options available for the Raspberry Pi 3B. This comparison resulted in my post "Raspberry Pi Heat Sink Science".
2020 and its Pandemic has gifted me with even more isolation (ahem social distancing 😷) this Fourth, so why not make the best of it and create Raspberry Pi Heat Sink Science Episode II: The 4th Awakens! This time with Raspberry Pi 4Bs! Raspberry Pi 4s have way more RAM (up to 8GB) and also run faster than their predecessor -- their quadcore ARM A72 can be overclocked to upward of 2GHz. Unfortunately, they also need more power and run much hotter.
I'm super excited about having more RAM, so I'm planning on modernizing my Raspberry Pi Kubernetes Cluster for 2020, but want to dig into just how much hotter these things get since that might affect my build design. I also just wanted an excuse to buy a ridiculous cooling tower for a Raspberry Pi. 😅
Configurations and Components
I will be testing a Raspberry Pi 4B 4GB under the following configurations.
Full disclosure: these are Amazon affiliate links, so if you buy anything from them I'll receive a small percentage as compensation. It might help me recoup some of the costs of these experiments. 🙏
- No Heatsink
- Heatsink (with Thermal Paste)
- Heatsink + 30mm Fan
- Power over Ethernet (PoE) Adapter with 25mm Fan
- Argon NEO Case
- GeeekPi Cooler Tower Heatsink + 40mm RGB Fan
Because having a stable power source matters when overclocking the Raspberry Pi 4, I chose to use an 18 Watt/3.5 Amp power supply by Argon that had pretty good reviews. For the Power over Ethernet experiment, I used a tp-link 4-port PoE switch.
Methodology
I started testing with a stock Raspberry Pi 4 using the latest firmware. At 1.5 GHz it was incredibly stable, even with no heatsink. This was boring. So the first thing I did was overclock my Pi to 2.0 GHz. This was surprisingly easy and stable with a decent power supply.
Benchmarking the Raspberry Pi 4
In my previous post, I used the stress tool to create synthetic load on the Raspberry Pi's CPU. This time I wanted to do something slightly more real and opted to use sysbench and its prime number verification test to create CPU load.
sysbench --test=cpu --cpu-max-prime=50000 --num-threads=4 run
Measuring Temperature and CPU Clock Frequency
While running this benchmark, I ran this script in the background to output a CSV containing the temperature and CPU frequency for every second of the experiment. Feel free to check out the script itself, but the important bits are the vcgencmd measure_temp command for getting the Raspberry Pi's temperature and the vcgencmd measure_clock arm command for getting the current clock frequency of the Pi's ARM processor.
The vcgencmd measure_clock arm command was a new one for me. Last time I just used whatever was in the /sys/devices/system/cpu/cpu0/cpufreq/scaling_cur_freq file, but discovered that this is more like a "desired frequency." The vcgencmd measure_clock arm command was giving me the actual frequency, which is useful for detecting thermal throttling1.
$ vcgencmd measure_temp
temp=34.0'C

$ vcgencmd measure_clock arm
frequency(48)=2000478464
To chart the results I used Python and friends: Pandas, Matplotlib, and Seaborn. If you're curious, you can check out my (pretty rough) plotting code here.
The benchmarks typically took around three minutes to complete (completion time is indicated by a vertical dashed line on the graphs), and measurements were collected for five minutes to see how quickly the Pi cooled back down. So without further ado, let's look at some results!
1 - The Raspberry Pi 4 will thermal throttle, or slow down its CPU, when its temperature is between 80-85°C, so this clock frequency measurement can tell us just how much!
Experiment 1: No Heatsink
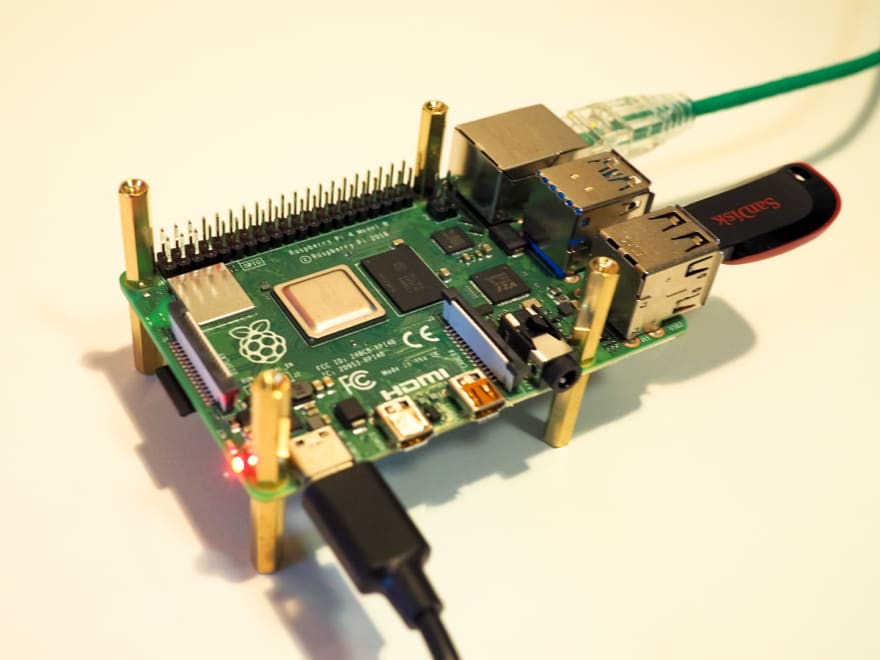
The first experiment I ran was with the Pi in its default configuration: no heatsink whatsoever. Just the processor's heat spreader. Unsurprisingly this configuration fared the worst.
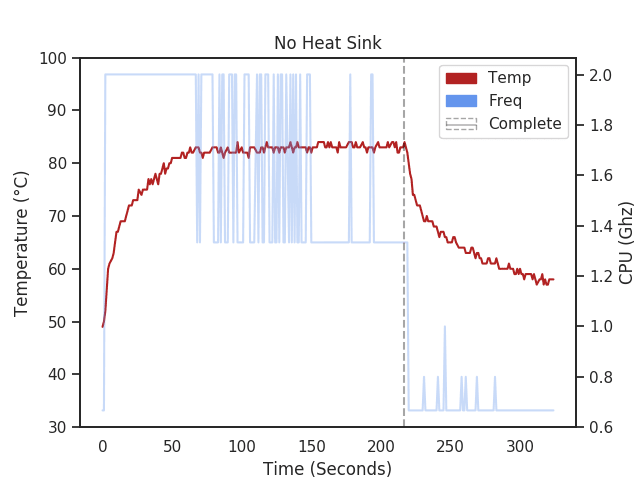
The sysbench CPU benchmark took around 216 seconds to complete -- almost 40 seconds longer than the other configurations -- and the Pi exhibited significant thermal throttling. Notice how the CPU frequency oscillates between 2.0 and 1.3 GHz.
Temperatures started out fairly high at around 50°C and quickly reached the throttle zone. Without any cooling the Pi never reached its base temperature during the five minute measurement window.
Noise levels: Silent! It's not cooled at all!
Experiment 2: Heatsink (with Thermal Paste)
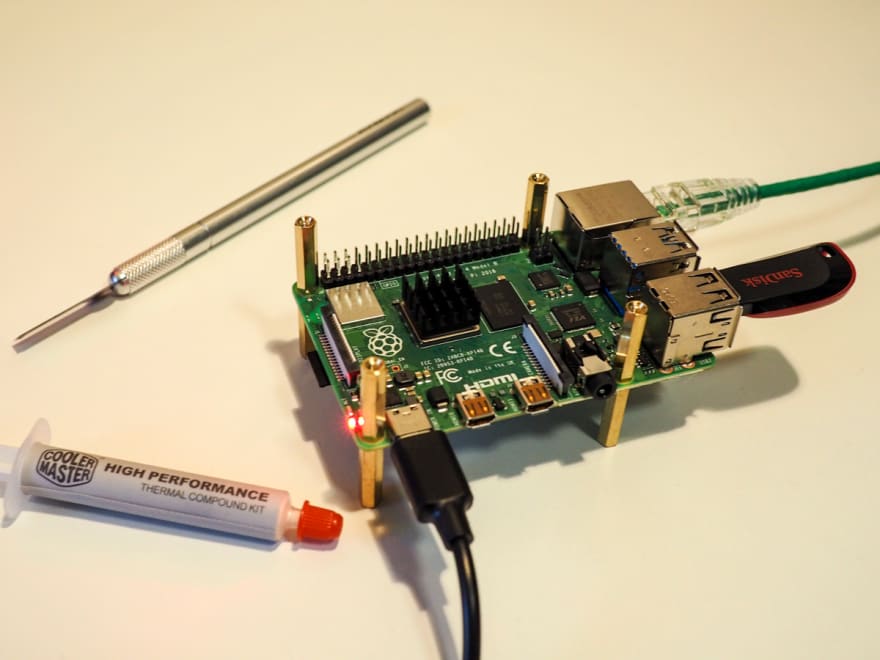
For the second experiment I used a cheap aluminum heatsink and some inexpensive Cooler Master thermal compound to affix it to the CPU.
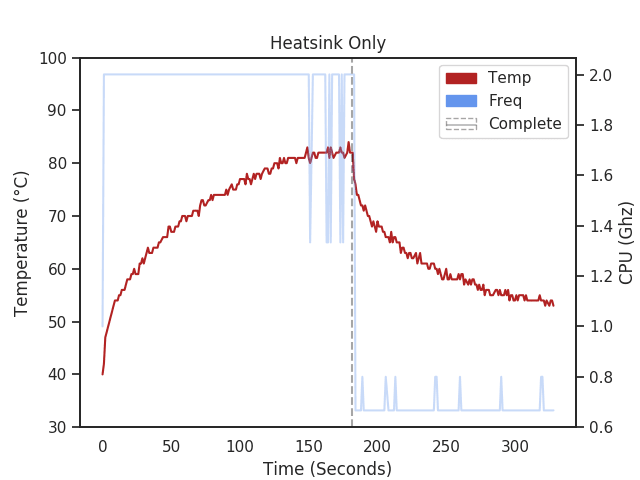
The benchmark took around 181 seconds to complete -- significantly faster than the previous experiment.
Temperatures started out much lower at around 40°C. They still reached the thermal throttle zone, but it took much longer to get there. The throttling didn't begin until 150 seconds into the experiment, whereas with no heatsink throttling started just 60 seconds in. This is a significant improvement and shows that if your Pi is typically used with short, bursty workloads you can likely get by with just a simple heatsink. If your Pi is running sustained CPU-intensive workloads, however, the heatsink alone won't suffice.
🙉 Noise Levels: Silent! It's passively cooled.
Experiment 3: Heatsink + 30mm Fan
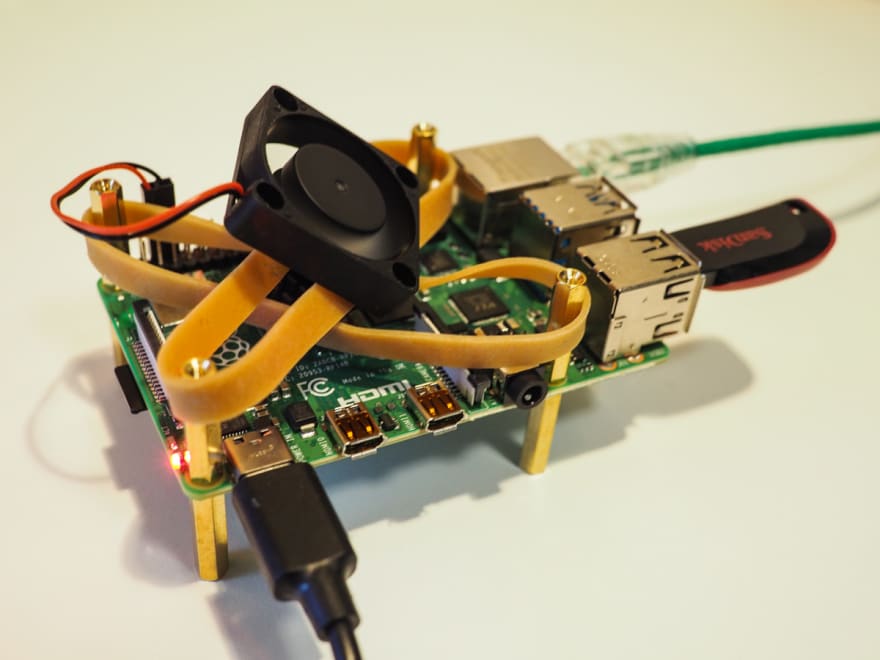
For the third experiment I kept the same heatsink on and added a cheap 30mm Raspberry Pi fan that I ordered. Unfortunately, the fan came with no mounting hardware so I had to improvise with some rubber bands. It's not pretty, but it got the job done.
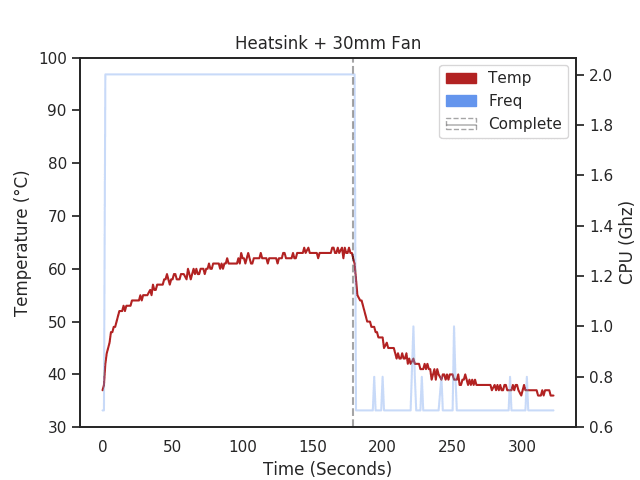
The benchmark took a little over 178.6 seconds to complete. A few seconds faster than with the heatsink alone and basically the same result as the following tests.
Temperatures were much improved with just this simple fan. We started at 37°C and reached 64°C at our highest point. There was no thermal throttling and the Pi was able to rapidly cool itself back down. If I actually had a case to mount this fan on, I could probably stop here. But I don't, and we've got more experiments to run!
🙉 Noise Levels: Medium. The 30mm fan was pretty quiet. There was a slight hum, but nothing too bad.
Experiment 4: Power over Ethernet Adapter + 25mm Fan
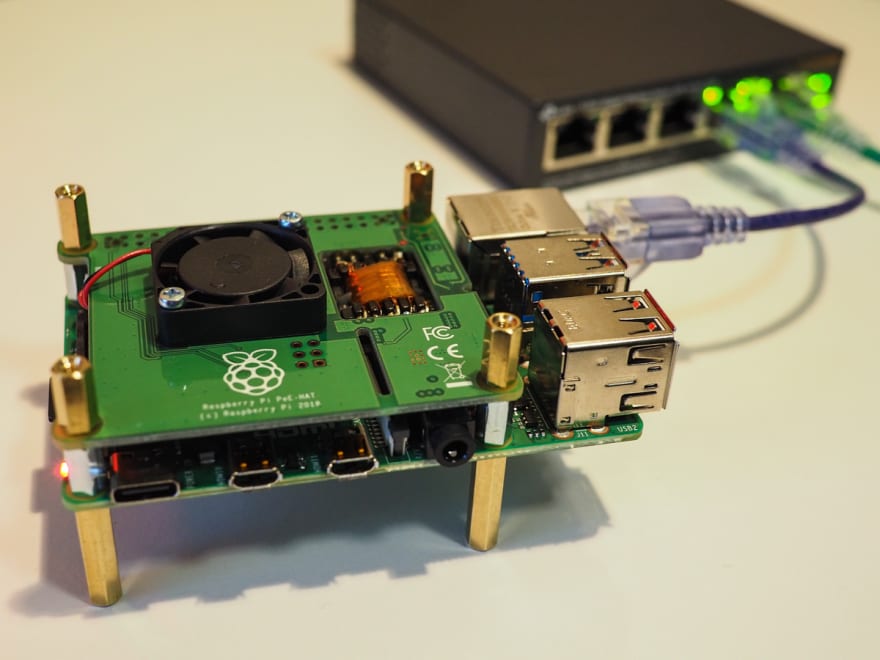
The fourth experiment was probably the most practical one for me. As I mentioned earlier, for my next Kubernetes cluster I'm planning on powering the Pis with Power over Ethernet (PoE) so that I don't have to mess around with a handful of expensive power supplies. The PoE adapter (aka PoE Hat) comes with a built in 25mm fan. Since my cluster will have multiple Pis in close proximity it's important that this adapter can keep it cool.

Like before, the benchmark took a little over 178.6 seconds to complete. It was a few milliseconds faster than the 30mm fan, but since I only ran the benchmark once this isn't enough data to claim it was absolutely faster.
Temperatures were great -- we maxed out at around 62°C with no thermal throttling. I'm pretty confident now that this will do fine in a clustered-configuration.
🙉 Noise Levels: Medium-Loud. The 25mm fan was fairly loud and pretty whiny. In a cluster I could see this definitely getting annoying. So if you're using Raspberry Pis because they're quiet... you might want to reconsider if you plan on using the PoE adapter. I mean, it's not that bad, but if you are running it in a small dorm or apartment I could see it being a nuisance.
Experiment 5: Argon NEO Case
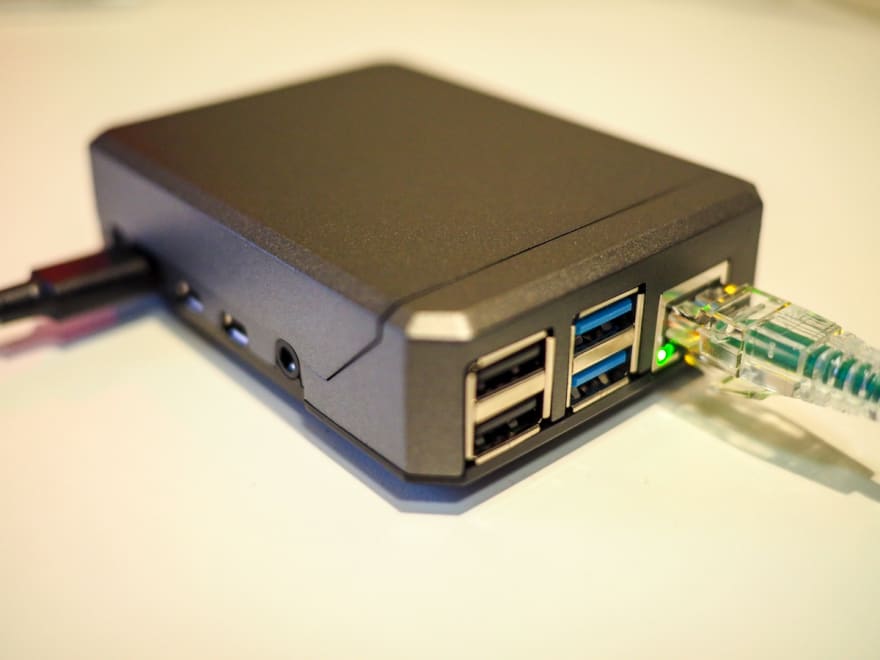
For the fifth experiment I tested a case that I purchased for its aesthetics. The Argon NEO case is made of aluminum and pretty slim. For $15 it feels really high quality and makes the Pi look like a "real" computer!
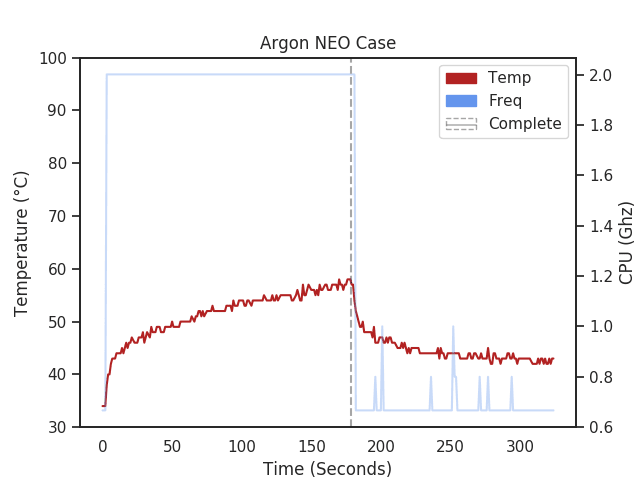
Internally the Argon NEO is affixed to the Pi's CPU with a piece of included thermal tape. This connects it to an aluminum column that lets it radiate heat throughout the entire case. Effectively making it into a massive heatsink! The results speak for themselves. We start at 34°C and make a very gradual climb as the benchmark runs. It tops out at 58°C -- our best performance yet!
I thought for sure that the small size of the case would inhibit air flow and cause it to get pretty hot, but I was pleasantly surprised with how well it performed2. For my Raspberry Pi 3 I've been using a Flirc Case that I've been pretty happy with. This one, however, definitely gives it a run for its money.
🙉 Noise Levels: Silent! It's passively cooled.
2 - I ran a longer experiment later and the Argon NEO was not able to keep a Pi cool when under load for hours at time. See the update at the bottom of the post for more details.
Experiment 6: Cooling Tower + 40mm RGB Fan
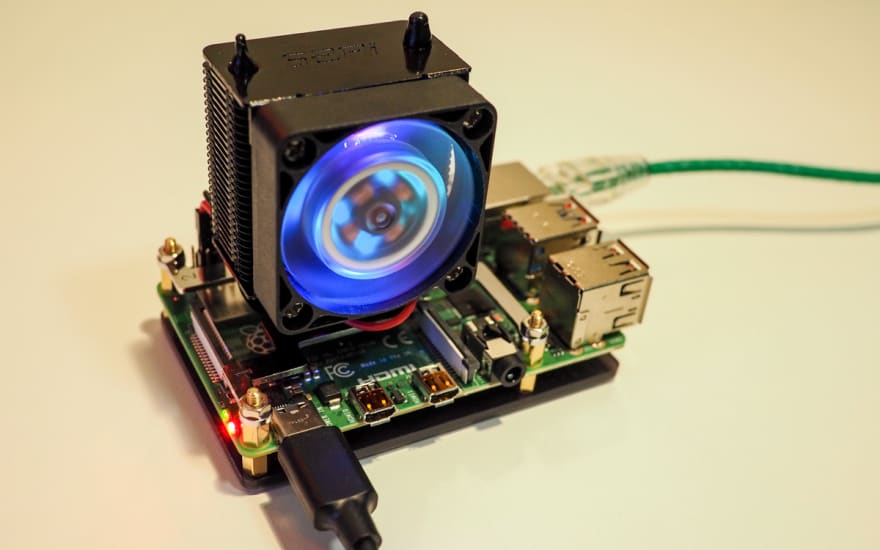
For the sixth and final experiment I got to test out my fun new toy: a cooler tower with a 40mm RGB fan that Amazon had recommended to me (they know me too well). It was a little irritating to assemble and mount, but overall not too bad.

As you can clearly see, this configuration performed the best. We started out at ~32°C and reached a peak of 50°C. The large heatsink tower with its (supposedly) copper heat pipes did an excellent job at drawing heat away from the CPU and the large, flashy RGB fan was able to blow all that heat away. Not only that, but it was able to cool the Pi back down extremely quickly once the benchmark had finished.
The only downsides are that it's bulky (about triples the height of the Pi) and cost the most at $22.
🙉 Noise Levels: Quiet. The quietest of the three fan configurations. The fan can also be powered off of the 3.3v port for even quieter operation (at the cost of higher temperatures). Pretty good!
Summary
If all you care about is absolute cooling performance, go with the cooler tower. It looks a bit ridiculous, it's expensive, and it's bulky, but it can sure keep a Pi cool.
However, if you can spare a few degrees and would prefer a more protective and practical case, I strongly recommend the Argon NEO. This case is good if you have short (under 10 minute) bursty load, but not if you expect to run the Pi under sustained CPU load. Otherwise seek something with active cooling.
If you want to get by on a budget, just buy an aluminum heatsink. They only cost a few cents each when purchased in bulk. If you think you're likely to have sustained CPU intensive workloads, spend a few dollars more and get a case with a small fan.
If you're interested in the PoE adapter because you want it for its Power over Ethernet capabilities, know that it will do a fine job at cooling your Pi. However, definitely don't buy it just for the fan! I'm satisfied enough, though, that the PoE adapters will be good enough for my future cluster.
Important Update
2020-07-06
I was impressed with the Argon NEO so chose to use it to run some long-running CPU-intensive tasks. I checked in on it later and just about burned myself on it! 🔥🚒
It was so hot I decided to put it on a silicone coaster to protect the furniture and run some longer tests. Here are the results of it versus the Cooler Tower when run for the better part of a day.
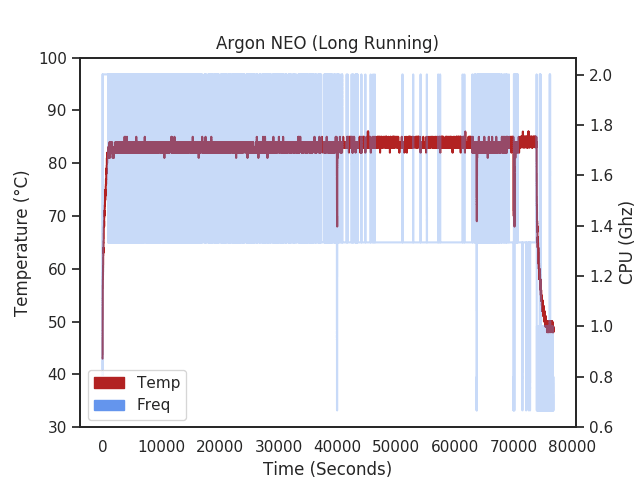
After around 10 minutes of continuous CPU load the Raspberry Pi in the Argon NEO case eventually reached 80°C and reached a max temperature of 86°C. During this time it experience significant thermal throttling and was unable to cool itself back below 80. Once the CPU load was removed it took the case a while to passively cool the Pi back down to reasonable levels.
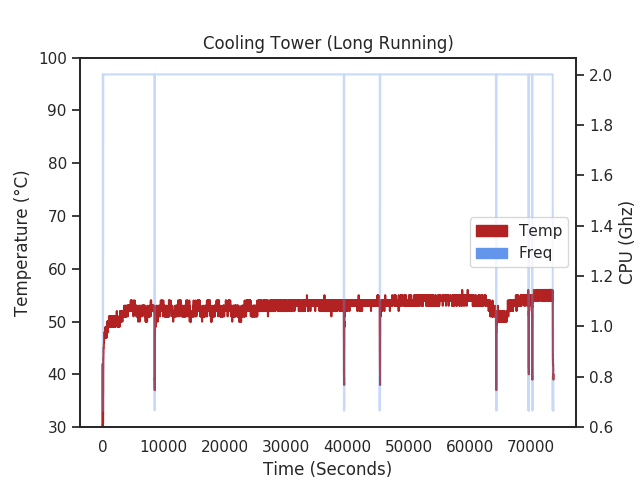
The Cooling Tower + 40mm fan, on the other hand, only reached a max of 32°C and was able to rapidly cool itself back to the baseline once the experiment stopped.

Top comments (0)