
Let's continue our journey.
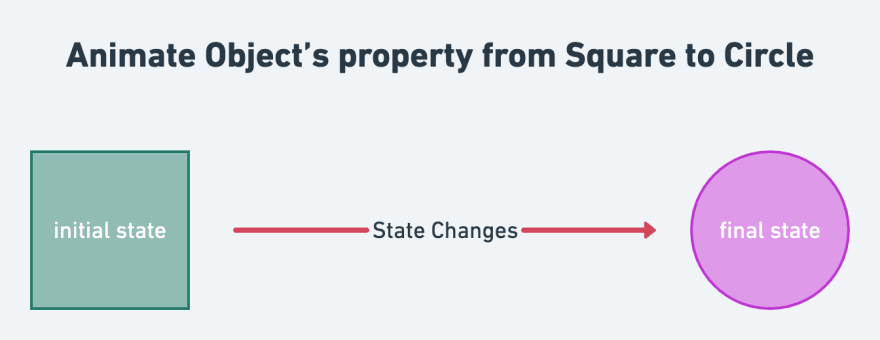
In the PART 1, we talked about the type of animation, the difference between Implicit and Explicit animation, how animation works, and we said that animation changes over time from its initial state to its final state, and there are four steps to follow to animate an object in SwiftUI, we called them the dancing rhythm of animation. Which were:
- Create a state variable for the object's property
- Add the states variables to the properties we want to animate.
- Define how we trigger the animation using user interaction.
- Add animation modifier to the properties.
From the previous lesson, you may have some questions on your mind about:
What is .easeIn parameter?
How do we control the duration of our animation?
How do we delay the start of our animation work?
How do we repeat and reverse our animation?
Therefore, today we'll talk about other parameters that the .animation() modifier has.
So, fasten your seat belts, and let's sail our world.
Project
As usual, let's open Xcode then create a new project.
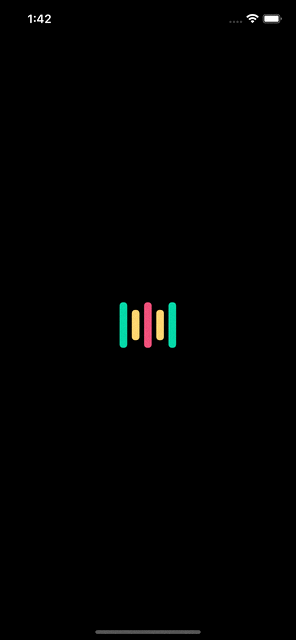
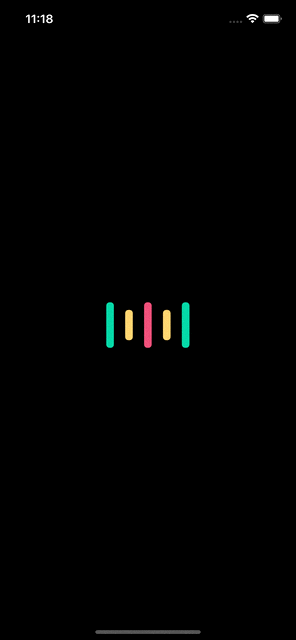
This is the pretty swanky animation that we're going to cook.
Now, without wasting more time on design, copy the following code snippet, then I will explain it to you.
var body: some View {

   HStack(spacing: 15){

            Capsule(style: .continuous)
                .fill(Color(#colorLiteral(red: 0.02352941176, green: 0.8392156863, blue: 0.6274509804, alpha: 1)))
                .frame(width: 10, height: 60)

            Capsule(style: .continuous)
                .fill(Color(#colorLiteral(red: 1, green: 0.8196078431, blue: 0.4, alpha: 1)))
                .frame(width: 10, height: 40)

            Capsule(style: .continuous)
                .fill(Color(#colorLiteral(red: 0.937254902, green: 0.2784313725, blue: 0.4352941176, alpha: 1)))
                .frame(width: 10, height: 60)

            Capsule(style: .continuous)
                .fill(Color(#colorLiteral(red: 1, green: 0.8196078431, blue: 0.4, alpha: 1)))
                .frame(width: 10, height: 40)

            Capsule(style: .continuous)
                .fill(Color(#colorLiteral(red: 0.02352941176, green: 0.8392156863, blue: 0.6274509804, alpha: 1)))
                .frame(width: 10, height: 60)
        }
    }
Here we only have five Capsule shapes that have different heights with a spacing of 15, nothing complicated.
Before we continue, we'll switch our simulator from light to dark mode, by pressing Command + Shift + A, then this is the result, of course, without any animation.
The first thing we have to do to animate something by following the dancing rhythm of the animation steps is what? Yes, your answer, friend.
You are amazing, that's right, is:
1. Create a state variable for the object's property.
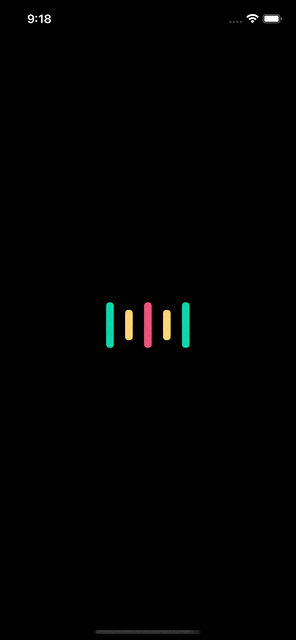
We want to animate the spacing within our HStack. Therefore, the property or parameter that needs to animate is spacing.
@State private var spacingAnimation: CGFloat = 15
Afterward, the second step is what?.
Fantastic, yes it is.
2. Add the states variables to the properties we want to animate.
So, we'll add our state to spacing.
 HStack(spacing: spacingAnimation){
               .
               .
               .
}
If we understand the four steps to animate an object ( the dancing rhythm of animation ) well, we can animate anything, not only opacity or color.
Now, the third step is:
3. Define how we trigger the animation using user interaction.
As we learned from PART 1, we need something that can trigger our animation. we have onTap, onDrag, onAppear when loading the screen the first time, even when the user scrolls in our app.
This time we'll be using, onAppear modifier, and we'll define the final state of our animation in it.
So add it in HStack.
  HStack(spacing: spacingAnimation){
              .
              .
              .

            Capsule(style: .continuous)
                .fill(Color(#colorLiteral(red: 0.02352941176, green: 0.8392156863, blue: 0.6274509804, alpha: 1)))
                .frame(width: 10, height: 60)
        }
        .onAppear{
         spacingAnimation = 5
       }
I think we're now familiar with the steps. So the last step is:
4- Add animation modifier to the properties.
Where do you think we should add it?
Exactly, in HStack, It is the one that contains the property we want to animate.
  HStack(spacing: spacingAnimation){
              .
              .
              .

            Capsule(style: .continuous)
                .fill(Color(#colorLiteral(red: 0.02352941176, green: 0.8392156863, blue: 0.6274509804, alpha: 1)))
                .frame(width: 10, height: 60)
        }
        // Here
        .animation(.easeIn)
        .onAppear{
         spacingAnimation = 5
       }
Before we continue, this is the complete code we have so far.
struct LessonTwo: View {

    @State private var spacingAnimation: CGFloat = 15

    var body: some View {

        HStack(spacing: spacingAnimation){

            Capsule(style: .continuous)
                .fill(Color(#colorLiteral(red: 0.02352941176, green: 0.8392156863, blue: 0.6274509804, alpha: 1)))
                .frame(width: 10, height: 60)

            Capsule(style: .continuous)
                .fill(Color(#colorLiteral(red: 1, green: 0.8196078431, blue: 0.4, alpha: 1)))
                .frame(width: 10, height: 40)

            Capsule(style: .continuous)
                .fill(Color(#colorLiteral(red: 0.937254902, green: 0.2784313725, blue: 0.4352941176, alpha: 1)))
                .frame(width: 10, height: 60)

            Capsule(style: .continuous)
                .fill(Color(#colorLiteral(red: 1, green: 0.8196078431, blue: 0.4, alpha: 1)))
                .frame(width: 10, height: 40)

            Capsule(style: .continuous)
                .fill(Color(#colorLiteral(red: 0.02352941176, green: 0.8392156863, blue: 0.6274509804, alpha: 1)))
                .frame(width: 10, height: 60)
        }
        .animation(.easeIn)
        .onAppear {
            spacingAnimation = 5
        }
    }
}
The result.

Answers
We still haven't achieved the desired end result, Therefore, let's answer the questions that were on our minds.
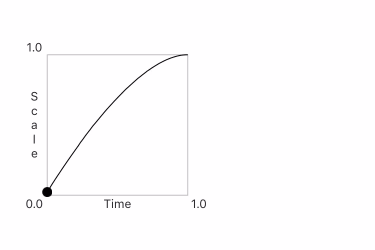
1. What is .easeIn parameter?
It's the animation Curve.
- Curve: the speed of the animation. In other words, how does the animation move? Does it move at a constant speed, or whether it starts out slow and speeds up? or what?.
SwiftUI provides us the following basic animation curves:
- linear: animation at a constant speed.

- easeIn: animation starts slowly and ends at a quick speed.

- easeOut: animation starts quickly and ends at a slow speed ( the opposite of easeIn ).
- easeInOut: animation starts slowly, speeds up, and then ends at a slow speed.

BUT, why did we say basic animation?
Because we can create our own custom curve, which is not our topic today, we'll talk about it later in Advanced Animation, when we want more customization in our animations.
Therefore, these are the four curves that you'll use most of the time in your projects.
In our case, we'll use .easeInOut
.animation(.easeInOut)
2. How do we control the duration of our animation?
The .easeInOut is a static property or variable which is of type Animation struct.
Animation struct has two names of .easeInOut, one is a static variable, the second is a static method. Which needs a required argument, it is duration. But what is this? Why do we need it?
- Duration parameter: the length of the animation. In other words, how long will the animation take from its initial state to its final state?.
By default, the duration of the animation in SwiftUI is 0.35 seconds. So, temporarily we'll use 4 seconds.
.animation(.easeInOut(duration: 4))
As you can see, we've got an animation that slowly changes its state.
Before move on. I'm sure you're a little confused between duration and curve.
You might think that if we had a quick-speed animation such as .easeOut ( starts quickly and ends at a slow speed ), our animation would finish before the time we set. NO, the time is fixed, and depending on the type of speed we chose, the animation speed will be evenly distributed during that time.
3. How do we delay the start of our animation work?
It's easy, just by adding a delay method next to .easeInOut.
We'll add a delay of 4 seconds.
.animation(.easeInOut(duration: 4).delay(4))

4. How do we repeat and reverse our animation?
By adding another method which is repeatForever.
    // I changed the duration and delay to 1 second

    .animation(.easeInOut(duration: 1).delay(1).repeatForever())
By the way, These methods are called chained methods.
Now, our object animates from its initial state to its final state, afterward, our animation repeats from its final state to its initial state
IMPORTANT TO UNDERSTAND
When our object changes from the initial state to the final state, here the animation lifecycle ends, is what it's over, and when we ask SwiftUI to repeat the process, it creates a new lifecycle for our animation, a second or third lifecycle. It depends on how often the process will be repeated.
I hope you understand it well, because lots of developers have confusing about this concept.
Back to our project, if you notice that we have four methods repeatForever:
- repeatForever(): ...
From initial => final state. Going back, from final => initial state.
- repeatForever(autoreverses: Bool): ...
autoreverses = true : The result will be as mentioned above ( the default ).

 autoreverses = false : Here's the trick.

 From initial => final state. Going back, from initial again => final state.
 Our animations will always repeat from the starting point.

Did you noticed the difference between True and False, I don't think there are more words to explain, the GIF made your eyes understand this trick part, be careful about it.
repeatCount(repeatCount: Int): specify how many animation lifecycles, or repeats we want.
repeatCount(repeatCount: Int, autoreverses: Bool): specify the number of repeats with autoreverses, False or True.
Trick About Delay
The position in which we put the delay method is matters.
When we add it after easeInOut(), the delay will occur in the first lifecycle and second, third, and so on.
Therefore, when going back from the final state to the initial state, the delay will occur again.
.animation(.easeInOut(duration: 1).delay(1).repeatForever())

But, when we add it after repeatForever(), the delay will only happen once, only at the beginning of the animation.
.animation(.easeInOut(duration: 1)).repeatForever().delay(1))

Complete Code
Already I have created some SwiftUI Loading Animation, you can use them freely in your project. Also, you will find some things, we still haven't talked about it yet.
My Repository: https://github.com/adamkif/SwiftUI-Loading-Animation
struct LessonTwo: View {

    @State private var spacingAnimation: CGFloat = 15

    var body: some View {

        HStack(spacing: spacingAnimation){

            Capsule(style: .continuous)
                .fill(Color(#colorLiteral(red: 0.02352941176, green: 0.8392156863, blue: 0.6274509804, alpha: 1)))
                .frame(width: 10, height: 60)

            Capsule(style: .continuous)
                .fill(Color(#colorLiteral(red: 1, green: 0.8196078431, blue: 0.4, alpha: 1)))
                .frame(width: 10, height: 40)

            Capsule(style: .continuous)
                .fill(Color(#colorLiteral(red: 0.937254902, green: 0.2784313725, blue: 0.4352941176, alpha: 1)))
                .frame(width: 10, height: 60)

            Capsule(style: .continuous)
                .fill(Color(#colorLiteral(red: 1, green: 0.8196078431, blue: 0.4, alpha: 1)))
                .frame(width: 10, height: 40)

            Capsule(style: .continuous)
                .fill(Color(#colorLiteral(red: 0.02352941176, green: 0.8392156863, blue: 0.6274509804, alpha: 1)))
                .frame(width: 10, height: 60)
        }
        .animation(.easeInOut(duration: 1).repeatForever().delay(1))
        .onAppear {
            spacingAnimation = 5
        }
    }
}
Summary
Today we became know almost 90% of the knowledge about how to animate an object, curves ( easeIn, ... ), delay, repeatForever, repeatCount and autoreverses.
In the next lesson, we'll figure out the other 10%, which will be about animating an object from one state with many points that need to go through before getting the final state ( sequence of animation ), creating our custom curve, and much more.

Top comments (0)