
In the last lesson, we took some theories about animation, therefore, today we're going to make our hands dirty, learn by doing. BUT, Hold on.
We need to understand important concepts of animation before jumping into the code, bring your own coffee and focus with me POR FAVOR.
In our life, if you have a glass of water and feel thirsty, what organism in your body would you use to drink water, of course, you would use your hand which in turn is part of the arm to hold a glass of water, naturally, you would not use your ear 😅😅.
We're not in Physiology classes on the human body. Do not panic.

Hence, The object is your arm, and the property is your hand, the initial state of your hand was close to you, then you moved your arm and specifically the property of your hand to the final state to hold a glass of water and drink it.
Animation works like this, we need to know the object whose state we want to change, and specify the property of the object we want to animate, such as opacity or color properties.
To jump into the code, you should know that there are two types of animations:
Code-based animations: animations implemented via code, such as animate the size of this object,
scale, position, opacity, color, and rotation angle.Drawing-based animations: these animations look like someone drew them,
usually done using paths.
Drawing-based animations are advanced animations, so don't worry, we'll learn them until
we've mastered code-base animations and most of the time developers use external packages of this type of animation, like Lottiefiles or GIFs.
Therefore, our focus will be on Code-based animations which in turn has two types:
Implicit animations: changes the object's properties caused by animation() modifier.
Explicit animations: changes the object's properties caused by withAnimation() closure.
I know these definitions mean nothing to you now but it's the heart of animation if you understand it, you're halfway to animating anything. Also at the end of this lesson, I will explain the difference between implicit and explicit animation in more detail.
I'll explain the Implicit animations first, then the Explicit animations, all right.
Implicit Animation
Let's get started, open Xcode, and create a new project, then create the object we want to animate, the object is Rectangle.
 var body: some View {
        VStack{

            Rectangle()
                .fill(color.green)
                .frame(width: 100, height: 100)
                .cornerRadius(3.0)

    }
}
Before continue, there are four steps to follow to animate an object in SwiftUI, they are the dancing rhythm of animation.
1. Create a state variable for the object's property.
In our case, we want to animate the Color and Corner Radius property, then define the initial state of those properties.
@State private var rectColor: Color = Color.green
@State private var rectCornerRadius: CGFloat = 0
2. Add the properties to the modifiers we want to animate.
To .fill() and .cornerRadius() modifiers.
 var body: some View {
        VStack{

            Rectangle()
                .fill(rectColor)
                .frame(width: 100, height: 100)
                .cornerRadius(rectCornerRadius)

    }
}
3. Define how we trigger the animation using user interaction.
By onTap, onDrag, onAppear when loading the screen the first time, even when the user scrolls in our app. something can run out of our animation.
We will use a button to trigger our animation, then define the final state of our properties, Color and Corner Radius.
 VStack(spacing: 140){

       Rectangle()
                .fill(rectColor)
                .frame(width: 100, height: 100, alignment: .center)
                .cornerRadius(rectCornerRadius)

            Button(action: {
                rectColor = Color.pink
                rectCornerRadius = 50
            }) {
                Text("Animate the Box")
                    .foregroundColor(.white)
                    .bold()
            }
            .padding()
            .background(Color.blue)
            .cornerRadius(15)
        }
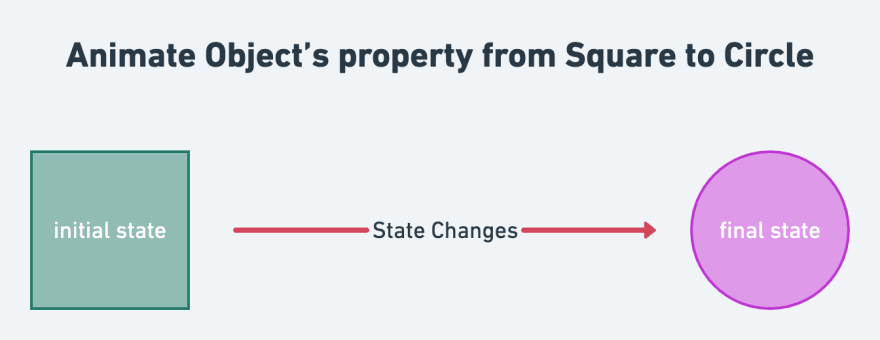
Our design will be like this:

If you click the button to trigger the animation, you'll notice that the state of the object will immediately change from 0 to 50 without any smooth animation. It's boring for your eyes, it's not realistic, in our life, things don't move like that, I'm right.
Therefore we will need to add a modifier to ask SwiftUI,
Please change the state of the object properties from square to circle in a smooth manner.
So, the fourth step is:
4- Add animation modifier to the properties.
  VStack{

        Rectangle()
                .fill(rectColor)
                .frame(width: 100, height: 100)
                .cornerRadius(rectCornerRadius)
                .animation(/*@START_MENU_TOKEN@*/.easeIn/*@END_MENU_TOKEN@*/)
    }
Now build your app and run the animation, you'll get a smooth animation, the states gradually change from the initial state to the final state, and SwiftUI automatically computes and renders the animation, that's what I mean by state changes over time. Your eyes can see changes that happen gradually rather than immediately.

Wait a minute, what about .easeIn parameter, where did it come from, what is its role?
In nutshell, it is the speed of the animation, how does the animation move, does it move at a constant speed or slow, or what, we will explore more details about it in PART 3 with other parameters.
We're not done yet, you should be aware of something, .animation() modifiers will only apply to all properties directly above it, nothing below will not. move the animation modifier over the corner radius property, you'll notice strange behavior, the corner radius state changes instantly instead of being smooth. So be aware.
  VStack{

      Rectangle()
                .fill(rectColor)
                .frame(width: 100, height: 100)
                .animation(/*@START_MENU_TOKEN@*/.easeIn/*@END_MENU_TOKEN@*/)
                .cornerRadius(rectCornerRadius)
    }
Explicit Animation
Finally, let's talk about Explicit animations, then just remove the .animation() modifier and add the closure withAnimation() instead, in the button
  VStack(spacing: 140){

      Rectangle()
                .fill(rectColor)
                .frame(width: 100, height: 100, alignment: .center)
                .cornerRadius(rectCornerRadius)

            Button(action: {
                // Here
                withAnimation(.easeIn) {
                    rectColor = Color.pink
                    rectCornerRadius = 50
                }

            }) {
                Text("Animate the Box")
                    .foregroundColor(.white)
                    .bold()
            }//End of Button
            .padding()
            .background(Color.blue)
            .cornerRadius(15)
     }
We'll get the same result as before, changes happen gradually and smoothly in the animation.
Now that we have seen the implicit and explicit animations, what is the difference between them?.
The Difference
The difference between them is in explicit animation, we tell SwiftUI, this state variable will change depending on the animation, we're explicit with it, implicit animation is the opposite, somehow, SwiftUI won't know that state will depend on the animation, only after finding the .animation() modifier, then the animation will happen.
Summary
This is how the animation behaves in our app is not a magical thing, all the animation we see in our life we can implement via code, but only if we understand how the animation changes from its initial state to its final state. In the next lesson, we'll continue our journey and dig deeper into the .animation() modifier.

Top comments (0)