TL;DR:
This post dives into one of the newer capabilities of the Gemini 2.0 Flash model, continuing the conversation from where we left off after looking at its audio generation capabilities. By the end of this post, you'll know how to use the Gemini API (via Google AI) for (simple) image generation.
UPDATE (Apr 2025): This post made it to Dev.to's Top 7 Featured DEV Posts of the Week around the time of Google Cloud NEXT, so check this article highlighting the biggest launches. Many thanks to all readers and DEV editors for this recognition!
NOTE: the Gemini 2.0 audio & image generation "output" features from this and the other post are not available in the newer Gemini 2.5 models, which focused on adding reasoning capabilities. See this chart for the capabilities of all Gemini models.

Introduction
Thanks for stopping by my blog covering how to use Google APIs from Python (and sometimes Node.js). While there's much hype today around AI agents, MCP, and fine-tuning open models like Gemma, there are occasions where it's more efficient and cost-effective to access a big name proprietary LLM like Gemini, an all-purpose, multimodal model.
For image generation, there are even more choices, considering there are dedicated AI programs for this purpose, like Midjourney, DALL-E, and Stable Diffusion. The main issue for developers with these is that API access isn't straightforward. There may not be an API, requiring you to use an app, and most importantly, it's unlikely to be free. Even Google's higher-quality Imagen model isn't free to use.
Perhaps you're new to AI or wish to experiment with the Gemini API before integrating into an application. Using the Gemini API from Google AI is the best way for you to get started and get familiar with using the API. The free tier is also a great benefit. Then you can consider moving any relevant (Gemini API) work over to Google Cloud/GCP Vertex AI for production.
Rather than strictly being an end-user of ChatGPT or Gemini, accessing LLMs programmatically via API allows you to automate processes as well as integrate AI capabilities into your applications. For the purposes of this post, if you're already using the Gemini API, whether text input, multimodal input, or audio generation, you might as well add image generation to your skillset. And if you're completely new to AI or accessing Gemini via API, any of these posts will get you started!
Prerequisites
Although Google published a developer blog post announcing the image generation feature, most of the post oddly focuses on its use within AI Studio and barely contains any code. What little code there is shows up at the bottom and is severely lacking for real use. The documentation does a better job and also includes examples of image editing with Gemini as well as using the more-capable Imagen model.
The image generation samples in the docs served as motivation for the code featured here. In addition, the samples below also demonstrate one way of requesting generated text along with the image as well as giving developers different options for providing the API key. Before jumping into the code, check these two boxes off:
- Create API key
- Install required packages
Create API key
Create an API key (if you don't already have one). Then save it via one of these options:
- Assign API key to
GOOGLE_API_KEYenvironment variable (easiest, and simplifies your code), or - Save as
GOOGLE_API_KEY = 'YOUR_API_KEY'locally tosettings.py(Python) or.env(Node.js)
If saving locally, Python developers can also choose to save it to .env instead of settings.py but would have to add use of the python-dotenv package to more closely mirror working in a Node.js environment. There's also the GCP Secret Manager as yet another option. Regardless of which technique you use, review the suggestions in the sidebar below to protect it!
⚠️ WARNING: Keep API keys secure
Storing API keys in files (or hard-coding them for use in actual code or even assigning to environment variables) is for prototyping and learning purposes only. When going to production, put them in environment variables or in a secrets manager. Files likesettings.pyor.envcontaining API keys are susceptible. Under no circumstances should you upload files like those to any public or private repo, have sensitive data like that in TerraForm config files, add such files to Docker layers, etc., as once your API key leaks, everyone in the world can use it.If you're new to Google developer tools, API keys are one of the credentials types supported by Google APIs, and they're the only type supported by Maps APIs. Other credentials types include OAuth client IDs, mostly used by GWS APIs, and service accounts, mostly used by Google Cloud (GCP) APIs. While this post doesn't cover Google Maps, the Maps team put together a great guide on API key best practices, so check it out!
Install required packages
-
Python:
pip install -U google-genai pillow(orpip3) -
Node.js:
npm i @google/genai dotenv(removedotenvif API key inGOOGLE_API_KEYenvironment variable)
Both versions import the newer, more flexible Gemini API client library (allowing developers to call the Gemini API from both Google AI and GCP Vertex AI platforms).
The Python version also imports the PIL-compatible Pillow library while the Node version optionally imports dotenv if storing the API key in the GOOGLE_API_KEY environment variable.
If you clone the overall samples repo and go to the Gemini images folder, you can shorten the installation commands, leveraging requirements.txt (Python) or package.json (Node.js) which contain the required packages:
-
Python:
pip install -Ur requirements.txt(orpip3) -
Node.js:
npm i
Alternatively, if you're a Python developer familiar with the wonders of uv, run these commands instead:
- Update
pip&uv(if nec.):pip install -U pip uv - Install packages:
uv pip install -Ur requirements.txt
The application
Now let's look at both the Python and Node.js versions of the image generation app.
Python
The sample app gem20-image.py asks Gemini to create an image of a cat in a spacesuit driving a moon buggy. It also asks the model to return a caption for the image complementing the generated image.
The code
Let's jump into the app starting with the imports and constants:
from io import BytesIO
from PIL import Image
from google import genai
from settings import GOOGLE_API_KEY

MODEL = 'gemini-2.0-flash-exp'
GENAI = genai.Client(api_key=GOOGLE_API_KEY)
CONFIG = genai.types.GenerateContentConfig(
        response_modalities=['Text', 'Image'])
PROMPT = 'Create an image of a cat in a spacesuit driving a moon buggy. ' \
            'Also return a caption for the image.'
FILENAME = 'spacecat.png'
Within the imports, you'll find several key resources that power the app:
-
io.BytesIOfile-like object to contain the generated image (then saved locally to disk) - Gemini API
genaiclient library (and itstypessub-module) - Pillow PIL-compatible library that does that actual local image save
The last import brings in the API key from settings.py. However, if you store it in the GOOGLE_API_KEY environment variable, you can shorten the app by deleting this pair of lines...
from settings import GOOGLE_API_KEY

GENAI = genai.Client(api_key=GOOGLE_API_KEY)
... and replacing them with this one line that reads the API key from GOOGLE_API_KEY by default:
GENAI = genai.Client()
After the imports come the constants, outlined in the following table:
| CONSTANT | Description |
|---|---|
MODEL |
Gemini 2.0 Flash (Experimental) model |
GENAI |
Gemini API client object |
CONFIG |
Model configuration (response modalities) |
PROMPT |
Prompt as described earlier |
FILENAME |
Filename of generated image to save |
The rest of the code makes up the heart of the application:
print(f"MODEL:\t\t'{MODEL}'\nPROMPT:\t\t'{PROMPT}\n")
response = GENAI.models.generate_content(
        model=MODEL, contents=PROMPT, config=CONFIG)

for part in response.candidates[0].content.parts:
    if part.text:
        print(f"CAPTION:\t{part.text.strip().replace('**Caption:** ', '')}")
    elif part.inline_data:
        image = Image.open(BytesIO((part.inline_data.data)))
        image.save(FILENAME)
        print(f'IMAGE:\t\t{FILENAME}')
The first part sets up the end-user output, and more importantly, issues the LLM query, passing the API the model requested, prompt, and configuration, including the response modalities. The models.generate_content() method is called to execute the API request.
The rest of the code parses the response, extracting the generated image as well as the caption, displaying the latter (after minor cleanup) and saving the former locally to disk with the requested filename.
Running the script
Running the script produces an image file along with a generated caption appropriate for the image:
$ python3 gem20-image.py
MODEL:      'gemini-2.0-flash-exp'
PROMPT:     'Create an image of a cat in a spacesuit driving a moon buggy.
Also return a caption for the image.

IMAGE:      spacecat.png
CAPTION:    Just another cat-stronaut cruising the lunar
terrain in his purr-fectly engineered moon buggy.
Your mileage may vary, but this is the image I got:
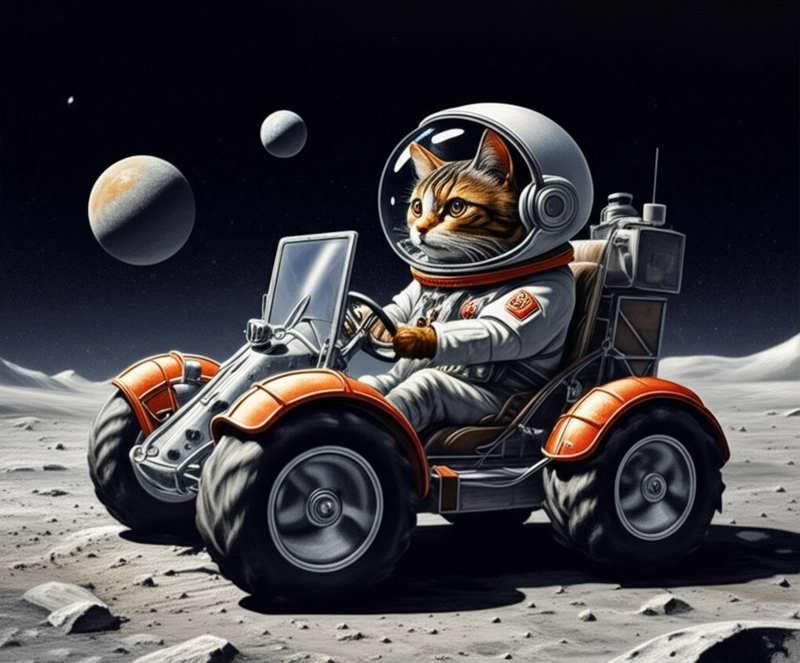
gem20-image.py])
Node.js
Now let's look at the modern ECMAscript module gem20-image.mjs.
The code
As with Python, the JS module starts with imports and constants:
import * as fs from 'node:fs';
import dotenv from 'dotenv';
import { GoogleGenAI } from '@google/genai';

dotenv.config();
const MODEL = 'gemini-2.0-flash-exp';
const GENAI = new GoogleGenAI({ apiKey: process.env.GOOGLE_API_KEY });
const CONFIG = { responseModalities: ['Text', 'Image'] };
const PROMPT = 'Create an image of a cat in a spacesuit driving a moon buggy.'
                + 'Also return a caption for the image.';
const FILENAME = 'spacecat.png';
The Node app imports the Gemini API client library as well as fs to save the generated image. If the API key is stored in .env, import dotenv to copy those values to environment variables.
If storing the API key in the GOOGLE_API_KEY environment variable, simplify the code by deleting this pair of lines in the app (because the API key will already be an environment variable [no need to read from .env]):
import dotenv from 'dotenv';

dotenv.config();
Now for the main part of the app:
async function main() {
  // Generate image with Gemini 2
  console.log(`MODEL:\t\t'${MODEL}'\nPROMPT:\t\t'${PROMPT}'\n`);
  const response = await GENAI.models.generateContent({
      model: MODEL, contents: PROMPT, config: CONFIG});

  for (const part of response.candidates[0].content.parts) {
    if (part.text) {
      console.log(`CAPTION:\t${part.text.trim().replace('**Caption:** ', '')}`);
    } else if (part.inlineData) {
      const image = part.inlineData.data;
      const buffer = Buffer.from(image, 'base64');
      fs.writeFileSync(FILENAME, buffer);
      console.log(`IMAGE:\t\t${FILENAME}`);
    }
  }
}

main();
Identical in functionality to the Python version, the first chunk of code creates the API client and calls the API with the model, prompt, and config. The closing for-loop processes the results: Extract the caption & generated image, saving the latter locally while displaying the cleaned-up caption to the end-user.
Running the script
As expected with most LLM results, you're going to get a different caption and generated image... these are what I got:
$ node gem20-image.mjs
MODEL:      'gemini-2.0-flash-exp'
PROMPT:     'Create an image of a cat in a spacesuit driving a moon buggy.
Also return a caption for the image.'

IMAGE:      spacecat.png
CAPTION:    Just another day at the office for this purr-fessional lunar driver.
Here's another take on the "space cat" when I ran this script (and unsure why there's a horizontal white line at the top):

gem20-image.mjs])
CommonJS version
If you prefer a CommonJS version, gem20-image.js, replace these four lines...
import * as fs from 'node:fs';
import dotenv from 'dotenv';
import { GoogleGenAI } from '@google/genai';

dotenv.config();
... with these require() calls ...
const fs = require('fs');
require('dotenv').config();
const { GoogleGenAI } = require('@google/genai');
The extra call to dotenv.config() isn't needed because it's called along with require() in this version. And, if you store your API key in the GOOGLE_API_KEY environment variable, remove all the dotenv lines of code (as well as from package.json).
LLMs usually produce different results each time, and doing so with this version gave me the following caption as well as a different generated image (not shown here):
$ node gem20-image.js
MODEL:      'gemini-2.0-flash-exp'
PROMPT:     'Create an image of a cat in a spacesuit driving a moon buggy.
Also return a caption for the image.'

IMAGE:      spacecat.png
CAPTION:    "One small purr for a cat, one giant leap for feline-kind!"
Now that you've experienced a working demo, feel free to update the prompt (and output filename) with whatever you're interested in seeing Gemini create for you, or grab any part of the code to integrate in your own AI applications. I plant the seeds... it's up to all of you to make it grow!
Summary & next steps
In this post, we continued exploring the capabilities of the Gemini API, this time looking at how to generate images using the 2.0 Flash (Experimental) model from both Python and Node.js. Learn more about image generation in the Gemini API docs from Google AI.
At the time of this writing, there's no Vertex AI docs page covering image generation using Gemini 2.0 Flash (Experimental), only Imagen 3. However, it does appear the model is supported. Drop a comment below if you're able to get a derivative of the code from this post working on Vertex AI.
From here, you can check out other posts in this series (see tables at the top or bottom of this post) or continue to explore other Gemini features, or "jump ahead" and explore the reasoning capabilities of the Gemini 2.5 models, to be covered in upcoming posts.
Drop a comment if you found an error in this post, a bug in the code, or have a topic you'd like me to cover. For bugs, you can also file an issue at the repo. I enjoy meeting users on the road... see if I'll be visiting your community in the travel calendar on my consulting page.
PREV POST: Part 4: Generate audio clips with Gemini 2.0 Flash
References
Below are various links relevant to this post:
Code samples
- Sample in this post (Python & Node.js)
- Code samples for Gemini posts
- Code samples for all posts
Gemini API (Google AI)
- API overview
- API SDKs page
- Image generation
- QuickStart page
- QuickStart code
- GenAI API reference
- Gemini API pricing (free & paid tiers)
Gemini 2.0 & 2.5 models
Other Generative AI and Gemini resources
Google Cloud/GCP Vertex AI
- Vertex AI home page
- Gemini 2.0 Flash on Vertex AI
- All model versions & support lifecycle
- Supported experimental models
Other relevant content by the author
WESLEY CHUN, MSCS, is a Google Developer Expert (GDE) in Google Cloud (GCP) & Google Workspace (GWS), author of Prentice Hall's bestselling "Core Python" series, co-author of "Python Web Development with Django", and has written for Linux Journal & CNET. By day, he's an AI Technical Program Manager at Red Hat focused on upstream open source projects that make their way into Red Hat AI products; at night, he runs CyberWeb specializing in GCP & GWS APIs and serverless platforms, Python & App Engine migrations, and Python training & engineering. Wesley was one of the original Yahoo!Mail engineers and spent 13+ years on various Google product teams, speaking on behalf of their APIs, producing sample apps, codelabs, and videos for serverless migration and GWS developers. He holds degrees in Computer Science, Mathematics, and Music from the University of California, is a Fellow of the Python Software Foundation, and loves to travel to meet developers worldwide at conferences, user group events, and universities. Follow he/him @wescpy & his technical blog. Find this content useful? Contact CyberWeb for professional services or buy him a coffee (or tea)!


Top comments (4)
For those with sharp eyes, there's a minor typo in the Python version which shows up in the output as well. I'll correct it in the repo shortly but will leave it in the post for now. (So nope, these were all written by me, not AI.)
This starts a completely different discussion: Should I ask AI to generate these code samples? Rather than coming with the perspective of, "I need to vibe-code something that runs," my decades of teaching experience tells me, as a software engineer, to write efficient, readable code to help people most effectively learn a concept, choosing pedagogy over automation.
However, if I prompt an LLM with code generation instructions plus that additional bit of reasoning, how closely would it come to resemble what I put together 100% as a human? There's a difference between writing code to perform a work task to get something done vs. code used for teaching purposes that also follows global style guidelines and industry best practices.
good stuff.
🙌🙌🙌🙌🙌🙌🙌🙌🙌🙌🙌🙌🙌🙌🙌🙌🙌🙌
Thx @pedro_a6f4059a2df3c6d57ba ... as mentioned in the post, there's already software & sophisticated LLMs that do this (or you can fine-tune an open model), but they're likely not free nor available via API. Gemini, via its API, is slowly turning into somewhat of a "1-stop shop," convenient for developers already using the API or thinking about it.
Some comments may only be visible to logged-in visitors. Sign in to view all comments.