On the fifth day of Gitmas, my mentee asked of me...
how do I connect these?
what's this "GitHub" of which I've heard,
Git's ready - what then,
how do I get Git set up,
and could you explain Git, pretty please?
Welcome to Day 5 of the 12 Days of Gitmas! Today I'll be teaching how to connect your repository on GitHub to the local one on your computer.
If you've been following along, by now you've probably created a repository on your computer, and created the same repository on GitHub.
Now we're going to connect the two.
If you remember the instructions in the last post, I (and GitHub) said that you should not create a README if you already created the repository locally. If you didn't create a README file, then your repository on GitHub will currently look something like this:

However, if you did create a README file, your GitHub will look more like this - showing the content of the README file instead of instructions for what to do next:

If you did accidentally create a README, it's not the end of the world! You can still follow the instructions here to connect your repositories - the main difference is that you just won't have the instructions showing up on your GitHub repository page.
Whatever you do, you want to start with one repository completely empty, and one with a README or other files already in it.
In order for Git to work properly, all the versions of your repository need to have the same history. Otherwise, Git won't know what changed, and won't be able to do its job. This means that all your repositories have to start from the same place - so if you start with content in both your local repository and your GitHub version of the repository, Git won't know which is the true origin of your history.

If you already had content in your local repository and then you accidentally created your GitHub repository with a README, just delete the GitHub repository and recreate it without a README.
By now, you should have three things - a local repository, a repository with the same name on GitHub, and content in exactly one of those. Now let's connect the two!
In your terminal, paste the following command, except replace the content between brackets with your appropriate repository (so for me, the link might look something like https://github.com/sushicodes/gitmas.git):
git remote add origin https://github.com/[your GitHub username]/[your repository name].git
That https://github.com/[etc., etc.] is the link to clone your repository. If you already have content in your repository on GitHub, you can find it by clicking on the green "Clone or download" button, and then the "Use HTTPS" link in the top right corner of the popup.

If you don't have any content in your GitHub repository, the link is right along the top (click HTTPS - we'll go into the difference between HTTPS and SSH in the next post):

If you started with an empty GitHub repository
First thing first, you need to add some content to your repository! If you already have content, excellent - you can skip the first step. If you don't have anything there yet, you can add a README! The purpose of a README is to explain what your project is about, and/or add documentation for other people who want to work on or use your project. You can put whatever you want in your README, but for now we'll just start out with the name of your project.
If you'd like, you can manually create a file and name it README.md (the .md means it's a markdown file - using the same formatting we use in blogposts on dev.to!) Then, in the file, type # [project name] (replace that with your project's name) - that creates a header, with the name of your project.
BUT WAIT - there's a way to do this directly in the command line! Just type:
echo "# [project name]" >> README.md
(again - replace that with your own project name), and the README file will be created for you!

Alright, step 2 - start here if you already had content in your project and didn't want to create a README.
If you type:
git status
you'll see a list of all the files that have new changes since your history.
Then you can manually add them one by one, by typing
git add [filename]
(for example, git add README.md) for each file. OR if you know you definitely want to keep all the changes you've made, you can type
git add .
and it will add all of the files that have changes.
Now you need to commit your changes! This has kind of the same meaning as committing something to memory. You're committing your changes to the repository, so they now will become a part of the history.
To do this, type:
git commit -m "initial commit"
"initial commit" is your commit message. This can be whatever you'd like, but typically you want this to describe what has changed in this commit. For example, "fixed bug where page kept flashing" or "added README to repository" would be good commit messages; "bug fixes" would be a bad one (but a bad one we're all guilty of...).
-m is a shortcut to add a message. You can do git commit just by itself, but then you run the risk of getting stuck in vim (which is the default editor in most operating systems - and notoriously confusing to get out of)... and since this is a tutorial for absolute beginners, we're not quite ready for that yet! We'll discuss this more in a future post.
If you were just working on a local repository by yourself, this would be sufficient to add this new version of your project to your repository's history! But since the whole point of this is teaching you how to work with GitHub, we need to get your changes somewhere that everyone else can access them.
The last thing you need to do is:
git push -u origin master
This pushes your commit to GitHub! It will ask for your username and password - this is the login information for your GitHub account. (When you type your info, you won't see any characters entered on screen - not even *****. This is as expected!)
Now you can refresh the page of your repository on GitHub, and you'll see your README show up!
Congrats - you've connected your local repository to GitHub!

If you created a README in your GitHub repository
In this case, you won't have to go through the process of creating a README locally and committing it (but familiarize yourself with the process anyways - you'll definitely need to add, commit, and push your changes in the future!)
Once you've added the remote origin, all you have to do is:
git pull
You might get an error when you try to pull - if you're on a Mac, it'll probably look like this:
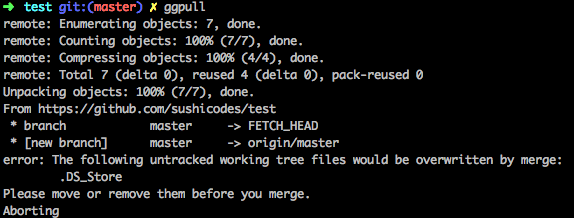
This is because when you create a folder on Mac, it automatically creates a .DS_Store file in your folder. (You don't see this in the finder, because the period at the beginning of its name indicates that this is a hidden file. To delete it, type rm .DS_Store in your terminal. rm is the command for "remove". Technically, you shouldn't need to remove .DS_Store, rather you should use a .gitignore file to force Git to ignore it. But .gitignore is beyond the scope of today's post - don't worry, I'll definitely cover it in an upcoming Gitmas post!)
Delete this file, then try git pull again. This time, it should work.
Now, when you go into your project folder, you can see the README file you created on GitHub! In this case, the GitHub version of your repository is the origin.
Congrats - you've connected your local repository to GitHub!

Next post, I'll be explaining what SSH and HTTPS mean, and why you would use one versus the other.
If you have any questions about Git or requests for other topics you'd like to see me blog about, please leave a comment! And if you're enjoying this series, consider supporting me on Patreon, following me on Twitter or checking out my Twitch streams!

Top comments (3)
When I did git push something went wrong
what should I do
Can you tell me or share a screenshot of the error you get? Try doing
git push -u origin master, this may fix the issue you're having.I tried the method you said, it didn't work either
I have shared screenshots,May not be displayed
Can we direct message on twitter