On the seventh day of Gitmas, my mentee asked of me...
push-ing, pull-ing, diff-ing?
what is SSH-ing,
how do I connect these,
what's this "GitHub" of which I've heard,
Git's ready - what then,
how do I get Git set up,
and could you explain Git, pretty please?
Today's Day 7 of the 12 Days of Gitmas, and today we'll be talking about how you actually track and commit your changes in Git.
If you've been following along, by now you know how to create your own Git project, and connect it to GitHub. Now you can work on your project locally!
But... how do you actually use the version control aspect of Git? And how do you get your changes onto GitHub?
(For this post, make sure you're working on your own repository! The concepts will be the same if you're working with someone else's project, however there's some additional information you'll need to know first that we'll go over when we discuss branches and PRs, in an upcoming post.)
First thing first, go ahead and make some changes in your project. For example, add some information to your README, and add a new file within your project.
Now go to your console, and type:
git status
You'll see a list of all the files in your project that have been added or changed since the last commit.
.DS_Store, made some changes to the README.md file, and added a new file called index.html.If you want to see more details about exactly what has been changed, type:
git diff
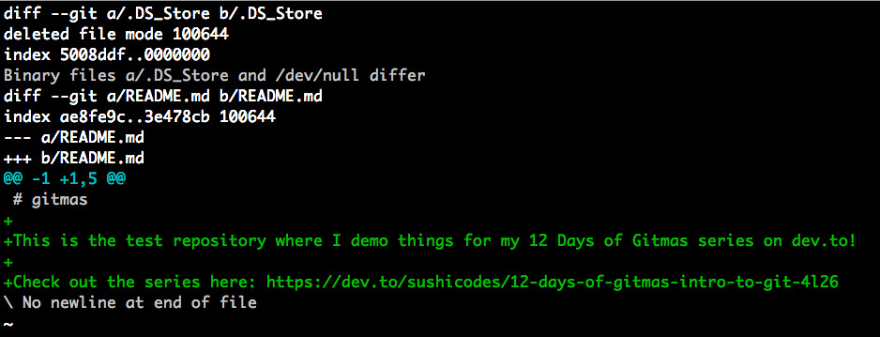
This will show you a "diff" of the files (the difference between the previous version of each file and the new version).
README.md file, because index.html isn't being tracked yet. Type q to get out of this view.If you're happy with the changes, then you can
git add [filename]
to add all the changes associated with a specific file, or
git add .
to add all the changed files. This tells Git which files you want to add to your commit, to record them to your version control history.
git add ., you can do git status again to see that your files have been added. The files with changes that are staged to be committed will be in green. If there are any files left that you haven't added, they will still be red.Lastly, you need to run
git commit
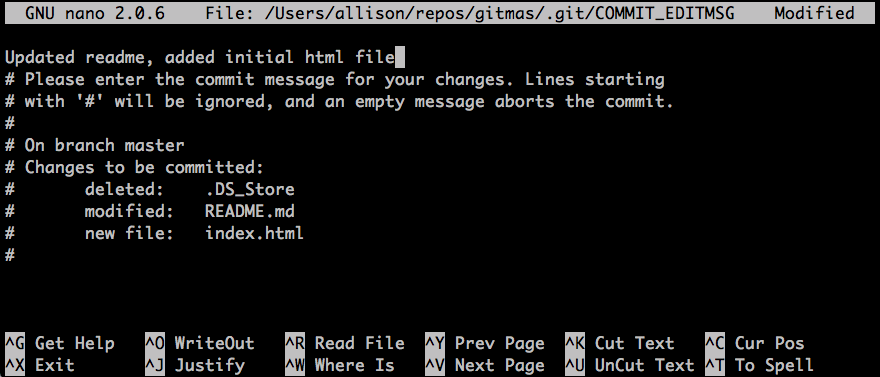
in order to commit your changes. This will open your default editor to write your commit message. If another text editor opens when you type this, you can write your commit message at the top, save, then quit the application, and Git will commit your changes.
Otherwise, it's likely the default editor is vim. Vim is notoriously difficult to exit once opened if you're not familiar with it, so there are a few other options.
You can do
git commit -m "Write your commit message here"
to just take care of it entirely in the command line.
Or, you can change your editor. I prefer to use nano, so whenever I set up a new computer, I run
git config --global core.editor "nano"
to set nano as my default editor. You can get more information about setting different text editors as your default in this GitHub article.
^x to exit, then y to save your commit message. If you n, it will just cancel the commit.You may be wondering, what should you write as your commit message? Different companies or projects have different standards, so depending on what you're working on, you may have to format your message a specific way or include certain information - like an issue ID, task name, change type (bug, feature, etc.), and so on.
Regardless, you'll want your commit message to be short and concise, yet descriptive. "bug fix" or "asdf" are terrible commit messages (that, let's be honest, we're all probably guilty of - but it's still a bad practice!), while "adjusted spacing on homepage banner" or "created API for scheduler" are much better. Ultimately, you'll want to be able to look at your commits from a day ago or a year ago (or have someone else look at your commits!) and be able to have a pretty good idea of what changed in that commit, in case you need to revert your code, or see how something used to be done.
As far as Git is concerned, you've now successfully committed your changes to the version control system. But wait - your changes aren't in GitHub yet, so nobody else can see or use them!
In order to update GitHub with your changes, there are two more commands you need to know.
First,
git pull origin master
If someone else is working on the project with you, then they may have made changes as well! You need to pull down their changes to your local machine regularly, so your repository is up to date. (We'll talk about what origin master means when we discuss branches in a couple of posts.)
Then,
git push origin master
This pushes your changes to GitHub, so everyone else on the project can see them. It's good practice to always make sure you git pull first, because if there are changes on GitHub that you don't have locally, and you try to git push, you'll get an error telling you to git pull first.
And that's that! You now know how to make changes, commit them in Git, and push them to your GitHub repository. But that's not all! We still need to discuss what .gitignore is, how to work with someone else's repository, and so much more! If you're not following yet, make sure to click the Follow button so you'll get notified when the rest of this Git series is posted!
And if you have any questions about Git or requests for other topics you'd like to see me blog about, please leave a comment! And if you're enjoying this series, consider supporting me on Patreon, following me on Twitter or checking out my coding or cooking Twitch streams!


Top comments (2)
hi Allison. Am having problem maybe you can help. i have being flowing this post to get my account set up. i created new project and files on github. but when i run the git command in terminal its not going through. i tried to config in terminal again but still its not working.
Hi Dennis, did you create your repository locally (on your own computer), and run
git initthere? Do you get any error messages when you try to do that?