
Welcome! In this guide, we will assist you in integrating the power of AWS SES, SMTP, and Laravel 8 Version for reliable email delivery. With easy-to-follow steps, you'll master this integration and enhance email communication efficiency. Let's get started!

Amazon Simple Email Service (SES)
Is an email platform that provides an easy, cost-effective way for you to send and receive email using your own email addresses and domains.
For example, you can send marketing emails such as special offers, transactional emails such as order confirmations, and other types of correspondence such as newsletters. When you use Amazon SES to receive mail, you can develop software solutions such as email autoresponders, email unsubscribe systems, and applications that generate customer support tickets from incoming emails. Amazon Simple Email Service (SES)
Amazon SES sends email using SMTP
Which is the most common email protocol on the internet. You can send email through Amazon SES by using a variety of SMTP-enabled programming languages and software to connect to the Amazon SES SMTP interface. This section explains how to get your Amazon SES SMTP credentials, how to send email by using the SMTP interface, and how to configure several pieces of software and mail servers to use Amazon SES for email sending. send-email-smtp
Create Mail Class
Create a new mail class using, this enables you to craft custom email templates tailored to your project's needs.
php artisan make:mail NotifyMail
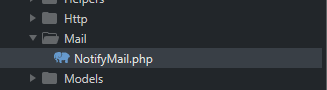
NotifyMail.php created Mail folder app/Mail
namespace App\Mail;

use Illuminate\Bus\Queueable;
use Illuminate\Contracts\Queue\ShouldQueue;
use Illuminate\Mail\Mailable;
use Illuminate\Queue\SerializesModels;

class NotifyMail extends Mailable
{
    use Queueable, SerializesModels;

    public function __construct()
    {
    }
    public function build()
    {
        return $this->view('mail.setmail');
    }
}
Focus on.
This is the declaration of the
build()method, which is used to construct the email content.mail.setmailis the name of the view to be used, this name points to the view located in theresources/views/maildirectory, with the file name setmail.blade.php.
Create Controller
The command generates a new controller that's specifically meant to handle sending email.
php artisan make:controller ManageMail\SendEmailController
located in the app/Http/Controllers/ManageMail directory.

namespace App\Http\Controllers\ManageMail;

use App\Http\Controllers\Controller;
use Illuminate\Http\Request;
use Mail;
use App\Mail\NotifyMail;

class SendEmailController extends Controller
{
    public function index() {
          Mail::to('yadisuhar05@gmail.com')->send(new NotifyMail());
          if (Mail::failures()) {
               return response()->json(['msg' => 'Fail'], 500);
          }else{
               return response()->json(['msg' => 'Success'], 200);
          }
     }
}
By importing these classes, you're setting up your code to utilize Laravel's email features.
- This makes it simple to send emails using the
use Mailfacade and to structure the content and settings of the email you want to send by utilizing theuse NotifyMailclass. -
Mail::toSends an email to the specified email addressyadisuhar05@gmail.com, The email content are defined in theNotifyMailclass.
Create Route
This route is used to test email sending through the action defined within the SendEmailController.
To create a route in Laravel, you need to import the relevant controller that contains the logic for handling the route.
use App\Http\Controllers\ManageMail\SendEmailController;

Route::get('/testmail', [SendEmailController::class, 'index']);
Create Views
Created file blade setmail.blade.php located in the resources/views/mail directory.
based on Mail Class NotifyMail.php
return $this->view('mail.setmail');
Make a simple page setmail.blade.php.
<!DOCTYPE html>
<html>
  <head>
   <title>Example Email</title>
  </head>
  <body>

   <p>AWS SES Configuration: Setting Up Email Delivery in Laravel</p>

  </body>
</html>

Set MAIL SMTP .env
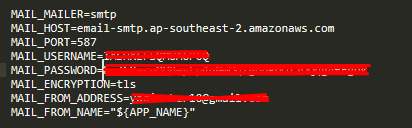
In the next chapter, we'll configure Laravel's .env file, where we'll input the needed credentials, including the username and password, for sending emails through AWS SES SMTP. This step is key for ensuring secure and efficient email communication.

With all the prepared components.
- mail class
- controller
- views
- routes
You have a strong foundation for managing email sending in your Laravel project. However, it's important to note that actual email sending cannot be done until you've successfully configured AWS SES and SMTP, which will be covered in the next chapter.

Top comments (0)