Here is how explored on how we can do Covid Data Analysis using AWS cloud services.
Today I'll write about part 1: Data Setup.
Solution overview
The following diagram illustrates the architecture of the solution.
The workflow is comprised of the following steps:
- Subscribe to a data set from AWS Data Exchange and export to Amazon S3
- Run an AWS Glue crawler to load product data
- Perform queries with Amazon Athena
- Visualize the queries and tables with Amazon QuickSight
- Run an ETL job with AWS Glue
- Create a time series forecast with Amazon Forecast
- Visualize the forecasted data with Amazon QuickSight
Step 1. AWS Data Exchange: Subscribe
- Go to AWS Data Exchange from AWS Console.
- Browse the Catalog and Search for Covid. You'll see few data sets are already available.
- I have selected "Enigma U.S. & Global COVID-19 Aggregation" which has global data.
- Subscribe to it, and after few minutes you'll see it listed under "My Subscriptions".
- On selecting it, you'll see Revisions and when it is updated.
Step 2: AWS Data Exchange: Export to S3
- You can click on the Revision ID.
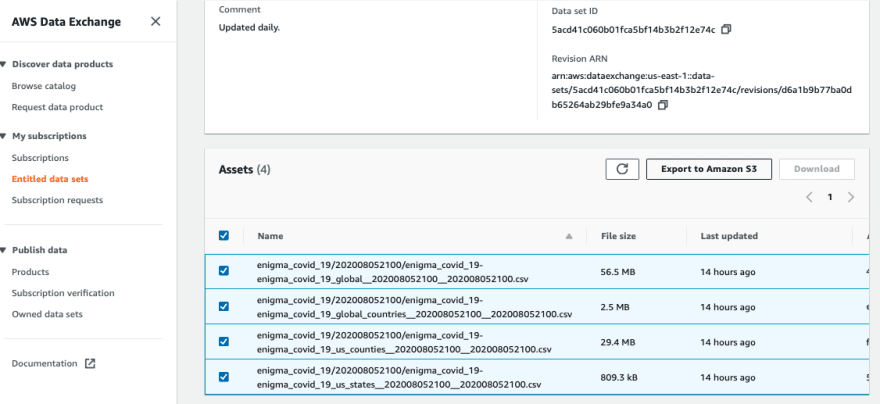
- Select the data set you want and click on export it to S3.
- You will see a new Job created and will be shown as Completed after export is done.
Step 3: Amazon S3: Verify the data
Step 4: AWS Glue
AWS Glue is a fully managed extract, transform, and load (ETL) service that makes it easy for customers to prepare and load their data for analytics.
Now that you have successfully exported the enigma covid data sets into an Amazon S3 bucket, you create and run an AWS Glue crawler to crawl your Amazon S3 bucket and populate the AWS Glue Data Catalog. Complete the following steps:
- On the AWS Glue console, under Data Catalog, choose Crawlers.
- Choose Add crawler.
- For Crawler name, enter a name; for example, covid-data-exchange-crawler.

- For Crawler source type, choose Data stores.
- Choose Next.
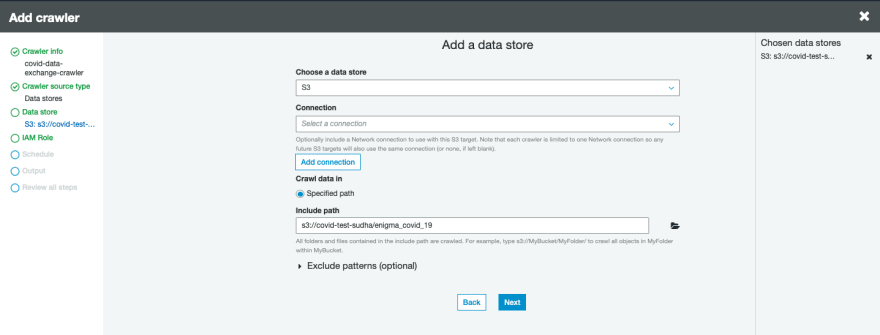
- For Choose a data store, choose S3.
- For Crawl data in, select Specified path in my account.
- The crawler points to the following path: s3:///.
- Choose Next.

- In the Choose an IAM role section, select Create an IAM role. This is the role that the AWS Glue crawler and AWS Glue jobs use to access the Amazon S3 bucket and its content.
- For IAM role, enter the suffix demo-data-exchange.
- Choose Next.

- In the schedule section, leave the Frequency with the default Run on Demand.
- Choose Next.
- In the Output section, choose Add database.
- Enter a name for the database; for example, covid-db.
- Choose Next, then choose Finish.

- This database contains the tables that the crawler discovers and populates. With these data sets separated into different tables, you join and relationalize the data.
- In the Review all steps section, review the crawler settings and choose Finish.
- Under Data Catalog, choose Crawlers.
- Select the crawler you just created.
- Choose Run crawler.

- The AWS Glue crawler crawls the data sources and populates your AWS Glue Data Catalog. This process can take up to a few minutes. When the crawler is finished, you can one table added to your crawler details. See the following screenshot.

- You can now view your new tables.
- Under Databases, choose Tables.
- Choose your database.
- Choose View the tables. The table names correspond to the Amazon S3 folder directory you used to point your AWS Glue crawler. See the following screenshot.

Next Step: To Query data in Athena and Visualise in QuickSight!
Thank you for Reading 😊


Top comments (0)