Introduction
Hi, this post will be the first from a series called "Web Apps From Scratch" were I explore common UI patterns implemented with modern and standard web technologies (which means NO frameworks/libraries).
Now the motivation isn't to be against frameworks but instead, appreciate what they do for us by building without them. Additionally, we also have the opportunity to try out new HTML elements, css and javascript features.
Modals
Modals are a very popular UI component. When's the last time you have used alert, confirm and prompt? Modals give us a means to flash contextual content or ask for user input in a popup fashion that we may style to our liking.

The Dialog Element
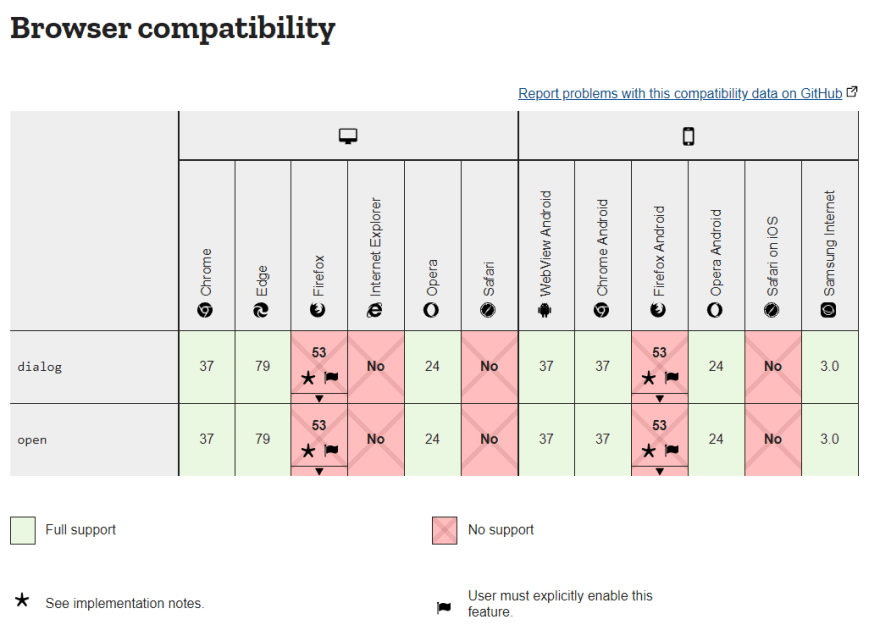
However, there is an HTML 5 element for this. It is called the dialog which gives us some good functionality and accessibility out of the box for the browsers that support it.
The API is fairly straightforward, to get started we add a dialog tag to the page like this.
<dialog role="dialog" aria-modal="true" id='myDialog' class="modal-content card">
<button id="closeModal">×</button>
<h1>Person Details</h1>
<main></main>
</dialog>
The role and aria-modal are ARIA attributes that enhance the accessibility of the page.
× is a HTML Symbol which renders a neat X that we can use for a close button.
Now the intended behaviour of the dialog to not display its content unless an "open" attribute is put into the tag. In Chrome, however, it shows by default so I apply the following style to override this behaviour.
dialog:not([open]) {
    display: none;
}
Stateful UI
Next, oftentimes we would like to pass data to our dialog but we cannot rely on a framework's state management in this series. One solution would be to utilize event-driven programming and pass data in our elements and the events they emit. For example we have a collection of people data we would like to display.

The first name is given on the card but when a details button is clicked, more data can be seen on the modal.

These cards can be rendered by the client or by the server but in order to have each card pass its data to the modal, we can make use of the data attribute/custom attributes.
The markup of the cards is as follows:
<section>
    <div class="card">
      <p>John Smith</p>
      <button  data-firstname="John" data-lastname="Smith" data-age="35" data-height="5.11" onclick='onModalOpen(event)'>Details</button>
    </div>

    <div class="card">
      <p>Sally Smith</p>
      <button  data-firstname="Sally" data-lastname="Smith" data-age="31" data-height="6.1" onclick='onModalOpen(event)'>Details</button>
    </div>

    <div class="card">
      <p>Paul Smith</p>
      <button  data-firstname="Paul" data-lastname="Smith" data-age="29" data-height="5.2" onclick='onModalOpen(event)'>Details</button>
    </div>

</section>
In each button, we embed the data of the corresponding person, this may be an id instead which then can be used to retrieve the data. Also when we call the eventHandler in the onclick attribute we need to make sure to pass the event object.
Now in the event handler to the button's click event, we can get the specific button and the relevant data.

    const dialog = document.querySelector('#myDialog');
    function onModalOpen(event){
      const button = event.target;//get the button from the event
      const buttonData = button.dataset;
      const html  = dataTemplate(buttonData);//get the values of all data attributes
      document.querySelector('dialog > main').innerHTML = HTML;
      //querySelector over getElementById, more flexible and doesn't require making ids
      dialog.showModal();
      //showModal() method available on all dialog elements to display the dialog on the screen
    }
buttondata is a DOMStringMap basically an object which contains the keys and values of the data attributes as strings. When we log buttonData we get the following. We than pass buttonData to a templating function that uses template literals to return the dynamic HTML that should be displayed in the modal.
    function dataTemplate({firstname, lastname, age, height}){
      //using object destrucuring to get the fields of the object
      return `<p>First Name: ${firstname}</p>
              <p>Last Name: ${lastname}</p>
              <p>Age: ${age}</p>
              <p>Height: ${height}</p>`;
      //using template literals to interpolate data
    }
We also make use of destructuring to pull out the data fields as variables.
Polyfills
Whenever a browser currently lacks the support of a standard feature often a library called a polyfill is made so that it doesn't break. We can add the pollyfills to the page so that the modal still works on safari and firefox.
<script src="https://cdnjs.cloudflare.com/ajax/libs/dialog-polyfill/0.5.6/dialog-polyfill.min.js"></script>
<link rel="stylesheet" href="https://cdnjs.cloudflare.com/ajax/libs/dialog-polyfill/0.5.6/dialog-polyfill.min.css">
Coming to a close
To close the modal we just add another event handler to our close button.
const closeModal = document.querySelector('#closeModal');
closeModal.addEventListener('click', function(){
  dialog.close();
  document.body.focus();
});
We set the body back to focus so assistive devices such as screen readers would know to go back to the main part of the page when closing the modal.
Conclusion
When we putting this all together, we get the following result.

You can see the complete example at this Repl link. I hope this first post of the series we informative and stay tuned for the nest one!

Top comments (0)