Project Week!
If You'd like to read up on Week 10, click here.
This past week was project week, but they shook it up on us.
We were assigned PARTNERS!

My partner was Alfonso (Fonzie) Pruneda and we started our project-ing by going over the project guidelines:
Must be a HTML/CSS/JS frontend with a Rails API backend. All interactions between the client and the server should be handled asynchronously (AJAX) and use JSON as the communication format.
Backend must render a resource with at least one has-many relationship.
The backend and frontend must collaborate to demonstrate Read, Create, and either Update or Delete for at least two of the models. The results of each action should be displayed to the user without a page refresh.
So, we were building a single page application (SPA). Fonzie and I started the week by brainstorming an idea for our project that we could have fun with and practice our web dev chops!
We both enjoy games, and wanted to make a game that would make the rest of our cohort laugh. We decided it might be fun to make a SPA where our peers could fight each other.
We called it Conflict Manager!

Conflict Manager - Planning
I am big on planning, so we spent the first day writing out a plan for what the user story would be, what all the "views" would look like, and what models we'd need to set up.
Here's a picture of part of our plan:

We digi-fied it so it'd look a bit cleaner and we'd both have access to it:
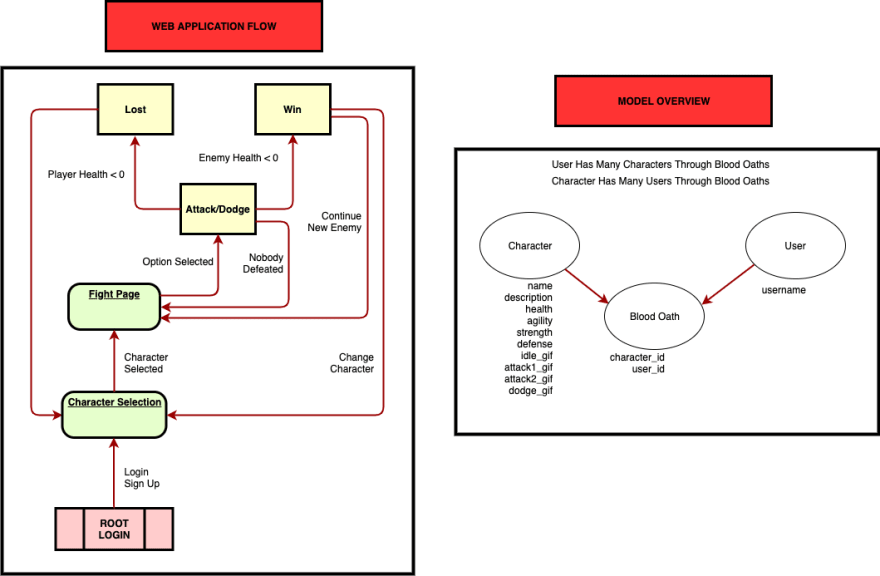
Model Overview
We had three models in our game:
User: A user had an 'account' which they could select. We were told explicitly to not implement authentication because we hadn't learned how to do authentication with Javascript, so there were no passwords. A user's progress in the game (their unlocked characters) would be saved when they logged back in.
Character: These were the selectable characters that would battle each other. They held data like health, damage, agility, animation_url, icon_url etc.
Blood Oath: This was the joiner class for a User and a Character. We called it a blood oath as a reference to one of our previous labs. When a User unlocked a Character, a Blood Oath would be formed between the two.
NOTE: We had a background model, but we decided later that since we didn't have a lot of backgrounds (and they really only had one attribute: their image_url), we could store them in our frontend JS file.
Setting Up the Backend
Per the requirements, we were setting up a backend using rails (I have provided samples of each component below). We had to build the following:
Routes
What data will our front end need to render fun images and text at the right time?
Rails.application.routes.draw do
  get '/characters', to: 'characters#index'
  post '/characters', to: 'characters#attack'
  get '/characters/:id', to: 'characters#show'


  post '/users', to: 'users#create'
  get '/users', to: 'users#index'
  get '/users/:id', to: 'users#show'
  patch '/users/:id', to: 'users#update'
end
Controllers
When the front end makes a request, what stuff in our database will we need to create/update?
class CharactersController < ApplicationController
    def index
        characters = Character.all
        Character.reset_health
        render json: characters
    end

    def show
        character = Character.find(params[:id])
        render json: character
    end

    def attack
        attacker = Character.find(params[:attacker_id]) # get the attacker
        defender = Character.find(params[:defender_id]) # get the defender
        defender.dodgeFlag = params[:defender_dodge] # check if the defender is trying to dodge
        damage_taken = defender.take_damage(attacker.attack) # make the defender take damage (or dodge)
        defender.save # save the new defender's health
        render json: # send back json information back to the fight page
        {
            attacker_defeated_gif: attacker.defeated_gif, # attacker's defeated gif
            defender_health: defender.health, # defender's new health
            defender_id: defender.id, # defender's id
            damage_dealt: damage_taken, # damage dealt
            defender_defeated_gif: defender.defeated_gif # defender's defeated gif
        }
    end

    def random_enemy
        randomEnemy = Character.all.sample
        render json: randomEnemy
    end
end
Models
How do we need to set up relationships between the models, and does each model need any special functionality?
class Character < ApplicationRecord
    has_many :bloodoaths
    has_many :users, through: :bloodoaths

    MAX_HEALTH = 100
    DODGE_RANGE_UPPER = 20
    DODGE_RANGE_LOWER = 17
    DODGE_ACTIVATE_VALUE = 3

    #reduces characters health and returns damage taken
    def take_damage(damage)
        damage_taken = 0
        dodge_roll = rand((self.agility + ((self.dodgeFlag && 1 || 0) * DODGE_ACTIVATE_VALUE)) .. DODGE_RANGE_UPPER)
        if !dodge_roll.between?(DODGE_RANGE_LOWER, DODGE_RANGE_UPPER)
            damage_taken = damage - (damage * (self.defense / 100.0)).to_i
            self.health -= damage_taken
            self.dodgeFlag = false;
            self.save
        end
        damage_taken
    end
    #returns a random character
    def self.get_opponent
        Character.all.sample
    end
    #resets all characters health
    def self.reset_health
        Character.all.each do |character|
            character.health = MAX_HEALTH
            character.save
        end
    end

end
Front-End (Views)
This was the new stuff we learned over the past two weeks. In order to build a single page application with views that were very different from each other, we would have to do some pretty serious DOM manipulation.
Fonzie and I decided that we'd take a more OOP approach to building our front end. We would:
- Create a class for each and every page
- Create three static methods that would build the top of each page, the middle of the page, and the bottom of the page
- Make event listeners for every button that would query the back end through fetches
- Create a method that clears the contents of the current page for transitions
Here is a sample:
/*-----------------------------------------------------------------------------*/
/*---------------------- Renders the Character selection page ---------------- */
class CharacterSelection{
    static renderPage(bodyElement){
        clearElements(bodyElement)
        let chooseTop = document.createElement('div');
        chooseTop.className = "choose-top";
        let chooseMid = document.createElement('div');
        chooseMid.className = "choose-mid";
        let chooseBottom = document.createElement('div');
        chooseBottom.className = "choose-bottom";
        this.renderTop(chooseTop);
        bodyElement.appendChild(chooseTop);
        this.renderMid(chooseMid);
        bodyElement.appendChild(chooseMid);
        this.renderBottom(chooseBottom);
        bodyElement.appendChild(chooseBottom)
    }

    static renderTop(chooseTop)
    {
        let titleText = document.createElement('p');
        titleText.textContent = "CHOOSE YOUR CHARACTER"
        chooseTop.appendChild(titleText);
    }

    static renderMid(chooseMid)
    {
        let iconContainer = document.createElement('div');
        let dynamicDescription = document.createElement('p');
        let iconName = document.createElement('p');
        iconContainer.id = "images";
        dynamicDescription.id = "description";
        iconName.id = "icon-name";

        chooseMid.appendChild(iconContainer);
        chooseMid.appendChild(iconName);
        chooseMid.appendChild(dynamicDescription);


        fetch(`http://localhost:3000/characters`)
            .then(resp => resp.json())
            .then(json => {
                for (let i = 0; i < json.length; i++)
                {
                    let icon = document.createElement("img"); //input element, text
                    icon.setAttribute('class',`fighter-icon`);
                    icon.setAttribute('id',json[i].id);
                    let iconAudio = document.createElement('audio');
                    iconAudio.volume = .5;
                    if(parseInt(localStorage.getItem("userWins")) >= json[i].wins_required)
                    {
                        console.log("it hits", json[i].win_required)
                        icon.src = json[i].icon_img
                        iconAudio.src = json[i].icon_audio_url
                        icon.addEventListener('click', function(e){
                            localStorage.setItem("fighterId", json[i].id)
                            dynamicDescription.textContent = json[i].description;
                            iconName.textContent = json[i].name;
                            iconAudio.play();
                        });
                    }
                    else
                    {
                        icon.src = 'https://i.imgur.com/VNYNDVn.png'
                    }
                    iconContainer.appendChild(icon);
                }
        })

    }

    static renderBottom(chooseBottom)
    {
        let continueButton = document.createElement('button')
        continueButton.textContent = "Continue";
        continueButton.id = "choose-continue";
        chooseBottom.appendChild(continueButton);

        continueButton.addEventListener('click', function(e){
            buttonClickAudio.play();
            ChooseBackground.renderPage(bodyElement);
        })
    }
}
Our front-end code generated HTML, but it wasn't styled. This meant that the content wasn't properly aligned, fonts weren't the right size or type, and general colors and image formatting wasn't in place. We used CSS to select the generated HTML by class, id and tag.
We used CSS Grid and CSS Flexbox for the alignment, and we used the Semantic UI for button styling.
Here's a sample from our CSS file:
@import url(https://fonts.googleapis.com/css?family=Anton);

body
{
    background-color: gray;
    display: grid;
    grid-template-columns: 1fr;
    grid-template-rows: 1fr 8fr 1fr;
}

.root-top
{
    display: grid;
    font-family: 'Anton', sans-serif;
    line-height: 1;
    font-size: 3em;
    color: #000;
    justify-content: center;
    align-content: center;
}

.root-mid
{
    display: flex;
    flex-direction: column;
    align-self: center;
}
The Effort
Fonzie and I worked on each part of the web application together. We did this on purpose so that we both got the same exposure to each part of the development process (both backend and frontend). We spent pretty much every day of project week from 8am-8pm working on the project. It was the most intense team work I've been involved with, ever. We both learned from each other and also kept each other on track!

The Final Product
We removed parts of our initial scope to allow us to dive deeper into parts of the application we really enjoyed. We learned some really important skills on our way to the finish line, such as:
- Learning how to properly scope a project
- How to review code written by others
- Learning to store media on Amazon Web Services S3 (we had gifs, images, and sounds)
- Learning to incorporate Semantic UI elements to help with styling
- How to incorporate gifs and videos into web applications
- Learning how to incorporate sound (and the hard truth about trying to autoplay audio with modern browsers... you can't).
- and more!
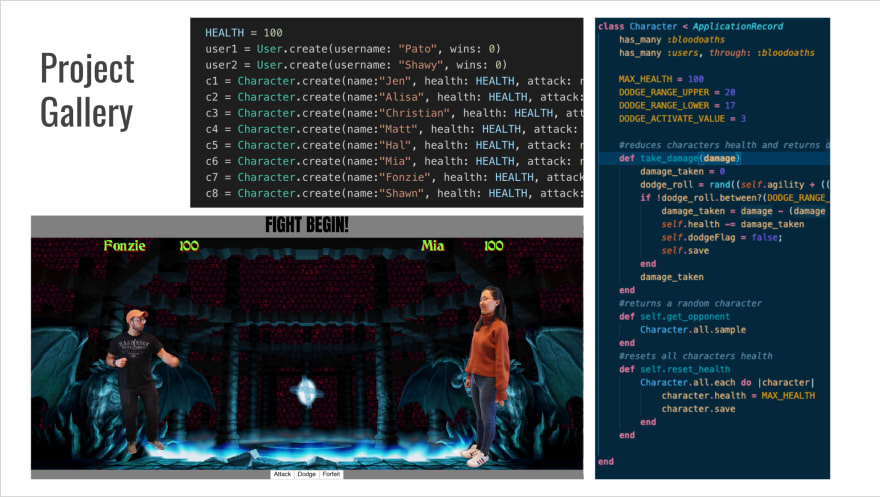
Here's some images from our presentation about our project:

If you are curious about the project, feel free to grab it on GIThub!
Here are the links:
Front-End: https://github.com/915fonzie/conflict-manager-frontend
Back-End: https://github.com/915fonzie/conflict-manager-backend
Presentation: https://docs.google.com/presentation/d/1Mj8NvnZwx21PDR9XutrxVbiTS7cTFROrYOBXnDenHlM/edit?usp=sharing
Hope that this gives you a little bit of insight on what goes on in a bootcamp!
Good luck in your own endeavors!
Shawn


Top comments (0)