
How I am using the fauna-gql-upload package, authored by Carl Hallén Jansson to simplify my Fauna GraphQL development workflow.
What I love about Fauna
At first glance, there is a lot to like about Fauna. First, it is a managed database. As a frontend engineer, I find the persnickety details and behaviors of databases cumbersome. I jump at any chance to avoid managing servers, dealing with state, and setting up my local development with a heavy database. Fauna is a backend as a service, so you don't need to worry about any of that. You setup your database in their UI, get your private key to access it and away you go. I love that experience.
I also love that Fauna has a GraphQL layer. I upload my schema and Fauna generates the basic queries, mutations and underlying implementation details like resolvers for me so I can start executing GraphQL queries immediately.
This is all great, but we can improve the Fauna GraphQL developer experience even further with some additional automation.
Why we need to automate
If you follow Fauna's Get started with GraphQL tutorial, you will need to use Fauna's admin UI to create and modify your GraphQL schema. That is fine to get started, but we need something more automated so we can continue to enhance our schema as our application evolves.
We don't want to upload a schema.gql file in Fauna's admin UI every time we need to modify our GraphQL server. What we need is:
- The ability to quickly and easily push changes to our GraphQL server beyond just the schema.
- The ability to know what other changes went along with our Fauna changes.
- The knowledge of who made those changes and why.
- The ability to revert to a prior state.
One way of doing this is to use fauna-gql-upload, a simple CLI to update your database's GraphQL schema, resolver functions, indexes, and database roles without going to the Fauna dashboard.
Yes, that's more like it! I can manage my GraphQL server as code just like any other code that powers my application. I can open PRs with the proposed changes and have my team review them before I commit them to my production database.
What we are building
In this tutorial, we are going to build a basic game of Rock Paper Scissors. By the end, you will be able to play a game with your Fauna backend using just GraphQL queries and mutations.
Setup your database
Before we can start using fauna-gql-upload, we need to set up a database. You can follow the Quick start with Fauna or use the admin UI to create your database. I will walk you through how to do this in the UI. After this you won’t need to manage anything else in Fauna’s UI, though it is still helpful to use it for document inspection, running one-off commands in the shell and executing GraphQL queries.
From the Fauna dashboard, select
New Database.
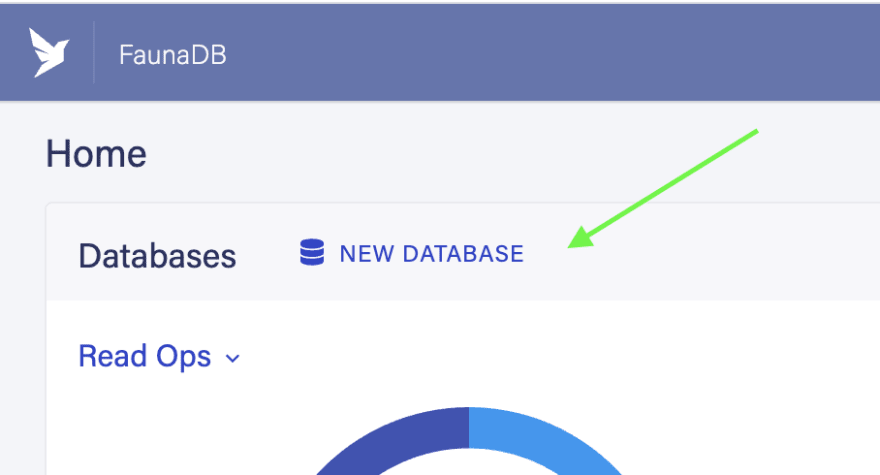
For the Database Name, enter
rock-paper-scissors.

In the left nav, select
Securityand then selectNew Key.
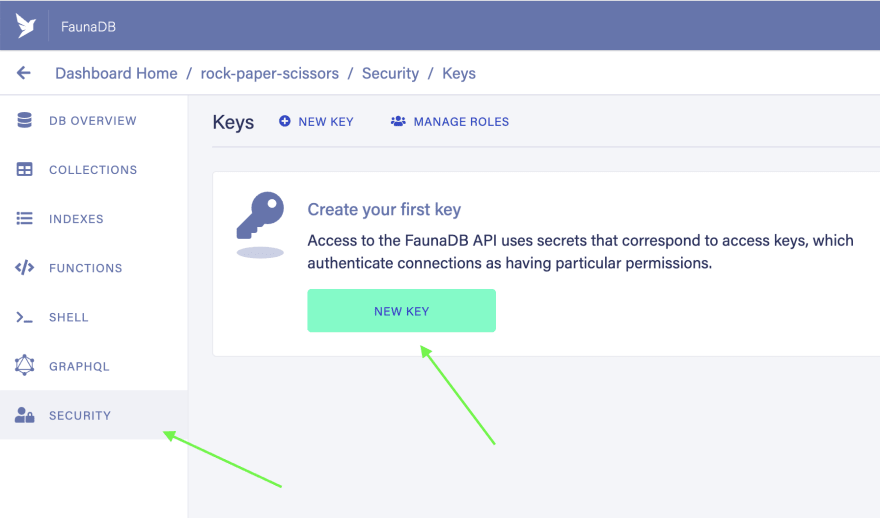
For the
Role, make sure it isAdminand then enterfauna-gqlas theKey Name, then selectSave.

Keep the window open or store the secret key somewhere safe. We will use it in a moment.
Setup your project
Before we do anything with Fauna, we will set up our code project. To simplify setup for you, I created a simple generator CLI built on top of hygen.io. You can view the template files for that in this GitHub repository.
Clone that repository to a local directory, i.e.
git clone <repository url>.In the created directory, run
npx @goldenshun/shun fauna gql.Follow the prompts to enter the name (rock-paper-scissors) and description for your project.
When prompted for your Fauna server key, enter the key you generated in step 5 of the
Setup your databasestep.


You should now have several configuration files in your project as well as a fauna directory. This also installed several dependencies, which is all you need to leverage fauna-gql-upload to create your GraphQL server. Let's take a look at a few key files.
fauna/schema.gql
This declares a simple Example model with property foo, which is a string.
type Example {
  foo: String!
}
package.json
There are a few scripts defined here, but the main one we will be using is fauna, which will compile our TypeScript files and then upload our GraphQL schema plus supporting FQL files via fauna-gql-upload.
"scripts": {
  "build:fauna": "tsc --project tsconfig.fauna.json",
  "fauna": "npm run build:fauna && fauna-gql",
  "fauna:override": "npm run build:fauna && fauna-gql --override"
}
Is TypeScript required?
TypeScript is not required to use fauna-gql-upload. The default examples for that project are all in vanilla JavaScript. I prefer TypeScript for my projects because it makes it easier for me to find small mistakes like typos and misplaced arguments when I am writing complex FQL statements. Use whatever works for you though!
.fauna.json
This file provides configuration to fauna-gql-upload so it knows where to find your schema, supporting FQL files and the secret you entered in the Setup your project step.
{
  "envPath": ".env.local",
  "secretEnv": "FAUNA_ADMIN_SECRET_KEY",
  "schemaPath": "fauna/schema.gql",
  "fnsDir": ".gen/fauna/functions",
  "rolesDir": ".gen/fauna/roles",
  "indexesDir": ".gen/fauna/indexes"
}
Create your GraphQL server
Now that you have your Fauna database and your code project setup, you are ready to run it!
npm run fauna
You should see this output in your terminal:
✔️  Successfully updated schema.

✔️  Successfully uploaded indexes

✔️  Successfully uploaded functions

✔️  Successfully uploaded roles
As you can see, in one command we pushed our GraphQL type definitions as well as supporting indexes, functions, and roles.
Test your GraphQL server
Back in the Fauna Admin UI, select
GraphQLin the left nav.
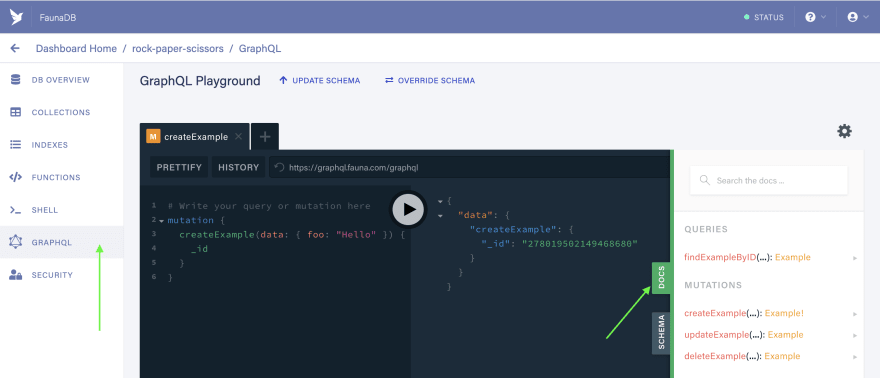
Open the
Docstab. You should see thefindExampleByIDquery as well as several mutations, includingcreateExample.
🎉 This is what Fauna does for you. Remember, all you uploaded in your schema.gql file was a model called Example. But after uploading your schema to Fauna, you now have the ability to create, read, update, and delete (CRUD) documents.
- Enter the following GraphQL mutation in the GraphQL playground and execute it.
mutation {
  createExample(data: { foo: "Hello" }) {
    _id
  }
}
If all went well, you should see a result like this:
{
  "data": {
    "createExample": {
      "_id": "278019502149468680"
    }
  }
}
Customizing your GraphQL server
What we've done so far is pretty cool. In just a few CLI commands, we were able to bootstrap a fully functional GraphQL server. Now that we know everything is up and running, let's implement something more interesting.
In order to play a game of Rock Paper Scissors with our Fauna backend, we need some additional functionality.
The basic game flow should look like this:
- You, the player, make a selection.
- The opponent (programmed in Fauna) also makes a selection.
- The winner is determined based on the rules of the game.
- The results are sent back to you, the player.
Simple enough, let's implement it!
Initial schema
First, we can define an enum that declares all possible selections in the fauna/schema.gql file.
enum Selection {
  Rock
  Paper
  Scissors
}
Next, we define what the results should look like. We will use a message like You win! or You lose! to display the results.
type Result @embedded {
  selection: Selection!
  opponentSelection: Selection!
  message: String!
}
Last, we need a way for you, the player, to make your selection. In this case, the automatic CRUD queries and mutations generated by Fauna are not enough. In order to facilitate the additional logic of our game, we need a custom resolver.
What is that
@embeddeddirective?
By labeling the Result type as embedded, it means Fauna will not create an associated collection nor additional queries and mutations associated with it. This is good for our purposes because we are merely defining the output shape of our game results, we are not planning to store those results anywhere.
For more information, refer to Fauna's docs on the embedded directive.
Implement a custom resolver
To implement a custom resolver, you need 2 things:
- A user-defined function (UDF).
- A query or mutation that references your UDF with the resolver directive.
This is where fauna-gql-upload really shines.
- Create a new file
fauna/lib/DetermineResult.tsand add the contents below.
This is a helper function that we'll use to compare our selection with a randomized opponent selection and determine a winner. Since it lives under /lib and not /functions, it will not be registered as a UDF in Fauna.
import { ExprArg, ExprVal, query } from "faunadb";
const { And, Equals, If, Or } = query;

export default function DetermineResult(selection: ExprArg, opponentSelection: ExprArg): ExprVal {
  return {
    selection,
    opponentSelection,
    message: If(
      Equals(selection, opponentSelection),
      "It's a tie!",
      If(
        Or(
          And(
            Equals(selection, "Rock"),
            Equals(opponentSelection, "Scissors")
          ),
          And(
            Equals(selection, "Paper"),
            Equals(opponentSelection, "Rock")
          ),
          And(
            Equals(selection, "Scissors"),
            Equals(opponentSelection, "Paper")
          ),
        ),
        "You win!",
        "You lose!"
      )
    )
  }
}
- Now create the file
fauna/functions/Play.tsand add the contents below.
This is our UDF. Note that it references the DetermineResult helper function we created above. Since FQL is somewhat verbose, I like to organize my functions like this to keep the logic readable and clean.
This UDF also makes use of some additional helper functions from fauna-fql-lib. Fauna does not provide its own random number generator (yet), but the RandomString function is good enough for our purposes.
The name property is especially important as it will serve as the identifier in the @resolver directive in schema.gql.
import { query } from "faunadb";
import { RandomString, Switch } from "faunadb-fql-lib";
import DetermineResult from '../lib/DetermineResult';
const { Lambda, Let, Query, Var } = query;

const selectionMap = {
  R: "Rock",
  P: "Paper",
  S: "Scissors"
};

const Play = {
  name: "play",
  body: Query(
    Lambda(
      ["selection"],
      Let({
        randomCharacter: RandomString(1, "RPS"),
        opponentSelection: Switch(Var("randomCharacter"), selectionMap),
      },
        DetermineResult(Var("selection"), Var("opponentSelection"))
      )
    )
  ),
};

export = Play;
- With the UDF defined, we can now reference it in our GraphQL schema.
Open fauna/schema.gql again and add the following query.
type Query {
  play(selection: Selection!): Result! @resolver(name: "play")
}
This defines a query called play that takes one argument, selection, which will be one of the enum values defined earlier (Rock, Paper, or Scissors). The query returns a non-nullable Result and the @resolver directive tells Fauna to use the play UDF we defined in the fauna/functions/Play.ts file we implemented earlier.
Make it so
So far, we've accomplished the 2 aformentioned requirements for a custom resolver all in our code editor:
- We updated our schema in
schema.gql - We defined a UDF to implement our game logic.
Now, in one command we can push all of this to Fauna:
npm run fauna
Again, you should see the following output:
✔️  Successfully updated schema.

✔️  Successfully uploaded indexes

✔️  Successfully uploaded functions

✔️  Successfully uploaded roles
Let's play!
Head on over to the Fauna admin UI again. Go to the GraphQL section and execute the query below.
query {
  play(selection: Rock) {
    selection
    opponentSelection
    message
  }
}
You should see output like the following:
{
  "data": {
    "play": {
      "selection": "Rock",
      "opponentSelection": "Scissors",
      "message": "You win!"
    }
  }
}
Conclusion
In this tutorial, we laid a strong foundation for developing any application with Fauna. We can make changes in our code editor and push them to Fauna in a single command. The full source code for this project can be found at fauna-rock-paper-scissors.
If you want to experience a more complete example of what you can build with Fauna and GraphQL, head on over to Botwise Games. I was grateful to find fauna-gql-upload to make my Fauna developer experience for that project even better. Special thanks again to Carl Hallén Jansson for authoring this library and continuing to improve it.
If you have any questions or comments on this tutorial, find me on Twitter @seanconnollydev or seanconnolly.dev.
Up next
In the next post in this series, we will learn how to use Fauna's generated GraphQL schema to build UI for our game with Next.js, TypeScript and Apollo hooks. See you then!


Top comments (0)