
The Open-Source Content Moderation Service we have prepared for you is so simple and elegant to use, that even if you do not have any knowledge about algorithms, it won’t matter! You just need to know, it’s using Machine Learning … it’s trendy! ;)
Agenda:
1. The Problem
2. The Solution
3. The Stack
4. Development Environment
5. API Usage Examples
6. File Structure
7. NSFW Models
8. Deploying on Production
9. What comes Next
The Problem
Publishing user-generated content always comes with a risk and moderation is a must! Going through piles of disturbing content, however, is time-consuming and seriously stressful. Big companies like Google and Facebook have entire teams dedicated to removing offensive content, but that’s a luxury we can’t all share. Not to mention that automating this process can come quite pricey & require a high level of expertise.
However, advances in computer processing power, storage, data tools, web, etc made machine learning technologies more and more affordable. Machine Learning has already matured to the point where it can be a vital part of various projects of all sizes. All this inspired our team to roll up our sleeves and create a fully-functional Content Moderation service built entirely with Open-Source tools and libraries, which is easily maintained and can be integrated into any Node.js project effortlessly.
The Solution!
In a brief series of three tutorials, we will build with you a fully functional Open-Source Content Moderation service with ReactJS based Admin Panel. It is designed to be easily integrated into every project even if this is your first encounter with Machine Learning. Check out our demo to have a sneak peek at the final result. ;)
Here’s what you’ll get by the end of this hattrick:
- Restful APIs, so you can flawlessly integrate content moderation logic in every project with user-generated content.
- Content Moderation Automation Engine - A straightforward and effortless way to remove all unseemly images. Set the params which decisions should be taken by the ML and for which manual moderation is needed, with no hassle.
- Ready-to-use Mobile-first React JS Moderation application - A beautiful admin panel, so your team can conveniently moderate and manage all images that require a manual assessment from an impeccable UI, no additional coding required.
- A cost-efficient solution - Our mission is to bring Machine Learning closer to single developers and teams of all sizes by making it affordable. SashiDo managed to drop all costs to the bare minimum of $4.95 for 1 000 000 predictions.
- No need for Machine Learning knowledge or skills to get this working!!!
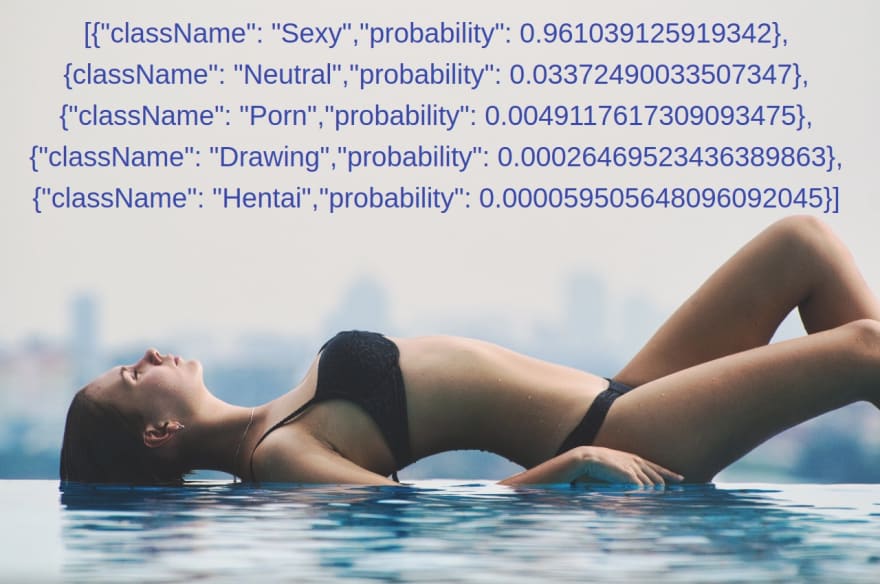
Examples and Demos
| Image Source | Image Source | Image Source |
|---|---|---|
 |
 |
 |
| Classification Result | Classification Result | Classification Result |
| [{ "className": "Neutral", "probability": 0.93821 }, { "className": "Drawing", "probability": 0.05473 }, { "className": "Sexy", "probability": 0.00532 }, { "className": "Hentai", "probability": 0.00087 }, { "className": "Porn", "probability": 0.00085 }] |
[{ "className": "Sexy", "probability": 0.99394 }, { "className": "Neutral", "probability": 0.00432 }, { "className": "Porn", "probability": 0.00164 }, { "className": "Drawing", "probability": 0.00006 }, { "className": "Hentai", "probability": 0.00001 }] |
[{ "className": "Drawing", "probability": 0.96063 }, { "className": "Neutral", "probability": 0.03902 }, { "className": "Hentai", "probability": 0.00032 }, { "className": "Sexy", "probability": 0.00001 }, { "className": "Porn", "probability": 0.00005 }] |
| Neutral Demo | Sexy Demo | Drawing Demo |
The Stack
For the purpose of this article, we will implement image classification into a SashiDo application, as such an approach will allow us to complete the task at hand masterly in no time. :) If you have your project elsewhere, no worries - our content moderation service is open-source and can be hosted on any other platform that supports fully featured Node.js + MongoDB or even cloud hosting providers as AWS VMs and Digital Ocean.
However, as we want to focus on the content moderation and not waste time on the infrastructure side, we decided to go serverless and use SashiDo. Have a look at how you can register and create an application in SashiDo with all Parse Server functionalities built-in.
When it comes to the tools and libraries, I’m sure you’ve asked yourself more than once - “Which one is the perfect tool to start off?”. Following the good old ‘Keep it simple’ rule we have preselected this awesome bundle for you. :)
- Node.js
- Mongo DB - a document database that’s used directly by the Parse Server.
- Parse Server - an open-source Backend-as-a-Service(BaaS) framework initially developed by Facebook. It comes with a bunch of built-in functionalities and can be deployed to any infrastructure that can run Node.js. To implement server-side logic, we'll use Parse Server Cloud Code. It is built directly into the Parse Server and we hope you’ll find it quite straightforward and easy to use.
- TensorFlow - an open-source software library by Google, designed specifically for deep machine learning applications.
- nsfw.js - an amazing JavaScript library by Gant Laborde for identifying unseemly images. Check out their cool demo at https://nsfwjs.com.
- axios - our preferred HTTP client. Of course, you can easily replace it with your favorite lib.
- Parcel.js- Parcel deserved its place here, as it’s a blazing fast, zero-configuration web application bundler.
Since the goal is to have a ready-to-use product, not only classification logic, for the upcoming tutorials, we will add React to our stack. It will help us build the admin panel in Part 3 of the series. :)
Anyhow, today we’ll begin with building the REST API for image classification, so let’s kick it off by starting the project in a development environment!
Development Environment
Implementing new features can always be challenging and has its risks, but setting up a local environment for testing makes life easier for you. :) So in case you want to apply some customizations or run a few tests before deploying in production, that’s the safe way to go.
We have developed and tested with Node.js 10.2.1 and MongoDB 3.4.X, so these are the minimum requirements.
You can find our plug-and-play service on GitHub. Then simply open the terminal into the directory you’ll use for storing and take the plunge by cloning the project.
Detailed instructions on how to proceed are available in the README file, but let me summarize the setup here as well:
1. Clone the project.
git clone https://github.com/SashiDo/content-moderation-image-api.git
2. Copy the env.example file to a .env and set your database URL.
    cd content-moderation-image-api
    cp env.example .env
Since we are testing with a SashiDo application, there is no need to run a local instance of MongoDB. Simply get your application's Database URL from the Dashboard -> App -> App Settings -> Security & Keys.
Once you set the DATABASE_URI variable into the newly created .env file, continue with the next step.
3. Install dependencies The project holds a complete example, all you need to do to is execute:
npm install
4. Start the local server.
npm run dev
Et voila! Running on http://localhost:1337 displays on your terminal.
[nodemon] 2.0.4
...
[nodemon] starting `node index index.js`
✨  Built in 2.55s.
node-pre-gyp ...
...
Running on http://localhost:1337
⠙ Building index.js...The NSFW Model was loaded successfully!
✨  Built in 16.41s.
Now that we have the classification service running locally, let’s put the focus on the usage, file structure, and models.
API Usage Examples
To make you feel as comfortable as possible we have added two approaches for classifying images - from an Express route, and for all Parse Server fans - from the Parse Cloud Code Functions. :)
cURL
The Express Router is a complete middleware and routing system. You can easily classify images in the browser or with a simple cURL request.
curl http://localhost:1337/api/image/classify?url=https://nsfw-demo.sashido.io/sexy.png
This is for (future)Parse Server fans - Simple Cloud Code Function - Cloud Code runs in the Parse Server rather than running on the user’s device. You can get predictions calling the nsfwImageClassify function from REST API or from your Android, iOS, etc app. Check the example below on how to invoke from the REST API:
curl -X POST \
  -H "X-Parse-Application-Id: myAppId" \
  -H "X-Parse-REST-API-Key: myRestKey" \
  -d '{ "url": "https://nsfw-demo.sashido.io/sexy.png" }' \
  http://localhost:1337/functions/nsfwImageClassify
Parse SDKs
You can invoke the nsfwImageClassify function from the client-side or using the Parse SDKs as well:
Android SDK
HashMap<String, String> params = new HashMap<String, String>();
params.put("url", "https://nsfw-demo.sashido.io/sexy.png");
ParseCloud.callFunctionInBackground("nsfwImageClassify", params, new FunctionCallback<Object>() {
  void done(Object predictions, ParseException e) {
    if (e == null) {
      // prediction
    }
  }
});
More information about how to work with the Android SDK can be found in the official docs.
iOS SDK
PFCloud.callFunctionInBackground("nsfwImageClassify", withParameters: ["url":"https://nsfw-demo.sashido.io/sexy.png"]) {
  (predictions, error) in
  if !error {
    // prediction
  }
}
More information about how to work with the Parse iOS SDK can be found in the official docs.
API Console
SashiDo app owners can test all Cloud Code functions from the Dashboard with just a click. Check our super-friendly API Console that also gives you the option to export any request to a cURL.

File Structure
Being well informed about the file structure is of great importance, as it puts you on solid grounds. To avoid any misunderstanding, we will give the architecture a bit of special attention.
Following the best practices, we keep all the source code in the src folder, with two subfolders - for the Cloud Code and visualization. Let’s focus on the cloud folder that holds all the image classification logic.
src/cloud/
├── ml_models/
│   ├── nsfw_model.js
├── routes/
│   ├── api.js
│   └── index.js
├── app.js
├── config.js
├── functions.js
└── main.js
Our recommendation for a structure is decoupling the API, NSFW models, and image classification logic to different files. Let me go brief over the architecture:
nsfw_model.js- contains logic for loading the NSFW model. The Classification method also belongs here.config.js- instead of loading the model and shape from process.env directly each time, we’ve saved them here.api.js- as you’ve already guessed, here’s the heart of this project - the API. To keep things simple and move one step at a time, we have implemented just one handler. Its only job is invoking the classify method for an image and returning a prediction.
import express from "express";
const router = express.Router();

router.get("/image/classify", async (req, res) => {
 try {
   const { url } = req.query;
   const result = await nsfwModel.classify(url);
   res.json(result)
 } catch (err) {
   console.error(err);
   res.status(500).json({
      error: "Ups... Something went wrong!"
    });
 }
});
That’s it! Our API is ready to go through a pile of photos in no time helping you protect your project’s users from inappropriate content.
NB! main.js, app.js, and functions.js are part of SashiDo’s predefined cloud code and the structure is Parse Server specific. Let me give a piece of information about each file’s function as such insights could help you hand over effortlessly to your project if hosted elsewhere.
main.js- is the entry point for each SashiDo application.app.js- holds your Express logic, as we mount it automatically to the Parse Server Deployment.functions.js- is where Simple Cloud Code lives. :)
NSFW Models
To keep it simple, in the context of this tutorial, you can think of the Machine Learning model as a file that has been trained to recognize certain types of patterns. For our specific case, we pass the model an image and it returns a JSON of predictions how likely this image falls into each of the following 5 classes:
- Drawing — Harmless art, or picture of art
- Hentai — Pornographic art, unsuitable for most work environments
- Neutral — General, inoffensive content
- Porn — Indecent content and actions, often involving genitalia
- Sexy — Unseemly provocative content, can include nipples
SashiDo stores three pre-trained ready for integration nsfw models that you can choose from. Each of these models has different accuracy, shape size, and resource consumption.
You've probably noticed that mobilenet models are far more lightweight than the inception one, which has a high RAM and CPU consumption. That's why for the development environment we have preset the Mobilenet 93. However, you can always choose a different model. To evaluate each model’s performance and check which matches your use case best, check the NSFWJS Demo page.
For our examples and demos, we’re using Inception_v3, as that’s our favorite choice. If you also choose using Inception_v3, keep in mind that your project will need more computing power. For the occasion in which SashiDo is your mBaaS provider - the minimum Engine that can handle this task is Production 2X.
Deploy to Production
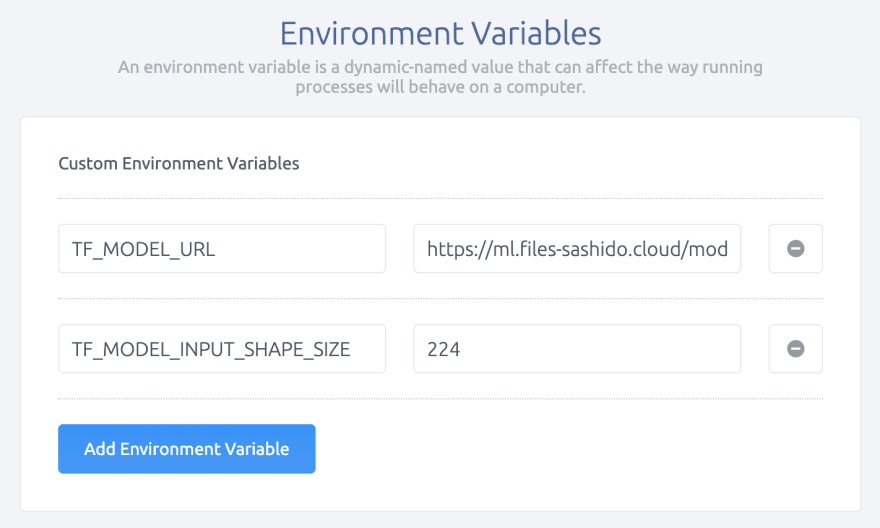
1. Configuration
The configs we need to set up in production are TF_MODEL_URL for the TensorFlow Model URL and TF_MODEL_INPUT_SHAPE_SIZE for the Input Shape Size. Check the previous section to make your pick.
If you are a proud SashiDo app owner or collaborator, jump to Runtime -> Env Variables section to set the values. Please, note that any change of environment variables from the Dashboard automatically triggers a Deployment of your project. When you’re all set, the final result should be:
2. Push the project code to your SashiDo App
Having a local environment for experimenting surely pays off! You already went through the code and verified it’s behaving properly. Make sure that you've connected your SashiDo account to GitHub and safely push the changes to your production app’s master branch.
An elegant approach to go with is adding a remote:
git remote add production git@github.com:parsegroundapps/<your-pg-app-your-app-repo>.git
... and applying to the live app seamlessly.
git push -f production master
If you're keeping up with the good practice and have a testing/staging application apart from your live one, we would always advise pushing changes there first.
Naturally, pushing new code to GitHub automatically triggers a Build and Deployment of your SashiDo App.
3. Get Live Predictions
Same as with testing locally, try out calling the classify method to validate the smooth operation of the service applied. In case you forgot what are the commands, refresh your memory here.
Well, that’s it! A piece of cake, right. :)
What comes Next
Content Moderation Service with Node.js, TensorFlowJS, and ReactJS. Part 2: Moderation Automation - The next part describes in detail how to add an Automation Engine and implement the logic for the automatic deletion of most hazardous images. It will be quite useful, I promise!
Content Moderation Service with Node.js, TensorFlowJS, and ReactJS. Part 3: Moderation Admin App - To put the cherry on top, we add a beautiful Admin Panel and prove that even most boring tasks may be completed with finesse.
And if you’re still wondering about where to host such a project, don’t forget that SashiDo offers an extended 45-day Free trial, as well as exclusive Free consultation by SashiDo's experts for projects involving Machine Learning.
Our team will be happy to hear about your specific use case and what problems our moderation service helped you solve. You're more than welcome to drop us a line at hello@sashido.io!
Happy Coding!

Top comments (0)