
Hi there! Today we are going to build a simple Quiz REST API using NodeJS and MongoDB. It means people will be able to retrieve, update, delete and create quiz questions in the database with this project.
You can find this project finished in its github repository.
Notes
I'm assuming you have already installed node and that you understand at least the basics of nodejs and javascript. But if that isn't the case, you can take a look at the node oficial guide before reading this article.
I'm also assuming you're familiarized with the concept of APIs (Application Programming Interfaces).
If you don't know anything about MongoDB but have experience with databases, you can follow this post without any struggle. However, if you're curious or doesn't know anything about it, you may want to check out the MongoDB Docs.
Table of Contents
- Setting up
- Server Setup
- Database Connection
- Dotenv File
- Routes File
- Testing our Route
- Building a Model
- Routes - Create Questions
- Routes - Get All questions
- Routes - Get One Question
- Routes - Update One Question
- Routes - Delete One Question
- Conclusion
Setting Up
Our first step is to open up a terminal and create a new directory for the project, then start a node application with npm init. You can answer all questions from the CLI the way you want to. After that, we can finally begin to install our dependencies. Here we're going to use express and mongoose modules. The first one will provide us the HTTP utility methods we need to construct our API. Now the second one, is going to allow us to interact with our database. We'll need a package named cors as well. It will help us to solve the cors problem. Run the following command to install them:
npm i express mongoose cors
Beyond these, we'll use nodemon to make the development process faster and dotenv to get our environment variables from a .env file. You can install these packages with:
npm i --save-dev nodemon
npm i dotenv
Now that we've installed nodemon, it's the time to set up our scripts in the package.json file, which was automatically created when we first ran npm init. So open up this file and look for the key scripts, if isn't any scripts key, you should add one. It should be something like this:
"scripts": {
  "dev": "nodemon src/server.js"
}
Now, when we wish to run the project, all we need is to execute the command npm run dev.
Server Setup
We now have installed all the packages we'll need. So on the root of the project, create a new directory named src and add a new file called server.js inside of it.
Inside our server.js file, we're going to import the express module and then create a instance of it.
const express = require('express')
const app = express()
Now we need to tell the app to listen to a given port.
But how do we do it?
We just call the listen method, passing the port number and a callback function as parameters. In this case, we're trying to get the port number from a environment variable.
app.listen(process.env.PORT, () => {
    console.log("The API is running...")
})
A piece of cake, isn't it?
Alright! At this point, the file should be looking like this:
const express = require('express')
const app = express()
app.listen(process.env.PORT, () => {
console.log("The API is running...")
})
```
## Database Connection
We are now going to connect to a mongodb database. If you wish, you can run a local database with [MongoDB Community Server](https://www.mongodb.com/download-center/community). In this example, we're going to use [Atlas](https://www.mongodb.com/cloud/atlas), a cloud hosted database, which has a free plan with a 512MB storage limit.
Still in `server.js` file, we'll include the `mongoose` module and make the connection with... Guess what? The connect method!. It will result in something like this:
````javascript
const express = require('express')
const app = express()
const mongoose = require('mongoose')
mongoose.connect(process.env.DATABASE_URL, { useNewUrlParser: true, useUnifiedTopology: true })
const db = mongoose.connection
db.on('error', (error) => console.error(error))
db.once('open', () => console.log('database connected'))
app.listen(process.env.PORT, () => {
console.log("The API is running...")
})
```
Okay! The `mongoose.connect` method receives two parameters, the database url and a object containing a few configurations. You don't have to worry much with the second parameter though. It was needed because the standard config is now depreceated. You can read more about it on the oficial [docs](https://mongoosejs.com/docs/guide.html) if you wish.
As you can see, the database URL is actually coming from a environment variable. So that's a good moment to set up our `.env` file.
## Dotenv File
So we'll now create a new file at root directory and name it `.env`. It's content should be something like the following:
```
DATABASE_URL=mongodb://xxxxxx/xxxxx
PORT=3333
```
So you can replace the variable value by the URL of your database. If you're using `Atlas` as well, you can find the database URL choosing the application connection method in [atlas](https://www.mongodb.com/cloud/atlas)'s dashboard section. We also defined our PORT number to 3333.
Now that we've created our `.env` file we must include it in `server.js`. This can be easily done by adding the line `require('dotenv').config()` right bellow the declaration of the mongoose constant.
So `server.js` should be similar to this:
```javascript
const express = require('express')
const app = express()
const mongoose = require('mongoose')
require('dotenv').config()
mongoose.connect(process.env.DATABASE_URL, { useNewUrlParser: true, useUnifiedTopology: true })
const db = mongoose.connection
db.on('error', (error) => console.error(error))
db.once('open', () => console.log('database connected'))
app.listen(process.env.PORT, () => {
console.log("The API is running...")
})
```
If everything is fine, you can run `npm run dev` and should see a log saying you've connected to the database.
## Routes File
It's now time to create our routes file. Inside the src folder, make a new file named `routes.js`. This file will be responsible for declaring all the routes in our API. So open it up and let's code:
```javascript
const express = require('express')
const router = express.Router()
module.exports = router
```
Until now, we've included the express module and made a router from its instance. In the end of the file, we've exported the router constant so we can import them in another file. It brings us to the routes themselves. The routes we're gonna build in this project are:
1. Route for getting all questions
2. Route for getting one question
3. Route for making one new question
4. Route for updating one question
5. Route for deleting one question
If you're not very familiar with http verbs and request methods, you can read about them [here](https://restfulapi.net/http-methods/#delete).
We're only going to make the **skeleton** of all the routes for now. That will make our `routes.js` file look like this:
```javascript
const express = require('express')
const router = express.Router()
// get all quiz questions
router.get('/questions', (req, res) => {
})
// get one quiz question
router.get('/questions/:id', (req, res) => {
})
// create one quiz question
router.post('/questions', (req, res) => {
})
// update one quiz question
router.put('/questions/:id', (req, res) => {
})
// delete one quiz question
router.delete('/questions/:id', (req, res) => {
})
// this one is just a test
router.get('/', (req, res) => {
res.send('H3ll0 W0RlD')
})
module.exports = router
```
I'm going to explain all these routes later. For now, I've put a extra route for testing purposes at the end of the file. When we make a get request for the '/' path, we're going to get *H3ll0 W0RlD* as a response.
But before we can test this route, we'll need to tell our server to use the routes in `routes.js`. That being said, let's modify our `server.js` file.
```javascript
const express = require('express')
const app = express()
const mongoose = require('mongoose')
const routes = require('./routes') // includes the routes.js file
const cors = require('cors') // includes cors module
require('dotenv').config()
app.use(cors()) // We're telling express to use CORS
app.use(express.json()) // we need to tell server to use json as well
app.use(routes) // tells the server to use the routes in routes.js
mongoose.connect(process.env.DATABASE_URL, { useNewUrlParser: true, useUnifiedTopology: true })
const db = mongoose.connection
db.on('error', (error) => console.error(error))
db.once('open', () => console.log('database connected'))
app.listen(process.env.PORT, () => {
console.log("The API is running...")
})
```
## Testing our Route
We can now make a few tests to guarantee everything is going okay. For that purpose we'll need a REST client such as [Postman](https://www.postman.com/) or [Insomnia](https://insomnia.rest/download/). However, in my case I'm going to use Insomnia.
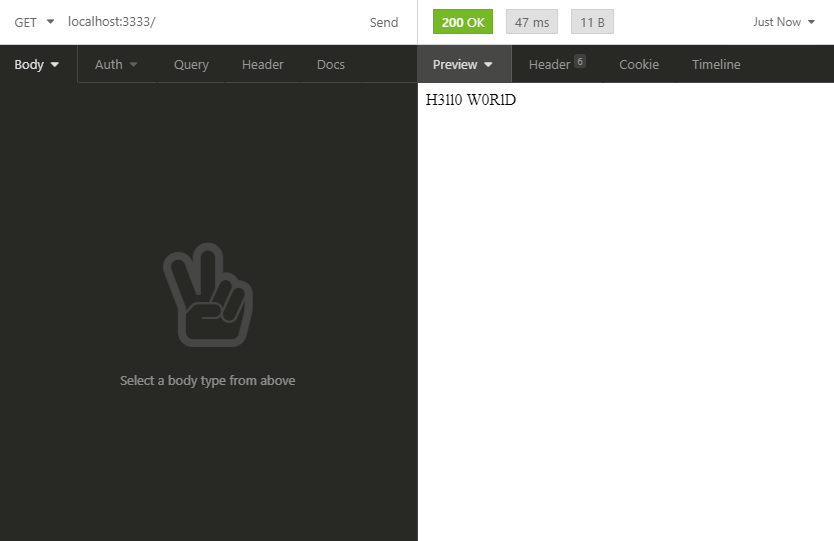
Here I've tested the 'localhost:3333/' route, which successfully returned me *'H3ll0 W0RlD'*.
After testing the '/' route, I've deleted it from `routes.js`, since it was only for testing purposes. By the way, you are free to test the others routes if you do wish. Just remember to use the right HTTP method to each route.
## Building a Model
Now that we've got the `routes.js` file settled, we should worry about creating a model and its schema. For those who aren't aware of this, in this context, models are just a representation of a database entity. If that still doesn't make much sense, just follow along with this post. It'll become easier as we go.
So let's create a folder named `models`, inside of our `src` directory. I've already created a new collection (it's like the tables in MySQL) called `questions` in our database. That being said, let's create a new file inside the models folder with the name `Question.js`.
Inside this file, we'll make its schema. A Schema is like a blueprint of a database entity (in this specific case, a collection named `questions`). So the content of `Question.js` will be similar to these:
```javascript
const mongoose = require('mongoose')
const QuestionSchema = new mongoose.Schema({
description: String,
alternatives: [
{
text: {
type: String,
required: true
},
isCorrect: {
type: Boolean,
required: true,
default: false
}
}
]
})
module.exports = mongoose.model('Question', QuestionSchema)
```
Basically, what we've done is describe how are the fields (or columns in MySQL) inside a document (similar to rows in MySQL) that belongs to Questions. In the end of the file, we exported the model using the specific method for exportation from mongoose. We've also gave the model the name *Question*.
This part is more or less self-explanatory, so I'm not going to dive into it. But if you want to read more about MongoDB Schemas, you can learn more [here](https://docs.mongodb.com/stitch/mongodb/document-schemas/).
## Routes - Create Questions
Alright! We made the necessary models and schemas, which means we can build up our routes for real this time. So back in our `routes.js` file, we first need to import the we've created.
```javascript
const express = require('express')
const router = express.Router()
const Question = require('./models/Question') // includes our model
```
Now we're going to modify the route for creating a new question. Right now, this is how it looks:
````javascript
// create one quiz question
router.post('/questions', (req, res) => {
})
```
We're using the **post** method in this route because we want to create something new into the database.
This route will serve to insert a new question into the database, each question has its description and alternatives. So we'll consider the data we need for creating a new question will be sent as JSON in the request body. That being said we'll wrap our request with a try/catch statement and retrieve the request data. We'll also return a 500 status code (which means 'Internal Server Error') in case of a error.
```javascript
// create one quiz question
router.post('/questions', (req, res) => {
try {
const { description } = req.body
const { alternatives } = req.body
} catch (error) {
return res.status(500).json({"error":error})
}
})
```
Now that we've got the description and the alternatives for the question, we'll use the Question schema for creating a new question. In the end, we'll return a 201 status code (it means 'created') along with the the created question.
```javascript
// create one quiz question
router.post('/questions', async (req, res) => {
try {
const { description } = req.body
const { alternatives } = req.body
const question = await Question.create({
description,
alternatives
})
return res.status(201).json(question)
} catch (error) {
return res.status(500).json({"error":error})
}
})
```
I've also turned the callback an asynchronous function, that way we could use promises inside it. By the way, we used **[Object Destructuring](https://codeburst.io/es6-destructuring-the-complete-guide-7f842d08b98f)** in the parameters of Question's create method to simplify our code.
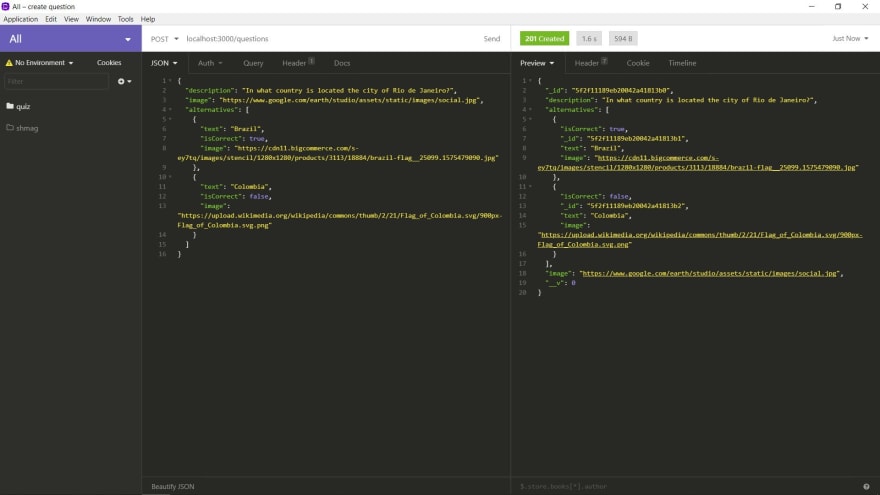
Now if we test this route with the help of a REST client we'll get something like this:
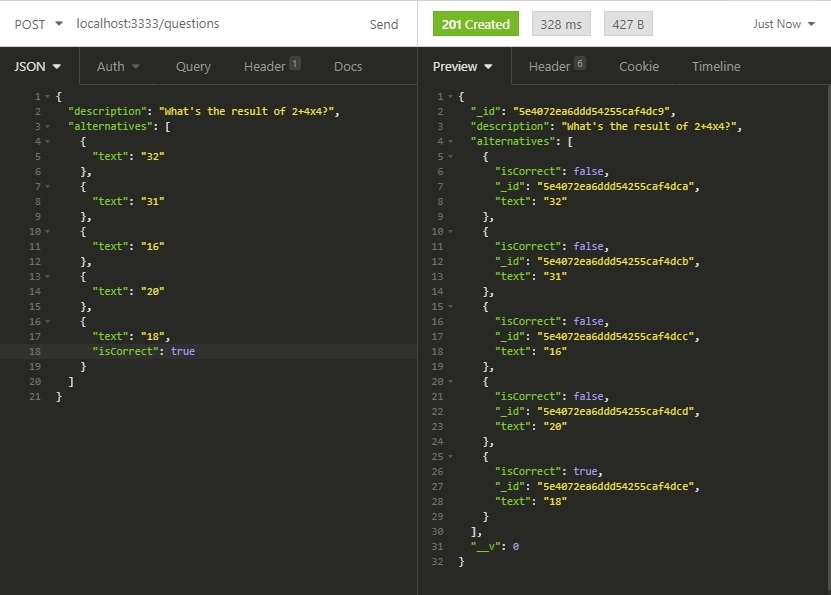
If you look to the right side, you'll notice there are a few extra fields, such as _id and __v. You don't have to worry much about them, they are automatically included by MongoDB. The _id field is just a ID and __v is the document version counter, which counts how many times that document was changed.
## Routes - Get All questions
It's now time to modify another route. This time will work with the route for getting all questions in the database. Since we're retrieving data from the database, we are using the get method. Right now, this is how the route is looking.
```javascript
// get all quiz questions
router.get('/questions', (req, res) => {
})
```
Just as the first one, we'll turn the callback a asynchronous function and wrap its inner side with a try/catch statement returning a 500 status code in case of error.
```javascript
// get all quiz questions
router.get('/questions', async (req, res) => {
try {
} catch (error) {
return res.status(500).json({"error":error})
}
})
```
With the same logic, we'll just use the Question schema to **find** all questions in the database. In the end, returning it to the client.
```javascript
// get all quiz questions
router.get('/questions', async (req, res) => {
try {
const questions = await Question.find()
return res.status(200).json(questions)
} catch (error) {
return res.status(500).json({"error":error})
}
})
```
Now when we make a get request to this route, this is what we get:
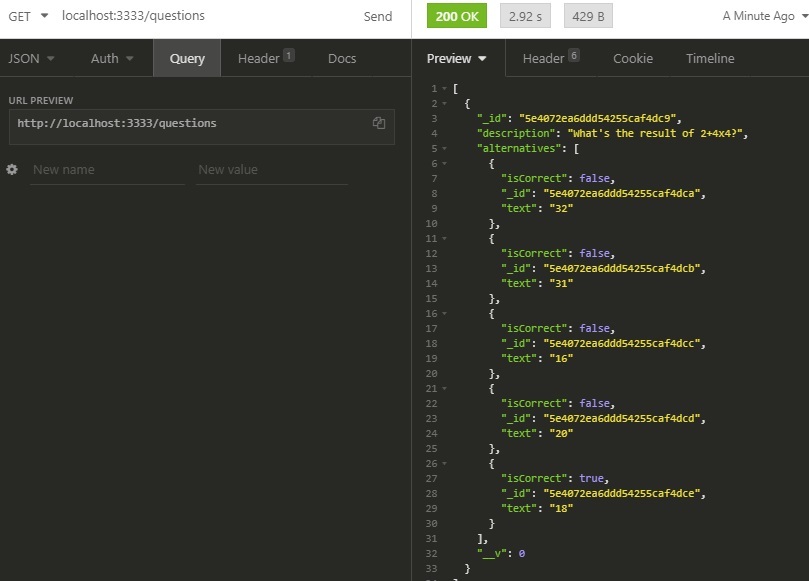
Since there were only one question in the database, just one was returned.
## Routes - Get One Question
Now that we've made a route for getting all questions, why not finish the route for getting just one specific question? Right now, this is how it's looking:
```javascript
// get one quiz question
router.get('/questions/:id', (req, res) => {
})
```
Notice that this route's path is a little bit different from the others, since it has *'/:id'* in the end. In a actual request, this part will be replaced by the question's id. So in some way it's similar to variables. We'll do the same process we've done in the other routes here.
```javascript
// get one quiz question
router.get('/questions/:id', async (req, res) => {
try {
const _id = req.params.id
const question = await Question.findOne({_id})
if(!question){
return res.status(404).json({})
}else{
return res.status(200).json(question)
}
} catch (error) {
return res.status(500).json({"error":error})
}
})
```
The difference here, is that we retrieved the request data from `req.params` since it's coming from the path. In contrast, we have used `Question.findOne` here considering we just one to get one question, we passed _id as the search parameter. So it'll look for a question with that specific _id. Below, we just tested if that question actually existis in the database and returned a properly answer.
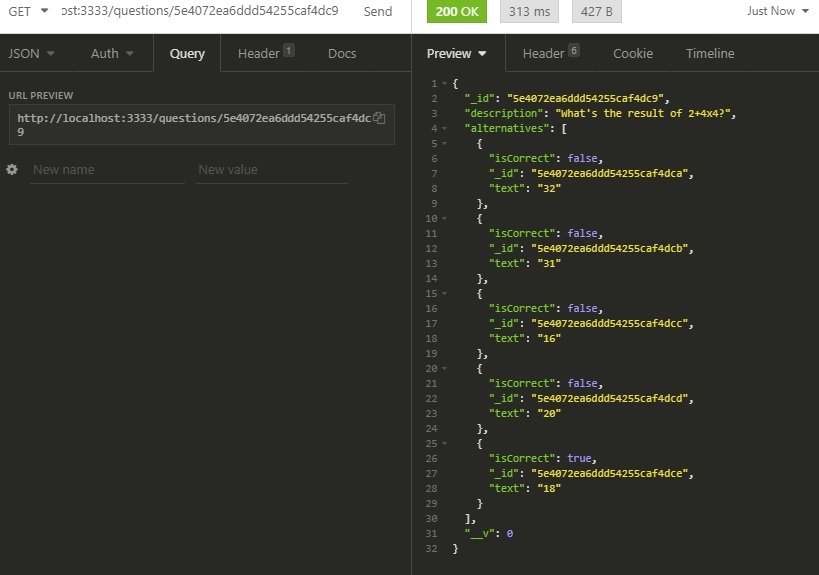
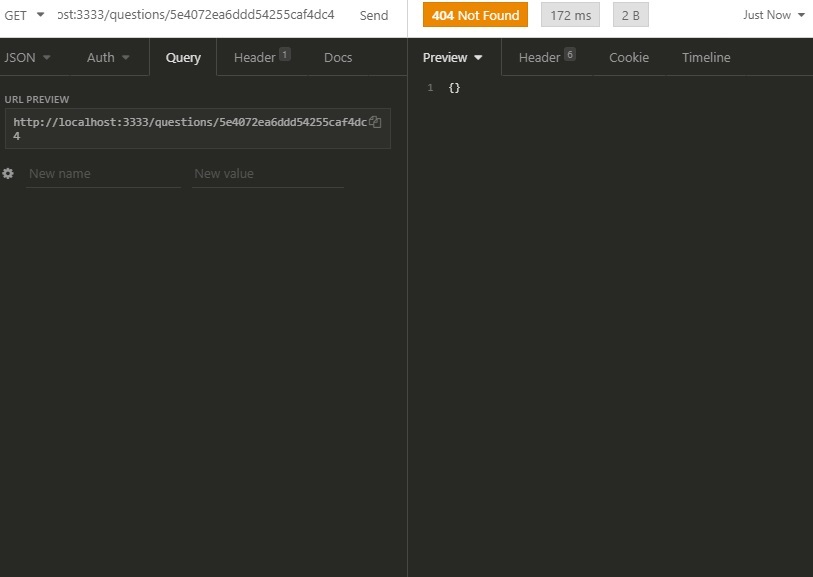
When you make a request with a real _id, this should be the result:
Now, if you use a incorrect _id:
## Routes - Update One Question
Now we're going to build up the route for updating a specific question. So we're using the *put* method for this one.
```javascript
// update one quiz question
router.put('/questions/:id', async (req, res) => {
try {
const _id = req.params.id
const { description, alternatives } = req.body
let question = await Question.findOne({_id})
if(!question){
question = await Question.create({
description,
alternatives
})
return res.status(201).json(question)
}else{
question.description = description
question.alternatives = alternatives
await question.save()
return res.status(200).json(question)
}
} catch (error) {
return res.status(500).json({"error":error})
}
})
```
We've done the same alterations in this route as well. We got the _id from the path and the new description and alternatives for that question from the request body. As said in the [docs](https://mongoosejs.com/docs/documents.html#updating) mongoose tracks document changes. So we first tried to find the question with the given _id. If the question doesn't exists, we then create it and return the data along with a 201 status code. If it does exists, we update the description and alternatives of the found document and calls the `save` method to update the actual document in the database. Finally, we return a 200 status code along with the question data.
When you pass **nonexistent** _id, a new question should be created. So the results should be something like this:
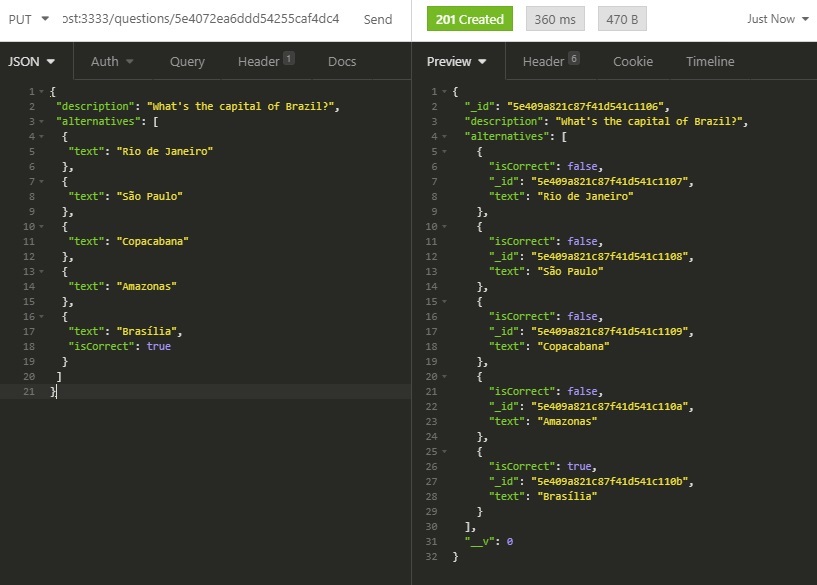
Now if you pass a **existing** _id, it will then update the contents of the question in the database. So it should end up like this:

## Routes - Delete One Question
It's finally the time for us to modify our last route. This route is responsible for deleting a specific question.
```javascript
// delete one quiz question
router.delete('/questions/:id', async (req, res) => {
try {
const _id = req.params.id
const question = await Question.deleteOne({_id})
if(question.deletedCount === 0){
return res.status(404).json()
}else{
return res.status(204).json()
}
} catch (error) {
return res.status(500).json({"error":error})
}
})
```
So as always, we've made the callback an asynchronous function and wrapped its contents in a try/catch statement. We've got the _id from the request parameters and called the `deleteOne` method to delete the question with that given _id.
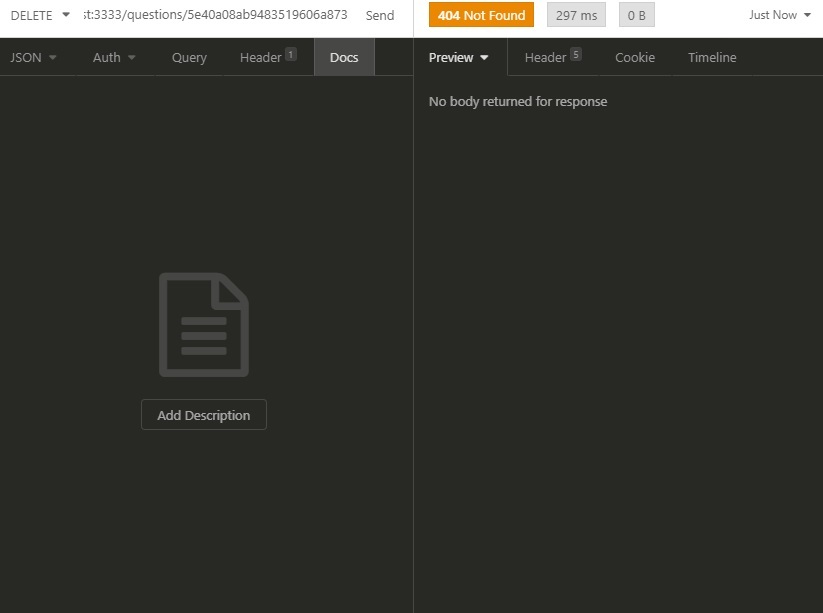
If the amount of deleted documents is equal to 0, it means the document doesn't exists. In that case, we return a 404 status code (not found):
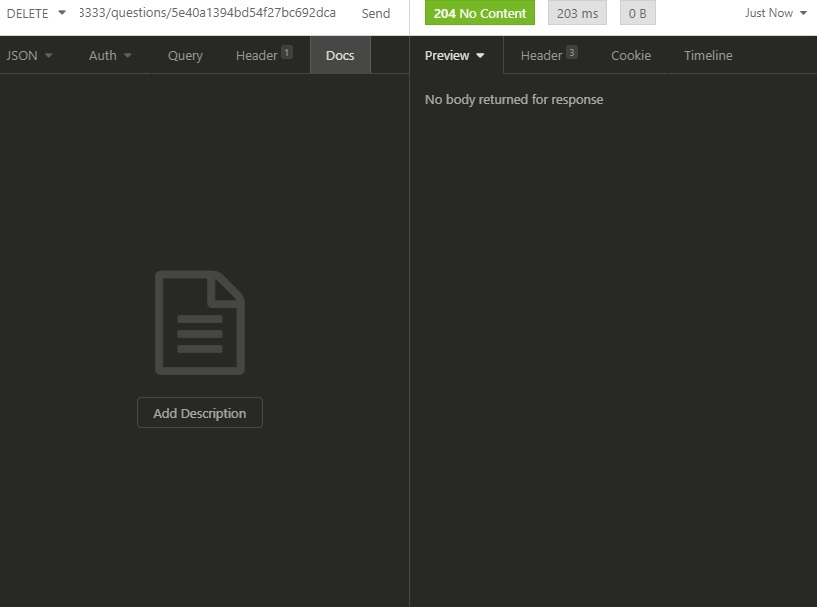
But if the document was really deleted, we return a 204 status code (no content):
## Conclusion
If you followed this article until here, it means we've finally **finished our API!**
Thank you for taking your time to read my post. I'm a newbie in writing articles, so if you have *any suggestions or corrections* about this post, I'd be glad to listen (read, in reality haha).
By the way, in **future**, I'll write another article about how to deploy this API to the cloud and another one for making a frontend to consume it.

Top comments (29)
Many thanks man, great help and easy tutorial!
hi Carlos , how can one include images to the questions , like a question that has both text and image , thank you
Hello RaynerRay!
That's a interesting question. I'd suggest you to add a new string field in the question model (7th step of the tutorial). That way you can save the path or the link of the image in the database. It would be something like this (Note the "image" field):
Thanks mate, if it works, i'll post here
Hi Carlos , sorry man but have tried all i can it's not working, trying to store images in both questions and answers,for example so a question can have test question and image answers, please help 👏
Well, in order to add an image field for the question and for each alternative, you need to modify the model in
Question.js. Here is my approach into this:Like I said before, you don't upload the images to the database, you just upload the link to the image, so they need to be hosted in another place on internet before hand.
Also, after modifying the model, you also need to update the routes for creating and updating questions in
routes.js. Something like this:That way, when you are creating a new question, you can pass data like this:
If you have more questions about this, feel free to send me a DM as well. Have a good day!
Many thanks, my mistake i was trying to upload images to the database, THANK YOU 🙏
Hi Carlos , another question , how can i create a relationship between the questions and a topic/subject, so that a user can select questions of a certain topic/subject only
Hey! Well, I see two ways of accomplishing that, one easy but not so good and another hard but a better solution.
The easy way is to just modify the Question model and add a "topic" field into it (it can either be a string or an array). The problem with that solution is that it can lead you to a lot of errors when registering new questions.
Now the second way is to create a model for the "topics" and modify the Question model with a new field for the "topics" (in this case, you would get the _id of the topic you want and save it inside the question). This way you can create new topics in the database and link them to the Questions.
It's kinda hard to explain how to do this with a comment, so I might write a new post to explain how you can build relationships between documents with mongodb as well. I hope I've been helpful.
true it's kinda hard to explain with a comment, maybe with code it'll be much clearer
I'm failing to direct you , want to show you my code, how can i dm you
I'm going to send you a message then.
Nice, look forward to the deployment tutorial!
Thanks Craig! I actually wrote a post about how to deploy an node API like this to Heroku for free, you might want to take a look.
Definitely will, thanks!
Great tutorial. Simple and to the point. Thanks!
Great tutorial, many thanks from france !
I'm very impatient to read the following article about the front-end consumer !
Thanks you! Gave me an idea on train myself on Quiz parts. Anyhow, can I show you my code and guide me a little bit?
Would love to have your opinion on my project!
Hi! I'm sorry about taking so long to answer, I was out of the platform for a period. About your question, I'm always open to this. Feel free to email me.
Informative and organized with good explanation. thanks brother
If we want to add more questions then what approach should be follow??
You can use the POST method for that, we have implemented it in one of the api routes (the 8th step).
If I want to add any Link inside the Quiz option then How can I add it.
You mean a link inside the alternatives text? If so, you could add a new field for the links, or use something similar to markdown. Using markdown, you could properly render the link in the text in the front-end.