11 Days of Salesforce Storefront Reference Architecture (SFRA) — Day 3: Creating a Storefront

With the development environment ready (and if it doesn't, please refer back to Day 2), it’s time to create our first storefront. A storefront is basically the term SFCC uses for a website application, be it an e-commerce site or an in-house employee benefits portal. A storefront is a foundational concept of SFCC development, as everything you develop for the platform is, ultimately, hosted on a storefront.
Uploading the Base Cartridge
Before we create our storefront, we need to upload the base cartridge to our Business Manager. The base cartridge contains the default controllers, JavaScript files and CSS for the site, and is necessary for creating sites on Business Manager. In order to authenticate the SFRA command-line tool with Business Manager, we need to set the credentials needed for it to upload cartridges:
- Using your favorite IDE, create a new file in the root of the storefront-reference-architecture folder named dw.json.
- Add the following content to the file:
{
    "hostname": "<sandbox-url.demandware.net>",
    "username": "<username>",
    "password": "<password>",
    "code-version": "<code version>"
}
🦏 Make sure to replace the placeholders with your real credentials. If you are coming from SGJC please note that these credentials are the same as you had for the server connection in Eclipse.
- Upload the base cartridge by running
npm run uploadCartridgein the root folder.
If all went well you should see an output similar to this:

Setting up a New Sandbox Site in Business Manager
Now that the app_storefront_base cartridge is uploaded, we can proceed to create a new site that will make use of it. The fastest way to set up an SFRA demo site is to use the demo site SFCC provides. To set up an SFRA sandbox site:
- On your local machine, clone the demo site repository by running git clone git@github.com:SalesforceCommerceCloud/storefrontdata.git
- cd to the repository folder (
cd storefrontdata). - In order to upload the sample site to Business Manager, the folder should be zipped up. You can zip the
demo_site_sfrafolder yourself, or runnpm run zipData(defined inpackage.json) to get the needed zip file. If successful you should have a newdemo_site_sfra.zipfile in your current folder. - Login to Business Manager and click Administrations > Site Development > Site Import & Export.
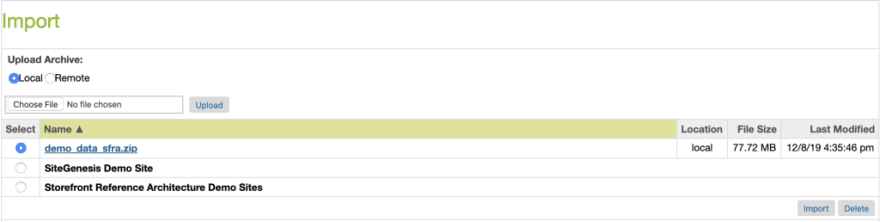
- Under Import make sure Local is selected. Click Choose File and select the demo_site_sfra.zip file we created earlier. Once selected, click Upload.
- Once the upload finishes, you should see the new file under the Import section. Select it and click Import.
Importing the site will take a while (about 10 minutes), you can watch the progress in the Status section at the bottom of the page. Once done, click Administrations > Sites > Manage Sites.
If all went well, you should see two new sites under the Storefront Sites section: RefArch and RefArchGlobal. Click on RefArch and select the Settings tab. You’ll notice that the base cartridge we uploaded before is on the Cartridges list.
🦏 We will discuss the Cartridges list and the importance of a cartridge in the cartridge chain on day 4.
- Using the dropdown in the top left corner, select RefArch, and click the Storefront button. If all went well, a new tab will open with the demo site:

Congratulations, you are now the proud owner of a brand new SFRA demo site 🎊
In tomorrow’s post, we will create our very first cartridge and use it on the newly created demo site!
As always, looking forward to your comments either here or on Twitter 😎

Top comments (0)