Part 8 written by


- Introduction, wire/bind
- Events and components
- Moar about components and simple state management
- Wire types and custom definitions (intents)
- Custom elements with hyper
- Customizing my custom elements
- Testing!
- Async loading, placeholder and a Typeahead with hyper
- Handling routes
- 3rd party libraries

There are a few common problems we deal with on a routine basis, when to brush our teeth, whether 3 day old pizza sitting on the counter is still good, and how to show users that something is happening when what is happening can’t be seen. And in a world driven by data, we often want to filter that data to only see what we want. We aren’t going to be able to help you with brushing your teeth or eating habits, but we can do something about the other problems.
If you’ve been following this tutorial, you already know how powerful hyperHTML combined with custom elements can be. We’ll be able to asynchronously load data while showing placeholder information, and create a typeahead that can filter the date we receive.
So let’s build a little app that solves these problems. For this part we are going to show a list of top 10 cryptocoins and the conversion to another currency. We will be using the cryptocompare api, you can read the documentation here. You don’t need to learn the full API if you don’t want, just follow along.
This is what we are going to build:
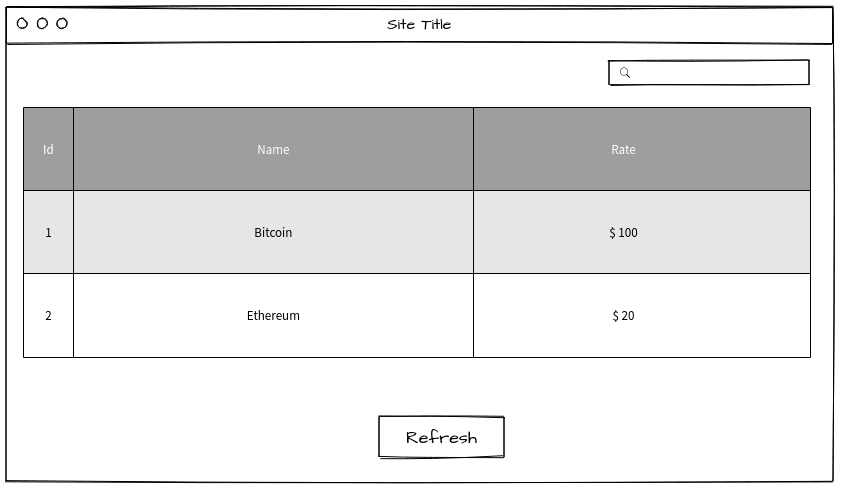
Filter on the top right to choose the rate to show.
Table with the top 10 coins and the rate.
Button to refresh the top 10.
Let’s reuse some of our code from part 6. Recall in part 6 we made a table with some random data and a few intents. We’ll build upon this table.
Typeahead
Typeaheads are complex elements. For our current project, we’ll use a simplified typeahead. Normally we’d need a lot more code to make this element complete, but for now, a simplified version will work. Whenever the user focuses on the dropdown the list appears, you type and the list filters, click on one of the options and you get the option selected and at that moment we trigger and on change event.
Be sure to review this code carefully, as we won’t go in depth about it here.
Notes on the typeahead code:
- We defined a get/set for options, to allow the user to pass options. We’re using an internal variable to store them. This helps avoid loops if we ever want to set options in our code.
- We’re using Bootstrap classes for styling. dropdown-menu-right will make sure the dropdown of our typeahead is visible on the screen.
- The open() and close() functions will set the state so when we next render, our typeahead will get the proper CSS class to show or hide. Remember, every time we call setState hyperHTML re-renders our element.
- We’re rendering an input that will be inside our element. This is very common thing to do with custom elements — to wrap a native element within our element. By doing this, it’s as if we are extending the native element with additional features.
- We don’t use (or need!) partial attributes. That’s why we need to wrap the class inside a ${}.
- We map over any options we find and return a wire() for each one. Returning the wire() is important; otherwise, hyperHTML won’t be able to attach the DOM nodes.
- Events let us listen for clicks on the input and open the dropdown, and clicks on the body to close it.
Before we can use the typeahead, we need to import it in index.js
// index.js
import "./Typeahead.js";

const input = document.querySelector("hyper-input");
And place the custom element in the HTML:

With the basic typeahead out of the way, it’s time to fetch the list of coins. Cryptocompare FTW. We’ll do the fetch here in index.js, and pass parts of the response to our typeahead.
const input = document.querySelector("hyper-input");

fetch(`https://min-api.cryptocompare.com/data/all/coinlist`)
 .then(b => b.json())
 .then(data => {
 input.options = data.Data;
 });
We should start options with an empty array so we don’t get undefined errors.
// typeahead.js
created() {
 this.options = [];
}
Now let’s take a look at the table.
Table
Cryptocompare has an endpoint to get a number of top coins by their total volume across all markets in the last 24 hours. We will use that one to set our table data, so let’s update index.js to do that.
fetch(`https://min-api.cryptocompare.com/data/top/totalvol?limit=10&tsym=USD`)
 .then(b => b.json())
 .then(data => {
 table.data = data.Data.map(coin => coin.CoinInfo);
 });
The table is empty. We need to update the html to target the real attributes
<hyper-table coin="USD">
 <hyper-column label="ID" attribute="Id"></hyper-column>
 <hyper-column label="Name" attribute="FullName"></hyper-column>
 <hyper-column label="Rate" attribute="data" sortable="false"></hyper-column>
</hyper-table>
We don’t really have a data attribute, but we will see why soon.
If we reload the page we see the table is empty and then all of a sudden we have the top 10 coins in the table. We should show some loading text so people know things are happening. A good place for this is inside the <tbody> of our table element.
Now to get the rate, we have to make another call to the server. Just to make it cool we are going to call once for every row in the table. In real production code you probably want to make a call once for everything instead of individual calls.
We added coin=”USD” to our table above. Since this is a value that can change, let’s put add an observed attribute called coin. When we start the app, it will start the hyper-input with this default value.
static get observedAttributes() {
 return ["coin"];
}
In our _renderCell function, let’s check if data is the attribute we are showing and then use the placeholder functionality of hyperHTML. This way we can show some loading text while fetch is loading, and afteward, the rate for the coin.
There’s a lot going on in this code. We’ve primarily encountered wires that look like this:
return wire()`<div class=${this.state.open}></div>`
However, in the above code, notice that we’re giving the wire a weak map and id: wire(item,:col${item.Id}) Hyper will use this to more efficiently use and render the wires. Also, for this wire we are passing an object, instead of HTML. Note that the “any” property is a promise that returns a wire, and the “placeholder” property is a wire. Hyper will use what is in the placeholder property until the promise in any is fulfilled. Whenever fetch is done, we are o return the rate and hyper will remove the placeholder wire and update our element with the new information. Pretty cool!
Success! We can see our table loading the coins then making 10 more requests to get the rate for each coin.
Putting it all Together
The next step is to connect the input with the table, we will do that in index.js
input.addEventListener("change", e => {
 table.coin = input.value;
 table.render();
});
Everytime our input changes, we will update the table coin with the new value and the re-render the table, which will make the rate column make new requests with the new coin and show the new data :D.
Oh no, we lose the sorting whenever we refresh the data… kind of makes sense since it’s new data. To fix that, let’s move the sorting piece outside our headerclick to its own function, and whenever we add new data we will just re-sort.
Alright! Lastly, for our table we will put a last-updated time in the footer. We have a date intent already, but for this we want to show the time also. Making a dateTime intent will help us with that
Very similar to our previous one but now we are showing the time too.
In the set data function, we are going to add a date so we have it for the footer
set data() {
 this._last = Date.now()
 ...
}
And of course the footer now looks like this

Code so far
Refresh
Since the top 10 changes rather often, let’s add a refresh button. With this button, the table can be updated without refreshing the whole page.
First, index.html, under the hyper-table add
<p class="text-center"><button class="btn btn-outline-secondary">Refresh</button></p>
Then in index.js, let’s wrap the fetch call for the table in a function called update. This way we can keep calling that every time we click the refresh button. We will also call it when we load the page so that we can get initial data to display.
And that’s it! Clicking on refresh updates the table and we can see the new timestamp in the footer.
I tried to focus more on the new parts, but if you need a more in-depth explanation of any part let me know in the comments and we can extend that part. Thanks for reading.
One last O Rly book :D


Top comments (0)