Part 7 written by Trevor Ganus,


- Introduction, wire/bind
- Events and components
- Moar about components and simple state management
- Wire types and custom definitions (intents)
- Custom elements with hyper
- Customizing my custom elements
- Testing!
- Async loading, placeholder and a Typeahead with hyper
- Handling routes
- 3rd party libraries

I’m not a big fan of having 100% code coverage, etc, etc, etc. But if we are writing components, they probably need to be tested as much as possible. We won't go super deep into testing, but we do want to show a few ways you can test your components and elements.
A small caveat before we begin: this post isn’t intended to cover everything you need to know about unit testing. Many other tutorials can teach you the basics of how to write code that tests well. Our goal is to show you how to use specific testing tools, with the understanding that you have a basic understanding of unit tests in general. With that out of the way, let’s get started!
Enter Tressa
Yup, YAAT — Yet Another Andrea Tool. Tressa is a very simple testing utility that we are going to use to test our stuff. It gives us the ability to do synchronized tests and asynchronous tests. It also comes with a basic assert function. Tressa requires consolemd, a module that lets us print using markdown to the console, which is pretty neat. Let’s see an example:
Note : we have to load tressa and consolemd with unpkg because for some reason stackblitz never finds echomd even if installed. Open the real console to see errors, the inner console from stackblitz doesn’t show them for some reason.
Let's dissect the code a bit to understand all the pieces
-
tressa.titleStarts a “section” of tests, by default title adds (“#”) for you -
tressa.endEnds the section of tests and returns the time spent on them -
tressa and tressa.assertThis where you put your assertions with an optional comment as a second argument. You can use either one, there is no difference between them. -
tressa.logconsole out with markdown, useful to separate parts of your tests -
tressa.asyncNeed to wait for an async operation? Use this wrapper. It returns a promise to test those cases.
You can see that tressa makes it very easy to test our code. Hopefully, you remember our table created with only hyper.Component. If not, here’s a quick refresh:
Open the real console to see errors, the inner console from stackblitz doesn’t show them for some reason.
Components
First let’s load consolemd and tressa. Then, let’s add a test for the footer component in our table. This component doesn’t really do much, so testing should be straightforward. Open the console to see the test results. If you are doing async tests, don’t forget to call the done() callback when your test is finished.
Cool, let’s move on to the header component. For this one, let’s see if the <thead> is getting icons when we pass the sorted property
Let’s also test the clicking on an <a> tag:
And now, all the code together:
So far, our tests have been on components separated from the DOM. We instantiate the elements with the new keyword. Let’s wrap up the table testing with a test directly on the component already rendered:
We don’t need to write all the tests in this asynchronous way, but I like it since it separates sections of our tests better. Being familiar with the asynchronous tests now will help us later, when we write more complex tests.
Intents
In our component project, we also have a couple of intents — one for icons and one for dates. Let’s test those now. For now, let’s remove the component testing so it’s easier to focus on the intents.
Well… we found our first bug. If we pass “a”, which is an icon that doesn’t exist in Octicons, we get:
TypeError: Cannot read property ‘toSVG’ of undefined
Let’s fix the intent:
Sweet, our test passes with the updated code. Now let’s test the date intent:
Err… that last test shows batman! NaN/NaN/NaN, let’s fix that:
if (!isNaN(newdate.getTime()) && typeof newdate.getMonth === ‘function’)
Yay! Let’s see the result:

Custom elements
This is our table as a custom element:
Since we are already using the functions of the table, let’s rewrite those as tests. But first let’s add some utilities and then put all the tests in a single file.
Let’s see if we are actually loading a table first:
It’s there, cool! Notice we get the same result from tressa() as when we were using tressa.assert() in our previous tests. Now let’s test data:
There are a couple of things we want to look at here. First, data will make a row appear, but since it doesn’t have any real data everything will be “-”… except date… lets update the intent to fix that with:
let formatted = ‘-’,
Second, data is more real and we see that we have data in our rows and the footer is updated.
Now let’s test the column functions: add/remove/update
Add
Remove
Update
Last but not least, sorting:
Let’s see everything working together:
Coverage

We tested our code, but what if we want to see how much was tested? For this, Istanbul is our friend. We can’t run Istanbul from stackblitz (that I’m aware of), but let’s create a project in github to run it, and that will generate a coverage report.
For this kind of test we’ll need to have Node.js and npminstalled. If you’re not familiar with these tools, here is a great place to start.
First, we need to change a couple of things. Code-wise we need to remove the tests from index.js and created a file called test.js (clever right?). Then, we need to remove all the imports except intents and table. With those changes, our index.js file looks like:
We also will need to setup the test environment, since we are not going to use a browser for our tests. Instead, we are going to use basicHTML. BasicHTML is a lightweight, dumb, and simple implementation of the HTML standard” — and yes it’s a YAAT.
So our start of the test file looks like this:
We bring tressa, then basicHTML, and we set it up. We are also bringing sizzle so we can make complex queries (sizzle is the selector engine used by JQuery so it’s a powerful tool). Then we load hyperHTML, and finally our tests with index.js.
Then, we setup our fake browser by making it ready and DOMContentLoaded. We can then add our table — just like regular HTML — by using a wire. That’s it! Let’s grab our table and run the same test we wrote previously.
Now, to run all of this we need a bunch more of dev dependencies. Add this to the package.json file and npm i away
The first part is just our dependencies for the tests. We added a script for running our test — nyc is the istanbul cli. Lastly, we setup nyc so it loads babel to transpile our code, and we add a couple of handy reporters. The HTML reporter will make it so we can look at a pretty web page.
Since we don’t need the classes to be transpiled lets add a .babelrc to customize the behavior.
When testing we use Istanbul and we target firefox 52… why 52?? IDK, sounds like a good number and it was the old ESR :D.
aaaand then fire up a console terminal, navigate to the folder with your package.json, and enter the command
npm test
Hopefully you will see something like this:

Open the coverage folder and open index.html to see the report… almost 100%… mm what are we missing? Take a peek at the Table.js file:
if (ElOrObj.nodeName === "HYPER-COLUMN") {
Apparently basicHTML is case sensitive. No problem, it’s an easy fix. Let’s do:
if (ElOrObj.nodeName && ElOrObj.nodeName.toLowerCase() === "hyper-column") {
npm test again, open the report… 100%
Yay! We did it! You can clone the full project here:
Integration tests
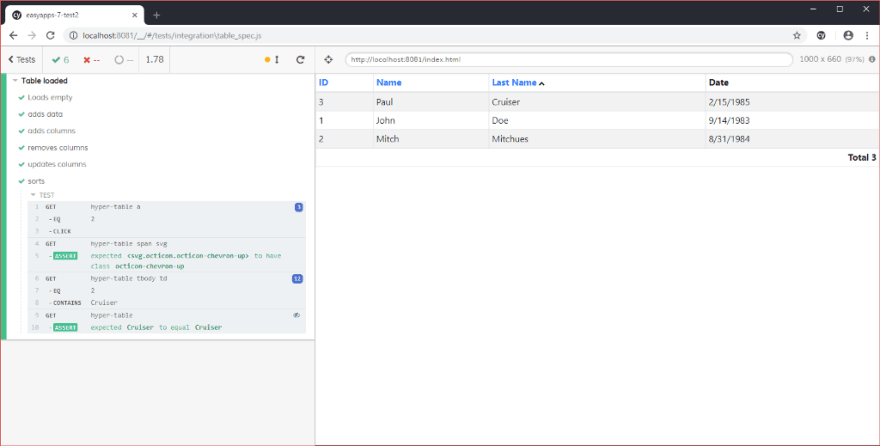
For integration testing, I really like cypress. It’s very easy to use and powerful. It lets us create unit, end-to-end, and integration tests. Cypress also gives you the ability to see the state of your web page/app at each stage of the tests.
With integration testing, we are testing the page directly, so we need to add some things to make that happen. Time does not permit me to explain everything for this, but if you want a more detailed explanation, let me know and I can create a post detailing the process.
The tl;dr; goes like this:
- Add cypress/rollup/babel and plugins to package.json
- Add test/build scripts in package.json
- run cypress for the first time
- build (babel/bundle) index.js with all the modules used
- start a local server http-server -p 8081
- create a new integration test, table_spec.js is what I called mine
- replicate tressa test and/or add more
- profit!!
For more information, check out the cypress docs. You can also clone and run the tests yourself with this project:
I’m not the best at testing, but this shows a couple of ways to test our components and elements.
As always, let us know your feedback and what else you want to see in this series. Thanks for reading!


Top comments (0)