
This post explains how to setup your Docker configuration for a web application
based on the Django framework. I got a lot of inspiration from other tutorials
and Docker examples: you can check these resources with the links at the bottom
of the post. You can also directly check the
repository
that reflects this tutorial.
In this particular example, we will use Gunicorn, but it should be easy enough
to replace it with an alternative Python WSGI HTTP server such as uwsgi. We will
also make use of pipenv, with related Pipfile and Pipfile.lock, instead of plain
pip and requirements.txt files.
Here is the plan:
- Overview: to get a better understanding of the whole thing
- Dockerfile: a simple Django application served by Gunicorn
- Pipenv: spice things up with Pipfile and Pipfile.lock
- Compose: add a container for NginX
- Compose: add containers for one or more Postgres databases
- Static files: collecting, storing and serving
- Resources
Overview: to get a better understanding of the whole thing
So, let's start with some drawings in order to get a better idea of what we want
to accomplish, and how everything will fit together.
In this first, very simple image, you can see that we want three containers:
one for NginX, one for Django + Gunicorn (they always go together), and one for
our database. The NginX container communicate with the Django+Gunicorn one,
which itself connects to the Postgres container. Pretty straight-forward, right?

In our configuration, it means we will declare three containers, or three
services if we talk in terms of Docker Compose.
Except that we need bridges between the containers, in order for them to
communicate. Let's add these bridges:

In docker-compose.yml, we will declare these bridges thanks to the networks
directive, and connect them to the right containers.
Of course, you may want or need several databases for your project. So here is
an updated image with two database containers. It's simply a matter of adding
a new brige:
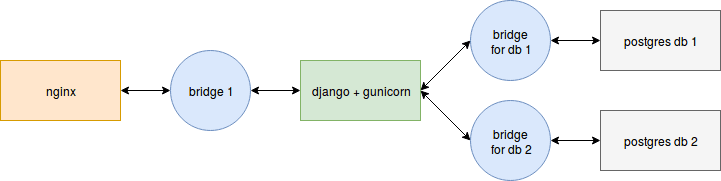
Once you know how to do it for two databases, it's very easy to add more.
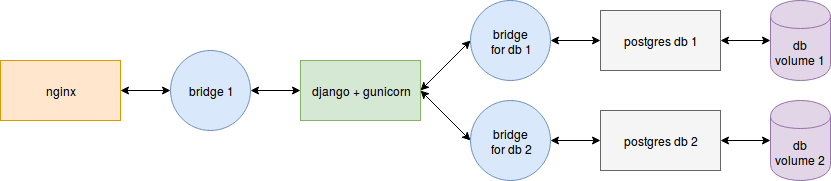
Now, this is enough for local development. But each time you restart your
containers or services, the data in the Postgres databases will be lost. In
production, we need these data to be persistent. If we keep the data in
production, let's keep them in local environment as well. To do this, we will
use volumes, a feature of Docker:
Alright, that is enough for the overview, let's get our hands dirty!
Dockerfile: a simple Django application served by Gunicorn
If you don't already have a simple Django project available for testing,
I invite you to create one with django-admin startproject hello.
Here is the directory/file tree you should have in order to follow this
tutorial:
.                         # Your current directory, created for this tutorial
└── hello                 # The Django project
    ├── hello             # The main Django app of your project
    │   ├── __init__.py
    │   ├── settings.py
    │   ├── urls.py
    │   └── wsgi.py
    └── manage.py
Now that you have a working Django project, you can run it by going into the
hello directory and type ./manage.py runserver. Go to
http://localhost:8000 to see the result.
Instead of running it with the Django runserver management command, let's try
with Gunicorn. First, install it with pip install gunicorn, be it in a
virtualenv or system-wide with sudo pip install gunicorn.
It's as easy as running gunicorn --bind :8000 hello.wsgi:application from
inside the Django project. If you are one directory above, use
gunicorn --chdir hello --bind :8000 hello.wsgi:application.
We have all we need to write our Dockerfile:
# start from an official image
FROM python:3.6

# arbitrary location choice: you can change the directory
RUN mkdir -p /opt/services/djangoapp/src
WORKDIR /opt/services/djangoapp/src

# install our two dependencies
RUN pip install gunicorn django

# copy our project code
COPY . /opt/services/djangoapp/src

# expose the port 8000
EXPOSE 8000

# define the default command to run when starting the container
CMD ["gunicorn", "--chdir", "hello", "--bind", ":8000", "hello.wsgi:application"]
The Dockerfile must be placed at the root of your test directory. As a reminder:
.                         # Your current directory, created for this tutorial
├── hello                 # The Django project
│   ├── hello             # The main Django app of your project
│   └── manage.py
└── Dockerfile            # Your Dockerfile
We are now able to build our container with docker build . -t hello, and to
start it with docker run -p 8000:8000 hello. The -p 8000:8000 option says to
bind the port 8000 of the host to the port 8000 of the container, allowing you
to go to http://localhost:8000 and see your application
running as if you were inside of the container.
Pipenv: spice things up with Pipfile and Pipfile.lock
This step is completely optional. If you prefer to use plain pip and
requirements files, you can skip this section.
First install pipenv with pip install pipenv, or system-wide with
sudo pip install pipenv.
Since we only need Django and Gunicorn, our Pipfile will be very simple:
[[source]]
url = "https://pypi.python.org/simple"
verify_ssl = true
name = "pypi"


[packages]
Django = "*"
gunicorn = "*"


[requires]
# our Dockerfile is based on Python 3.6
python_version = "3.6"
Just like the Dockerfile, Pipfile must be placed at the root of the project.
.
├── hello
│   ├── hello
│   └── manage.py
├── Dockerfile
└── Pipfile
Simply run pipenv lock to create Pipfile.lock from Pipfile.
Now we need to update our Dockerfile to use pipenv:
# start from an official image
FROM python:3.6

# arbitrary location choice: you can change the directory
RUN mkdir -p /opt/services/djangoapp/src
WORKDIR /opt/services/djangoapp/src

# install our dependencies
# we use --system flag because we don't need an extra virtualenv
COPY Pipfile Pipfile.lock /opt/services/djangoapp/src/
RUN pip install pipenv && pipenv install --system

# copy our project code
COPY . /opt/services/djangoapp/src

# expose the port 8000
EXPOSE 8000

# define the default command to run when starting the container
CMD ["gunicorn", "--chdir", "hello", "--bind", ":8000", "hello.wsgi:application"]
You can rebuild the image with docker build . -t hello and try to run it again
to see if everything works correctly.
Compose: add a container for NginX
Since we will then have two containers, one for Django + Gunicorn, and one for
NginX, it's time to start our composition with Docker Compose and
docker-compose.yml. Create your docker-compose.yml file at the root of the
project, like following:
.
├── hello
│   ├── hello
│   └── manage.py
├── docker-compose.yml
├── Dockerfile
└── Pipfile
We are gonna use the version 3 of the configuration syntax. First, we add
the Django+Gunicorn service:
version: '3'

services:
  djangoapp:
    build: .
    volumes:
      - .:/opt/services/djangoapp/src
    ports:
      - 8000:8000
We simply tell Docker Compose that the djangoapp service must use an image
that is built from the current directory, therefore looking for our Dockerfile.
The volumes directive tells to bind the current directory of the host to the
/opt/services/djangoapp/src directory of the container. The changes in our
current directory will be reflected in real-time in the container directory.
And reciprocally, changes that occur in the container directory will occur
in our current directory as well.
Build and run the service with docker-compose up. The name of the image will
be automatically chosen by Docker Compose (it will be the name of the current
directory with _djangoapp appended).
Ok, let's add our NginX service now:
version: '3'

services:

  djangoapp:
    build: .
    volumes:
      - .:/opt/services/djangoapp/src

  nginx:
    image: nginx:1.13
    ports:
      - 8000:80
    volumes:
      - ./config/nginx/conf.d:/etc/nginx/conf.d
    depends_on:  # <-- wait for djangoapp to be "ready" before starting this service
      - djangoapp
Note that we removed the ports directive from our djangoapp service. Indeed
we will not communicate directly with Gunicorn anymore, but with NginX. We still
want to access our app at http://localhost:8000, and
we want NginX to listen to the port 80 in the container, so we use
ports: - 8000:80.
Note: in a production environment, we would use 80:80 instead.
We also bind a local directory to the /etc/nginx/conf.d container directory.
Let's create it and see what's inside:
mkdir -p config/nginx/conf.d
touch config/nginx/conf.d/local.conf
You should now have the following files and directories:
.
├── config
│   └── nginx
│       └── conf.d
│           └── local.conf
├── docker-compose.yml
├── Dockerfile
├── hello
│   ├── hello
│   └── manage.py
├── Pipfile
└── Pipfile.lock
The config/nginx/conf.d/local.conf file contains our NginX configuration:
# first we declare our upstream server, which is our Gunicorn application
upstream hello_server {
    # docker will automatically resolve this to the correct address
    # because we use the same name as the service: "djangoapp"
    server djangoapp:8000;
}

# now we declare our main server
server {

    listen 80;
    server_name localhost;

    location / {
        # everything is passed to Gunicorn
        proxy_pass http://hello_server;
        proxy_set_header X-Forwarded-For $proxy_add_x_forwarded_for;
        proxy_set_header Host $host;
        proxy_redirect off;
    }
}
But before we try this out, remember that we need a bridge to make our services
able to communicate?
Update your docker-compose.yml as follow:
version: '3'

services:

  djangoapp:
    build: .
    volumes:
      - .:/opt/services/djangoapp/src
    networks:  # <-- here
      - nginx_network

  nginx:
    image: nginx:1.13
    ports:
      - 8000:80
    volumes:
      - ./config/nginx/conf.d:/etc/nginx/conf.d
    depends_on:
      - djangoapp
    networks:  # <-- here
      - nginx_network

networks:  # <-- and here
  nginx_network:
    driver: bridge
Run docker-compose up and see if you can still see the Django default page
at http://localhost:8000.
Compose: add containers for one or more Postgres databases
We now want to use Postgres instead of the starting default SQLite database.
We will need to update several things: our Pipfile, because we need the
psycopg2 Python package, the Postgres driver; our Django project settings; and
our docker-compose.yml file.
- Pipfile becomes:
  [[source]]
  url = "https://pypi.python.org/simple"
  verify_ssl = true
  name = "pypi"


  [packages]
  Django = "*"
  gunicorn = "*"
  "psycopg2" = "*"


  [requires]
  # our Dockerfile is based on Python 3.6
  python_version = "3.6"
Don't forget to run pipenv lock to update your lock file, and rebuild your
Docker image with docker-compose build.
- In the Django project settings, update the DATABASE setting from:
  DATABASES = {
      'default': {
          'ENGINE': 'django.db.backends.sqlite3',
          'NAME': os.path.join(BASE_DIR, 'db.sqlite3'),
      }
  }
...to:
  DATABASES = {
      'default': {
          'ENGINE': 'django.db.backends.postgresql_psycopg2',
          'NAME': 'database1',
          'USER': 'database1_role',
          'PASSWORD': 'database1_password',
          'HOST': 'database1',  # <-- IMPORTANT: same name as docker-compose service!
          'PORT': '5432',
      }
  }
As you can see, we used database1 everywhere, for the name, user, password
and host. In fact, we can change these values to whatever suits us. But we
must ensure the database container will use the same values! To do that, we
will copy these values in a configuration file destined to be read by our
database container.
Create a db directory in the config one, and add the database1_env file:
  mkdir config/db
  touch config/db/database1_env
The contents of config/db/database1_env must then be:
  POSTGRES_USER=database1_role
  POSTGRES_PASSWORD=database1_password
  POSTGRES_DB=database1
These variable are used by the Postgres Docker image, for more information
please check out the documentation on
docs.docker.com
or hub.docker.com.
It means that, when started, the Postgres container will create a database
called database1, assigned to the role database1_role with password
database1_password. If you change these values, remember to also change them
in the DATABASES setting.
- We are now ready to add our service in
docker-compose.yml. The added service must have the same name than what is declared in the DATABASES setting:
  version: '3'

  services:

    djangoapp:
      build: .
      volumes:
        - .:/opt/services/djangoapp/src
      networks:
        - nginx_network
        - database1_network  # <-- connect to the bridge
      depends_on:  # <-- wait for db to be "ready" before starting the app
        - database1

    nginx:
      image: nginx:1.13
      ports:
        - 8000:80
      volumes:
        - ./config/nginx/conf.d:/etc/nginx/conf.d
      depends_on:
        - djangoapp
      networks:
        - nginx_network

    database1:  # <-- IMPORTANT: same name as in DATABASES setting, otherwise Django won't find the database!
      image: postgres:10
      env_file:  # <-- we use the previously defined values
        - config/db/database1_env
      networks:  # <-- connect to the bridge
        - database1_network
      volumes:
        - database1_volume:/var/lib/postgresql/data

  networks:
    nginx_network:
      driver: bridge
    database1_network:  # <-- add the bridge
      driver: bridge

  volumes:
    database1_volume:
You should be able to understand everything here. However, we added two new
things: the database1: volumes: directive, and the root volumes:
directive. You need to declare your volumes in the root volumes: directive
if you want them to be kept persistently. Then, you can bind a volume to a
directory in the container. Here, we bind our declared database1_volume to
the database1 container's /var/lib/postgresql/data directory. Everything
added to this directory will be persistently stored in the volume called
database1_volume. So each subsequent run of the container will have access
to the previous data! It means you can stop and restart your service without
losing the data.
OK, let's try it. As we are using Django, we need to "migrate" the database
first. To do this, we will simply use Docker Compose to start our djangoapp
service and run the migration command inside it:
docker-compose build  # to make sure everything is up-to-date
docker-compose run --rm djangoapp /bin/bash -c "cd hello; ./manage.py migrate"
From now on, it should be really easy to add other databases: just add other
database services (database2) with their networks volumes (remember to
connect the networks and bind the volumes), update your DATABASES setting in
the Django project, and create the environment file for each database in
config/db.
Static files: collecting, storing and serving
UPDATE: a lot of us (including myself) seem to have trouble updating
the static files in the designated Docker volume. In retrospect,
collecting the static files in the Dockerfile might not be a good idea,
because of the caching mechanisms of Docker. A simple and effective solution,
mentioned by Isaac T Chikutukutu in the comments, is to remove this command
from the Dockerfile and manually run it when needed:
docker-compose run djangoapp hello/manage.py collectstatic --no-input
I edited the rest of the post accordingly.
(End of update)
Let's not forget about the static files! In order for NginX to serve them,
we will update the config/nginx/conf.d/local.conf file, as well as our
docker-compose.yml file. Static files will be stored in volumes.
We also need to set the STATIC_ROOT and MEDIA_ROOT variables
in the Django project settings.
- NginX configuration:
  upstream hello_server {
      server djangoapp:8000;
  }

  server {

      listen 80;
      server_name localhost;

      location / {
          proxy_pass http://hello_server;
          proxy_set_header X-Forwarded-For $proxy_add_x_forwarded_for;
          proxy_set_header Host $host;
          proxy_redirect off;
      }

      location /static/ {
          alias /opt/services/djangoapp/static/;
      }

      location /media/ {
          alias /opt/services/djangoapp/media/;
      }
  }
- Django project settings:
  # as declared in NginX conf, it must match /opt/services/djangoapp/static/
  STATIC_ROOT = os.path.join(os.path.dirname(os.path.dirname(BASE_DIR)), 'static')

  # do the same for media files, it must match /opt/services/djangoapp/media/
  MEDIA_ROOT = os.path.join(os.path.dirname(os.path.dirname(BASE_DIR)), 'media')
- Volumes in
docker-compose.yml:
  version: '3'

  services:

    djangoapp:
      build: .
      volumes:
        - .:/opt/services/djangoapp/src
        - static_volume:/opt/services/djangoapp/static  # <-- bind the static volume
        - media_volume:/opt/services/djangoapp/media  # <-- bind the media volume
      networks:
        - nginx_network
        - database1_network
      depends_on:
        - database1

    nginx:
      image: nginx:1.13
      ports:
        - 8000:80
      volumes:
        - ./config/nginx/conf.d:/etc/nginx/conf.d
        - static_volume:/opt/services/djangoapp/static  # <-- bind the static volume
        - media_volume:/opt/services/djangoapp/media  # <-- bind the media volume
      depends_on:
        - djangoapp
      networks:
        - nginx_network

    database1:
      image: postgres:10
      env_file:
        - config/db/database1_env
      networks:
        - database1_network
      volumes:
        - database1_volume:/var/lib/postgresql/data

  networks:
    nginx_network:
      driver: bridge
    database1_network:
      driver: bridge

  volumes:
    database1_volume:
    static_volume:  # <-- declare the static volume
    media_volume:  # <-- declare the media volume
- And finally, collect the static files each time you need to update them, by running:
docker-compose run djangoapp hello/manage.py collectstatic --no-input
Resources
Here are the resources I used to write this tutorial:
- Nginx+Flask+Postgres multi-container setup with Docker Compose
- Docker how to Django + uwsgi/gunicorn + nginx?
- Django tutorial using Docker, Nginx, Gunicorn and PostgreSQL.
- Django Development With Docker Compose and Machine
- Deploy Django, Gunicorn, NGINX, Postgresql using Docker
- Docker, how to expose a socket over a port for a Django Application
And here is the
repository
that reflects this tutorial (with a few more things).
Don't hesitate to share other interesting resources in the comment section!

Top comments (2)
Great explanations in your post! I'd be curious to see how you explain adding ssl to the mix.
Oh well, I'm not sure how I would explain this ^^ but I guess I could find inspiration in @pydanny's Django/Docker cookiecutter!