
As you may know, Shiny Server comes in two versions: open-source and
professional. The professional adds security and authentication features
like password protected applications, and controlled access via SSL and LDAP,
Active Directory, Google OAuth, PAM, proxied authentication, or passwords.
If you need these authentication features but don't want or can't spend
$9,995 per year for the professional edition, then I got a solution for you!
In this post, I will show how to wrap one or several Shiny applications into
a Django application to add authentication and access control to your Shiny
apps. The shining star here will not be Django, as you could replace it by
any other web application you want, but the famous NginX reverse proxy,
accompanied by its devoted auth-request module.
The code used in this post is also available as a repository on GitHub.
It contains a Docker configuration so you can try it easily.
On the menu
- Overview
- Wrapping a Shiny app into a Django-powered page
- Proxying Shiny requests to the Shiny app
- Adding an authentication step for every Shiny request
- Try it with a Dockerized project
- Comments
What most of you will be interested in is starting at section 2:
Proxying, though Wrapping is interesting as well if you
want to create an interface to access multiple Shiny apps.
Overview
Let's look at some pictures to see what we want to accomplish. The first picture
shows our client-server architecture. The client can communicate with the server
on the port 80 or 443 (HTTP or HTTPs), but not on the ports 8000 or 8100, which
are used internally by Django and Shiny. This can be configured through the
firewall.

The second picture shows what happens when the client requests the URL
that the Shiny app is served on. As we wrap the Shiny app into a Django-powered
page, the request is proxied directly to Django by NginX. Django then gets the
initial Shiny page HTML contents with an internal HTTP Get request, and renders
it in a iframe (we will see the details later). It then returns this rendered
page to NginX, which returns it to the client.

The third picture shows each subsequent requests from the client to the server
through a WebSocket, and how NginX is asking authorization to Django. When NginX
receives the request, it sends a sub-request to Django, asking for permission
to proxy the request to Shiny and return the response to the client. If Django
says yes (HTTP 200), NginX proxies the request to Shiny. If Django says no
(HTTP 403 or any other error code), NginX rejects the request by returning
HTTP 403 as a response to the client.

OK, let's try it! To begin, create a directory that we will use for this
tutorial:
mkdir django-shiny
cd django-shiny
Wrapping a Shiny app into a Django-powered page
This first section will help you setup an example project to follow this
tutorial, but the first two steps described are optional. You can immediately
jump to the Proxying Shiny requests
section where we will a use pre-setup example project using Docker. You will
need to install Docker if you don't already have it. See Install Docker for
installation instructions.
The third step however might be interesting to read if you need to wrap your
Shiny app into a Django-powered page and website, instead of just using Django
as an external authentication / authorization backend.
The Shiny app
Let's get a Shiny app example from RStudio's gallery.
The code is available on GitHub in this repository.
Clone it in a sub-directory called shinyapp:
git clone --depth=1 https://github.com/rstudio/shiny-examples
mv shiny-examples/001-hello shinyapp
rm -rf shiny-examples
We also need to install the Shiny R package. If you don't already have R
installed, you can install a recent version with the following commands:
sudo add-apt-repository "deb http://cran.rstudio.com/bin/linux/ubuntu trusty/"
sudo apt-key adv --keyserver keyserver.ubuntu.com --recv-keys E084DAB9
sudo add-apt-repository ppa:marutter/rdev
sudo apt-get update
sudo apt-get install -y r-base
Run this command to install Shiny:
sudo R -e "install.packages('shiny', repos='https://cran.rstudio.com/')"
To run the Shiny application on port 8100, use the following command:
sudo R -e "shiny::runApp(appDir='shinyapp', port=8100)"
Try to go to http://localhost:8100 to see if the app is running.
The Django app
We will create a new Django project called djangoapp. If you don't already
have Django installed on your system, install it in a virtualenv with
pip install Django, or system-wide with sudo pip install Django.
To create the project, run the following command:
django-admin startproject djangoapp
We need to initialize the SQLite database first.
python djangoapp/manage.py migrate
You can now run the Django application on port 8000 with the following command:
python djangoapp/manage.py runserver localhost:8000
And try to go to http://localhost:8000 to see if the app is running.
Injecting the HTML contents in an Iframe
At this point you should have the following tree:
.
├── djangoapp
│   ├── db.sqlite3
│   ├── djangoapp
│   │   ├── __init__.py
│   │   ├── settings.py
│   │   ├── urls.py
│   │   └── wsgi.py
│   └── manage.py
└── shinyapp
    ├── app.R
    ├── DESCRIPTION
    └── Readme.md

3 directories, 9 files
We will proceed in three main steps:
- Create a simple view that renders our wrapping HTML page
-
Create this wrapping HTML page that will:
- Create an Iframe and add it to the DOM
- Get the Shiny HTML contents in JSON format, with an asynchronous call
- Inject these contents in the Iframe
-
Create the view to return Shiny HTML contents as JSON by:
- Getting the contents with a GET request
- Parsing it with BeautifulSoup's HTML parser
- Dumping and returning it as JSON
Create the wrapping view
Let's create our wrapping view. First make sure you have listed djangoapp
in the Django settings' INSTALLED_APPS:
# settings.py

INSTALLED_APPS = [
    'django.contrib.admin',
    'django.contrib.auth',
    'django.contrib.contenttypes',
    'django.contrib.sessions',
    'django.contrib.messages',
    'django.contrib.staticfiles',

    'djangoapp'
]
Then we can add the URL in urls.py:
from django.contrib import admin
from django.urls import path

from . import views

urlpatterns = [
    path('admin/', admin.site.urls),
    path('shiny/', views.shiny, name='shiny'),
]
And now we create the view in a new views.py file:
touch djangoapp/djangoapp/views.py
from django.shortcuts import render, redirect

def shiny(request):
    return render(request, 'djangoapp/shiny.html')
Create the wrapping HTML page
Since we tell the view to render the djangoapp/shiny.html template, we need
to create it:
mkdir -p djangoapp/djangoapp/templates/djangoapp
touch djangoapp/djangoapp/templates/djangoapp/shiny.html
# too much of djangoapp already, I know
And write its contents. We simply add a title, to know we are in the wrapping
view, and then we add a script to retrieve the Shiny app contents:
<h1>We are in the wrapping page!</h1>

<div id="contents"></div>

<script src="https://code.jquery.com/jquery-3.3.1.min.js"></script>

<script>
  $(document).ready(function () {

    $.getJSON('{% url "shiny_contents" %}', function (data) {

      var iframe = document.createElement("iframe");
      $('#contents').append(iframe);

      iframe.contentWindow.document.open();
      iframe.contentWindow.document.write(data.html_contents);
      iframe.contentWindow.document.close();

      // Attempt circumvention
      if (iframe.contentWindow.WebSocket)
          WebSocket = iframe.contentWindow.WebSocket;
    });

  });

</script>
Several things happen here:
- we declare a
divof IDcontentsin which we will add aniframe, - we make use of JQuery's
$(document).readyand$.getJSONmethods to load HTML contents from an URL returning JSON, - we create the
iframe, add it in the document, then write the HTML contents inside of it. We also reassign theWebSocketvariable to the value of theiframeone.
Create the JSON view
As you maybe guessed, work is not finished. We need to add the shiny_contents
URL and view in the Django app. The view must return the contents of the Shiny
app initial page as JSON.
Add the URL in urls.py:
from django.contrib import admin
from django.urls import path

from . import views

urlpatterns = [
    path('admin/', admin.site.urls),
    path('shiny/', views.shiny, name='shiny'),
    path('shiny_contents/', views.shiny_contents, name='shiny_contents'),
]
Add the view to views.py:
from django.http import JsonResponse
from django.shortcuts import render

import requests

from bs4 import BeautifulSoup


def shiny(request):
    return render(request, 'djangoapp/shiny.html')


def shiny_contents(request):
    response = requests.get('http://localhost:8100')
    soup = BeautifulSoup(response.content, 'html.parser')
    return JsonResponse({'html_contents': str(soup)})
We are using requests and BeautifulSoup to get the HTML contents and return
it as text, dumped as JSON. If you know a better way, let me know in the
comments!
To install requests and BeautifulSoup: pip install requests beautifulsoup4.
OK, let's try! Run both the Shiny application and the Django application, then
go to http://localhost:8000/shiny to see how it goes!
You should see something like the following image:
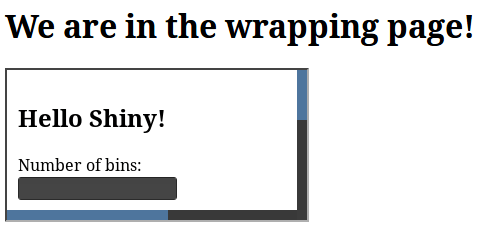
But since Shiny requests are not proxied, they are simply lost in-between, and
your Shiny app will not respond, nor get a nice look because the static assets
will not be loaded. We will fix this in the next section:
Proxying Shiny requests.
This is it for the setup and the Django-wrapped Shiny page. For the rest of the
tutorial, I will explain how to configure NginX and Django to act as proxy
and authorization servers. The result is available for you to try in this
repository: https://github.com/Pawamoy/docker-nginx-auth-request-django-shiny-example.
See the Try it out section.
Proxying Shiny requests to the Shiny app
This is time for NginX to come on stage. We need to create our new,
project-specific configuration file in /etc/nginx/sites-available/djangoshiny.
We will tell NginX to proxy every request with an URL like shiny/* to our
Shiny app. All other requests will be proxied to the Django app.
# declare your Django app
upstream djangoapp_server {
    server localhost:8000;
}

# declare your Shiny app
upstream shinyapp_server {
    server localhost:8100;
}

# required for WebSockets
map $http_upgrade $connection_upgrade {
    default upgrade;
    '' close;
}

server {

    listen 80;
    server_name localhost;

    client_max_body_size 100M;

    # normal requests go to Django
    location / {
        proxy_pass http://djangoapp_server;
        proxy_set_header X-Forwarded-For $proxy_add_x_forwarded_for;
        proxy_set_header Host $host;
        proxy_redirect off;
        if (!-f $request_filename) {
            proxy_pass http://djangoapp_server;
            break;
        }
    }

    # "shiny" requests go to Shiny
    location ~ /shiny/.+ {

        rewrite ^/shiny/(.*)$ /$1 break;

        proxy_pass http://shinyapp_server;
        proxy_redirect http://shinyapp_server/ $scheme://$host/shiny/;

        # required for WebSockets
        proxy_http_version 1.1;
        proxy_set_header Upgrade $http_upgrade;
        proxy_set_header Connection $connection_upgrade;

        proxy_read_timeout 20d;
        proxy_buffering off;
    }

}
Once you're ready, enable this configuration by linking it like this:
sudo ln -s /etc/nginx/sites-available/djangoshiny /etc/nginx/sites-enabled/djangoshiny
Now reload NginX, and that's it! If you launch both Django on port 8000, and
Shiny on port 8100, you should be able to connect to http://localhost/shiny
and enjoy your Django-wrapped Shiny application functioning properly!
There is still one thing we need to add: authentication and authorization.
I won't show how to create sign-in / sign-up / sign-out views: you can
find all the documentation to enable Django authentication system online.
What I will show you is how to make Django act as an authorization server
for Shiny.
Adding an authentication step for every Shiny request
We want all requests proxied to Shiny to be authorized by Django. For this we
are gonna use the auth-request module. This module is not compiled in
NginX by default on distributions like Ubuntu / Debian. If you want to recompile
NginX with auth-request enabled, check how I do it in this Dockerfile.
An easier solution is to use the Docker setup from the same repository, with
the official NginX image which already supports auth-request.
So, once your NginX is ready, add this authorization step in the configuration
file:
    location ~ /shiny/.+ {

        # we tell nginx to call that location for each request
        auth_request /auth;

        rewrite ^/shiny/(.*)$ /$1 break;

        proxy_pass http://shinyapp_server;
        proxy_redirect http://shinyapp_server/ $scheme://$host/shiny/;

        # this part is needed for WebSockets to work
        proxy_http_version 1.1;
        proxy_set_header Upgrade $http_upgrade;
        proxy_set_header Connection $connection_upgrade;

        proxy_read_timeout 20d;
        proxy_buffering off;
    }

    # the /auth location will send a subrequest to django, URL shiny_auth/
    location = /auth {
        internal;

        proxy_pass http://localhost:8000/shiny_auth/;

        proxy_pass_request_body off;
        proxy_set_header Content-Length "";
        proxy_set_header X-Original-URI $request_uri;
    }
Of course, we also need to write the view called by the shiny_auth/ URL.
It's a very simple one. First add the URL in urls.py:
from django.contrib import admin
from django.urls import path

from . import views

urlpatterns = [
    path('admin/', admin.site.urls),
    path('shiny/', views.shiny, name='shiny'),
    path('shiny_contents/', views.shiny_contents, name='shiny_contents'),
    path('shiny_auth/', views.shiny_auth),
]
And then the view in views.py:
from django.http import HttpResponse

def shiny_auth(request):
    if request.user.is_authenticated:
        return HttpResponse(status=200)
    return HttpResponse(status=403)
Et voilà! If the user is authenticated, Django will say "OK". If the user is
not authenticated, Django will say "No". But you could implement any logic
you need instead of just checking if the user is authenticated or not. You
could have several Shiny apps served on different URLs, powered by Django
(in wrapping pages, as we saw earlier), and grant access to users with a
permission system, etc..
Try it with a Dockerized project
Clone the repository and build the images with the following commands:
git clone https://github.com/Pawamoy/docker-nginx-auth-request-django-shiny-example docker-django-shiny
cd docker-django-shiny
sudo make all
This first build should take quite some time. It will build Shiny and Django
images, get static assets, create the database, create a super user, and then
run the application. You will then be able to go to http://localhost:8000
to see it in action.
To print the available make commands, simply run make.

Top comments (0)