In the first part of this article I will give you an overview of the OAuth 2 standard, in particular I will introduce the two most used grants, the Client Credentials and the Authorization Code grants.
In the second part I will introduce oauth2_client, a Flutter library that considerably simplifies working with OAuth 2.
By the end of the article you will be able to implement your own client with just little lines of code.
If you are already familiar with the concepts behind OAuth2, you can directly skip to the hands on section, otherwise keep reading...
What is OAuth 2?
OAuth 2 is an open standard protocol that allows applications to access protected resources of a service on behalf of the user. OAuth 2 defines authorization flows for native apps, web apps and for mobile devices.
Many companies offer OAuth 2 endpoints: these include the usual suspects, such as Google, Facebook, LinkedIn, GitHub, as well as many other.
Generally speaking, an authorization process can be carried on as follow:
- The application sends to the authorization server an Authorization Request to access a protected resource
- The owner of the resource (usually, the user) grants access to it
- The authorization server sends back an Access Token to be used with all the subsequent requests as a sort of authorization badge
This is just an high level depiction of the whole process. The actual flow will differ depending on the authorization grant type in use.
The two most used grant types are the Client Credentials grant and the Authorization Code grant.
The Client Credentials grant
The Client Credentials grant is primarily used on machine-to-machine applications, such as daemons, services or CLI. In this case the authorization server grants access to the application itself rather than to the user.
To use this flow, an application must have been assigned a client ID and a client secret. These parameters are generated by the authorization server, and are needed to ensure that the client connecting is the one that has been authorized.
The authorization process works more or less like this:
- The application sends to the authorization server an Authorization Request along with the client id and the client secret.
- The authorization server checks the provided credentials
- The authorization server sends back to the application an Access Token, along with a Referesh Token.
- The application uses the Access Token in every subsequent request to the service.

The Authorization Code grant
The Authorization Code grant is by far the most used flow as it is employed by applications that effectively operate on some user owned resources.
To use this flow, the application must have been registered with the OAuth server, providing at least a name and a redirect URI, that will be used to inform the application that the user authorized the request. During the registration, the provider assigns the application a client ID and a client secret, that will be exchanged in the authorization process.
To access a specific resource, the application should specify one or more scopes, a list of strings that represent the "permissions" the application is requiring. The scopes are defined by the resource server and are normally included in the API documentation of the service.
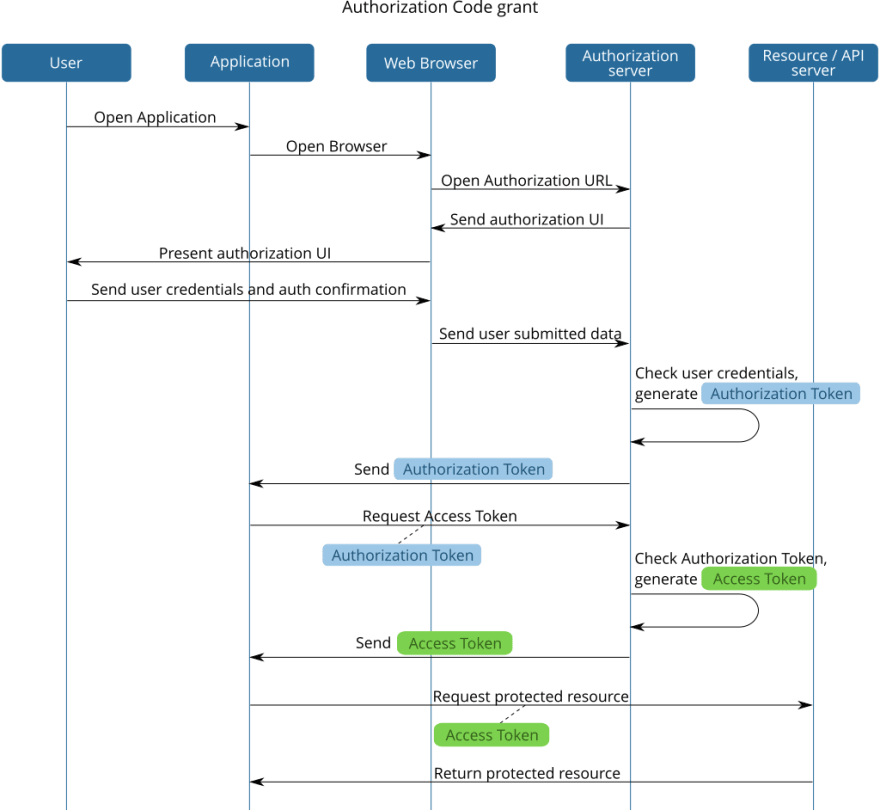
This flow can be summarized like this:
- The user opens up the app
- The app opens up a browser instance pointing to the authorization endpoint on the authorization server, requiring permission to access the needed resources, and passing in the Client ID and the list of required scopes.
- The user authenticates with the authorization server and grants access to the resources
- The authorization server redirects the client to the redirect uri sending an Authorization Token
- The client app issues an Access Token Request, passing in the Authorization Token and the client secret.
- The server validates the client secret and the Authorization Token and sends back an Access Token and a Refresh Token
- The client app uses the Access Token in every subsequent request to the API service as a sort of authorization badge.
The OAuth 2 framework has been designed to be extensible, and as such it underwent some additions since its inception, for example to address potential security flaws or extend its functionalities. One of these is the PKCE extension, designed to increase the Authorization Code grant security through an exchange of a client generated code that limits the chances of the authorization code to be intercepted.
Access Token expiration / invalidation
To limit the risks of token hijacking, the Access Token often has a limited lifespan after which it cannot be used anymore. Moreover, the Access Token could be explicitly invalidated by the resource server.
When the token expires, the application must require another Access Token using another grant type, the Refresh Token grant. As the name suggests, this flow uses the Refresh Token returned by the previous authorization flows to generate a new Access Token that must be used from that moment onward.
Hands on!
By now it should be clear that to implement an OAuth 2 capable application, one must implement not only the authorization process provided by the service he is going to use, but even the mechanisms to deal with the expiration or invalidation of the Access Token. These can easily become quite wasteful activities!
oauth2_client is a Flutter library specifically created with the purpose of simplifying the process of requiring and refreshing the OAuth 2 access token. It provides pre-made classes to authenticate againts the leading providers, such as Google, Facebook, LinkedIn, GitHub, but it's particularly suited for implementing clients for custom OAuth 2 servers.
It additionally provides convenience methods for secure token storage, automatic token refreshing and to transparently perform authenticated HTTP requests.
Suppose we wanted to implement an app with the GitHub API. As per their API documentation, GitHub recommends on using the Web application flow (with the Authorization Code grant).
This means that one of the steps of the process involves opening up a browser instance and intercepting a redirection to a provided redirect uri.
If one of the targets of our app is Android, we first need to set up an Intent Filter in the AndroidManifest.xml file to define a custom uri scheme that will be intercepted by our app:
<manifest xmlns:android="http://schemas.android.com/apk/res/android"
    package="com.example.mypackage">
    ...
    <activity android:name="com.linusu.flutter_web_auth.CallbackActivity" >
        <intent-filter android:label="flutter_web_auth">
            <action android:name="android.intent.action.VIEW" />
            <category android:name="android.intent.category.DEFAULT" />
            <category android:name="android.intent.category.BROWSABLE" />
            <data android:scheme="my.app" />
        </intent-filter>
    </activity>
</manifest>
The value of the android:scheme attribute can be anything you want, and must match the scheme used for the redirect uri (as we'll see later). Just make sure, if at all possible, not to use http(s), because in that case our application won't be able to intercept the server redirection, as it will be automatically handled by the system browser.
If you really want/need to use an HTTPS url as the redirect uri, you must setup it as an App Link.
First you need to specify both the android:host and android:pathPrefix attributes, as long as the android:autoVerify="true" attribute on the intent-filter tag:
<activity android:name="com.linusu.flutter_web_auth.CallbackActivity" >
    <intent-filter android:label="flutter_web_auth" android:autoVerify="true">
        <action android:name="android.intent.action.VIEW" />
        <category android:name="android.intent.category.DEFAULT" />
        <category android:name="android.intent.category.BROWSABLE" />

        <data android:scheme="https"
                android:host="www.myapp.com"
                android:pathPrefix="/oauth2redirect" />
    </intent-filter>
</activity>
Then you need to prove ownership of the domain host by publishing a Digital Asset Links JSON file on your website. This involves generating an App signing key and signing your app with it.
Our sample app will retrieve the list of the user's repositories. To do so, we must tell the server which "permissions" we'll need, using the scope parameter. The scope that requires access to the user's repositories (both public and private) is "repo".
Before you can interact with GitHub's OAuth 2 endpoint, you must create a new OAuth App. After this step your application will be assigned a clientId and a clientSecret.
Ok, enough of talking... Let's see some code!
import 'package:oauth2_client/github_oauth2_client.dart';
import 'package:oauth2_client/access_token_response.dart';

//Instantiate the GitHub client
OAuth2Client client = GitHubOAuth2Client(
    //Corresponds to the android:scheme attribute
    customUriScheme: 'my.app',
    //The scheme must match the customUriScheme parameter!
    redirectUri: 'my.app://oauth2redirect'
);

//Require an Access Token with the Authorization Code grant
AccessTokenResponse tknResp = await client.getTokenWithAuthCodeFlow(
    clientId: 'myclientid',
    clientSecret: 'myclientsecret',
    scopes: ['repo']);

//From now on you can perform authenticated HTTP requests
httpClient = http.Client()
http.Response resp = await httpClient.get('https://api.github.com/user/repos',
    headers: {'Authorization': 'Bearer ' + tknResp.accessToken});

//The list of the user repositories is encoded in the resp.body property...
As you see, fetching an Access Token is quite simple, and since GitHub tokens don't expire we should be all set... But what happens if the token gets invalidated by the app owner? You would need to check the validity of the token after every request and possibly fetch another token. Something like this:
...
httpClient = http.Client()
http.Response resp = await httpClient.get('https://api.github.com/user/repos',
    headers: {'Authorization': 'Bearer ' + tknResp.accessToken});

//The request to the service didn't succeed...
//We must refresh the token (not supported by GitHub endpoint) or
//generate a new Access Token
if(resp.statusCode != 200) {
    AccessTokenResponse tknResp = await client.getTokenWithAuthCodeFlow(
        clientId: 'myclientid',
        clientSecret: 'myclientsecret',
        scopes: ['repo']);

    //Perform another request to the server with the new access token
    http.Response resp = await httpClient.get('https://api.github.com/user/repos',
        headers: {'Authorization': 'Bearer ' + tknResp.accessToken});
}
Fortunately enough, the library provides an helper class that takes care of all of the burden:
//Instantiate the client...
OAuth2Client client = GitHubOAuth2Client(
    redirectUri: 'my.app://oauth2redirect',
    customUriScheme: 'my.app');

//Instantiate the helper passing it the client and passing in the authorization parameters
OAuth2Helper oauth2Helper = OAuth2Helper(client,
    grantType: OAuth2Helper.AUTHORIZATION_CODE, //default value, can be omitted
    clientId: 'myclientid',
    clientSecret: 'myclientsecret',
    scopes: ['repo']);

//Perform a request to the server
http.Response resp = await oauth2Helper.get('https://api.github.com/user/repos');
As long as the first request is made, the helper class performs the following operations:
- Checks if an Access Token already exists in the device storage
- If it doesn't exist, generates an Access Token using the required flow (Authorization Code when not specified) and stores it into the device secure storage.
- Sends the request to the server, adding the "Authorization" header with the access token
- If the server returns an "unauthorized" response, try to refresh the Access Token through the Refresh Token flow, if the service supports it, otherwise generate a new token. Finally, send another request with the new token.
As you see, not only the helper class takes care of the token retrieval/refresh process, it even stores the token in a secure storage on the device. This means that if your app is closed or the device is restarted, the retrieved tokens are still available and can be used without requiring a new authorization process.
That's all well and good, but what if I wanted to implement my own client?
Up until now, we saw how to use a predefined client class, but what if you needed to authenticate against a service that doesn't have a dedicated class?
Implementing your own clients is really simple, and normally requires only a couple of lines of code. For example, let's see how the GitHub client is made:
class GitHubOAuth2Client extends OAuth2Client {
  GitHubOAuth2Client(
      {@required String redirectUri, @required String customUriScheme})
      : super(
            authorizeUrl: 'https://github.com/login/oauth/authorize',
            tokenUrl: 'https://github.com/login/oauth/access_token',
            redirectUri: redirectUri,
            customUriScheme: customUriScheme) {

      //By default, GitHub responds to an Access Token request with a querystring-like
      //format. We need a json formatted response, that can be required through
      //the 'Accept' header...
      this.accessTokenRequestHeaders = {
        'Accept': 'application/json'
      };

  }
}
That's it! You really just need to extend the OAuth2Client class and provide the authorization and the token urls.
After that, you can use your client or even the helper as seen above, without any modifications.
Finally... The inevitable TL;DR
oauth2_client really simplifies working with OAuth 2 endpoints, as it takes care of all the peculiarities of the protocol and automates the process of refreshing the tokens upon expiration. It even transparently implements many of the best practices introduced to enforce the security and reliability of the process.


Top comments (45)
Hi Enrico! Thank you for the great article, it is really helpful. I do although need some help, I am trying to set up my own Oauth2 client for ios and I am able to to get to the Authorization page for this client but after I sign up it does not redirect back.
I added this to the Info.plist:
As you can see our redirect is https (the auth specifically requires https) and I based on what I read this might be the issue but I am not 100% sure. Any suggestions would be greatly helpful.
Hi @mma15, i'm getting an error like you, Had you resolved it ?
Hi Enrico. How I said before, this article is really amazing! I am just starting programming. I could implement a oauth2 following your tutorial and it works fine using iOS (flutter). However, it doesn't work when I try to use Android. I changed all this and still not works. What am I doing wrong??
My Manifest:
and my GoogleClient:
final GoogleOAuth2Client client = GoogleOAuth2Client(
redirectUri: 'com.example.ClassReport:/accounts.google.com:/', //Can be any URI, but the scheme part must correspond to the customeUriScheme
customUriScheme: 'com.example.ClassReport');
What happen when I try to compile to Android: after put password and click login, I don't go back to App. It keeps on google chrome.
Thanks,
Hi Samuel,
try changing the redirectUri, removing the ":/" at the end and using "://" after the scheme.
Something like com.example.ClassReport://accounts.google.com should work.
Remember to update the redirect uri accordingly in the Google application registration panel. Obviously you can use the same redirectUri for both iOS and Android versions.
Thank you again for supporting me. I did that but the error persists. So, I downloaded my json file from Google and implemented my own class (I'd like to say I'm learning a lot!) But, still I have two different situations:
I'm so sorry if I'm bothering you.
Below my class and my Json.
Json --> (client_id *, project_id *
"auth_uri":"accounts.google.com/o/oauth2/auth"...}
Class -->
import 'package:oauth2_client/oauth2_client.dart';
import 'package:meta/meta.dart';
class MyOAuth2Client extends OAuth2Client {
MyOAuth2Client({@required String redirectUri, @required String customUriScheme}): super(
authorizeUrl: 'accounts.google.com/o/oauth2/auth', //Your service's authorization url
tokenUrl: 'oauth2.googleapis.com/token', //Your service access token url
redirectUri: "urn:ietf:wg:oauth:2.0:oob:auto",
customUriScheme: "com.example.ClassReport"
);
}
Thanks again, Enrico.
I cloned your test app from Git and believe or not, I received the same error when I try to use :// --> (image) I think this is a Brazil problem. heheheh
Try to change the package's name, com.example.ClassReport to com.example.classreport redirect is not working when the package's name is in upperCase
You mentioned PKCE briefly. As it is recommended for use with Authorization Code in a mobile app, does oauth2_client support that under the covers? I don't see where to provide a 43-256 character code verifier so I am guessing either you do that under the covers or don't support PKCE?
Also, it is recommended that mobile apps use either an external user agent (a browser) or, to keep things cleaner UI wise, an in-app browser tab (Chrome tab for Android, or SFSafariViewController for iOS). Does oauth2_client bring up an in-app browser?
Hi Darrin, yes oauth2_client uses PKCE by default.
The code verifier is generated by the client class before performing the authorization code request, but you can even supply your own to the getTokenWithAuthCodeFlow method.
There is currently no way of supplying a custom code verifier through the helper class.
As for the user agent, afaik the recommendation is to use an external browser and not an embedded one, mainly for security reasons (such as avoiding the app to modify or inspect the browser window). As such, oauth2_client relies only on an external browser instance.
Agreed that an external browser is suggested but is also a relatively poor user experience. They don't want you using a native flow, but as of OAuth2.0, they were good with an in-app browser tab. So:
In iOS use SFSafariViewController
In Android use CustomTabsService /Chrometabs
That's a better user experience I think most will agree.
I agree with you it would be a better user experience and probably not even a security concern, since it wouldn't use a webview. I guess I'll take a look at how it could be integrated in the library...
Thank you for the suggestion!
You said "oauth2_client uses PKCE by default" but the
getTokenWithAuthCodeFlowmethod and theOAuth2Helperconstructor both still ask for a client secret. The whole point of PKCE is to do away with client secrets because storing them in the frontend is insecure. How is this handled?Hi, the library is meant to be general, so it can be used in different scenarios.The client secret is optional, you can avoid passing it if the provider doesn't require it. On the other hand PKCE is enabled by default but can be disabled by passing
enablePKCE: falseto thegetTokenWithAuthCodeFlowmethod.Hi nice tutorial
I want to know how to get authentication code through flutter and give more example with oauth2.0 and flutter in more detail with complete process of login and logout. It will help a lot
Hi thank you!
I just set up a new GitHub repository with a sample application.
Hope it helps!
Salve Enrico,
Given I am new in programming, I am having this issue that I am not able to solve.
I implemented the helper to post call for Legrand API: developer.legrand.com/tutorials/0a...
The server returns the access token valid for 60 mins and refresh token valid for 90days. The received refresh_token changes at each request. In order to be valid lifetime, you have to use the new generated refresh_token code to refresh your access_token.
I can use the getToken() and I can also post a call but every time I call it I need to log in within Legrand, so I am not able to refresh the accesstoken. Moreover, (see example below) I tried to check if the token was stored after the request but I always get tokenResponse as null, so seems the getToken() every times call the fetchToken().
Any thoughts? Thanks in advance for the help!
Code example:
var hlp = OAuth2Helper(client, clientId: clientId, clientSecret: clientSecret, scopes: scopes);
hlp.post(URL, headers: headersTest, body: bodyTest);
// check if access token is working
var tokenResp = await hlp.getToken();
accessToken = tokenResp.accessToken;
print('access token = $accessToken');
//check if token is stored
var tokenResponse = await hlp.getTokenFromStorage();
print('token response from storage $tokenResponse ');
Ciao Nuvolari2020!
So every time you post a request you are required to log in again?
This can happen when the requested scopes are incorrect or misspelled... Can you take a look at this issue, maybe it could help you too...
Ciao Enrico, thanks! I did not pass the right scopes, I solved it. Thanks a lot for the help and for the useful package. Thanks!!!
Great, glad it helped!
Hi there, I'm using LinkedInOauthClient and Oauth2helper to get data user from LinkedIn. But it doesn't auto close browser to response data to me. It just load page redirect. If I back browser by back button it'll throw exception "user close browser" and no data response. Can u help me?
Hi, which scheme are you using for the redirect uri? On Android it normally is much simpler to use a custom scheme instead of https.
You can find more info in the FAQ section of the readme in the github repository.
Hi dear friend. It's work now!!! Problem? A capital letter. I started to read the Google screen and noticed that there was a capital letter. So, I changed that letter, stopped the all process and I started again, works fine. Ten hours just because of one letter. But I can't complain: I learnt a lot!
Again, thank you for supporting.
Have a nice and blessed week.
Samuel Santos
Hi Samuel, I'm glad it works!
Hello, how can I implement the logout option?
Hi @yaredweldegebrialreda are you find out the solution to logout?
I tried implementing a custom Oauth2 class however i keep getting an error on redirect. The error says Canceled by user. I am not sure what value goes in the accesstokenrequestheader. The Api authorization returns a string 'redirect_uri?code={code}&state={state}' Also the api doesn't support scopes so I left it as an empty list.
Hi, how are you?
I'm trying to make the tutorial but when I make login with my github, have an error "404 Didn't find anything where". You can help me?
And If I wish use this from connect with my personal provider, I just remove the "github package" and install "oauth package"?
Thanks!!
Hi Enrico, I must say thank you for python this together it really helps a lot. I was able to I’m the client and everything works fine aside from the fact that the token doesn’t get refreshed when it’s expired. It redirects back to the login page when the tokens expires. I’m looking forward to your response. Thank you
Thanks a lot for this. Really helped me learn
Thank you, I'm glad it helps!
Thank you for sharing this article! I've been looking out for this and I've found you. It really helped me a lot!
Thank you Samuel, I'm glad it helped!
Hi thanks for the guide, but how do you assign the callback url on github?
mine always show "Url must be a valid URL" warning when i input the app package name on the callback url