
There are currently countless numbers of state management libraries out there. This blog will show you how to use state management for React Native in Nx monorepo with TanStack Query (which happens to use Nx on their repo) and Redux.
This blog will show:
- How to set up these libraries and their dev tools
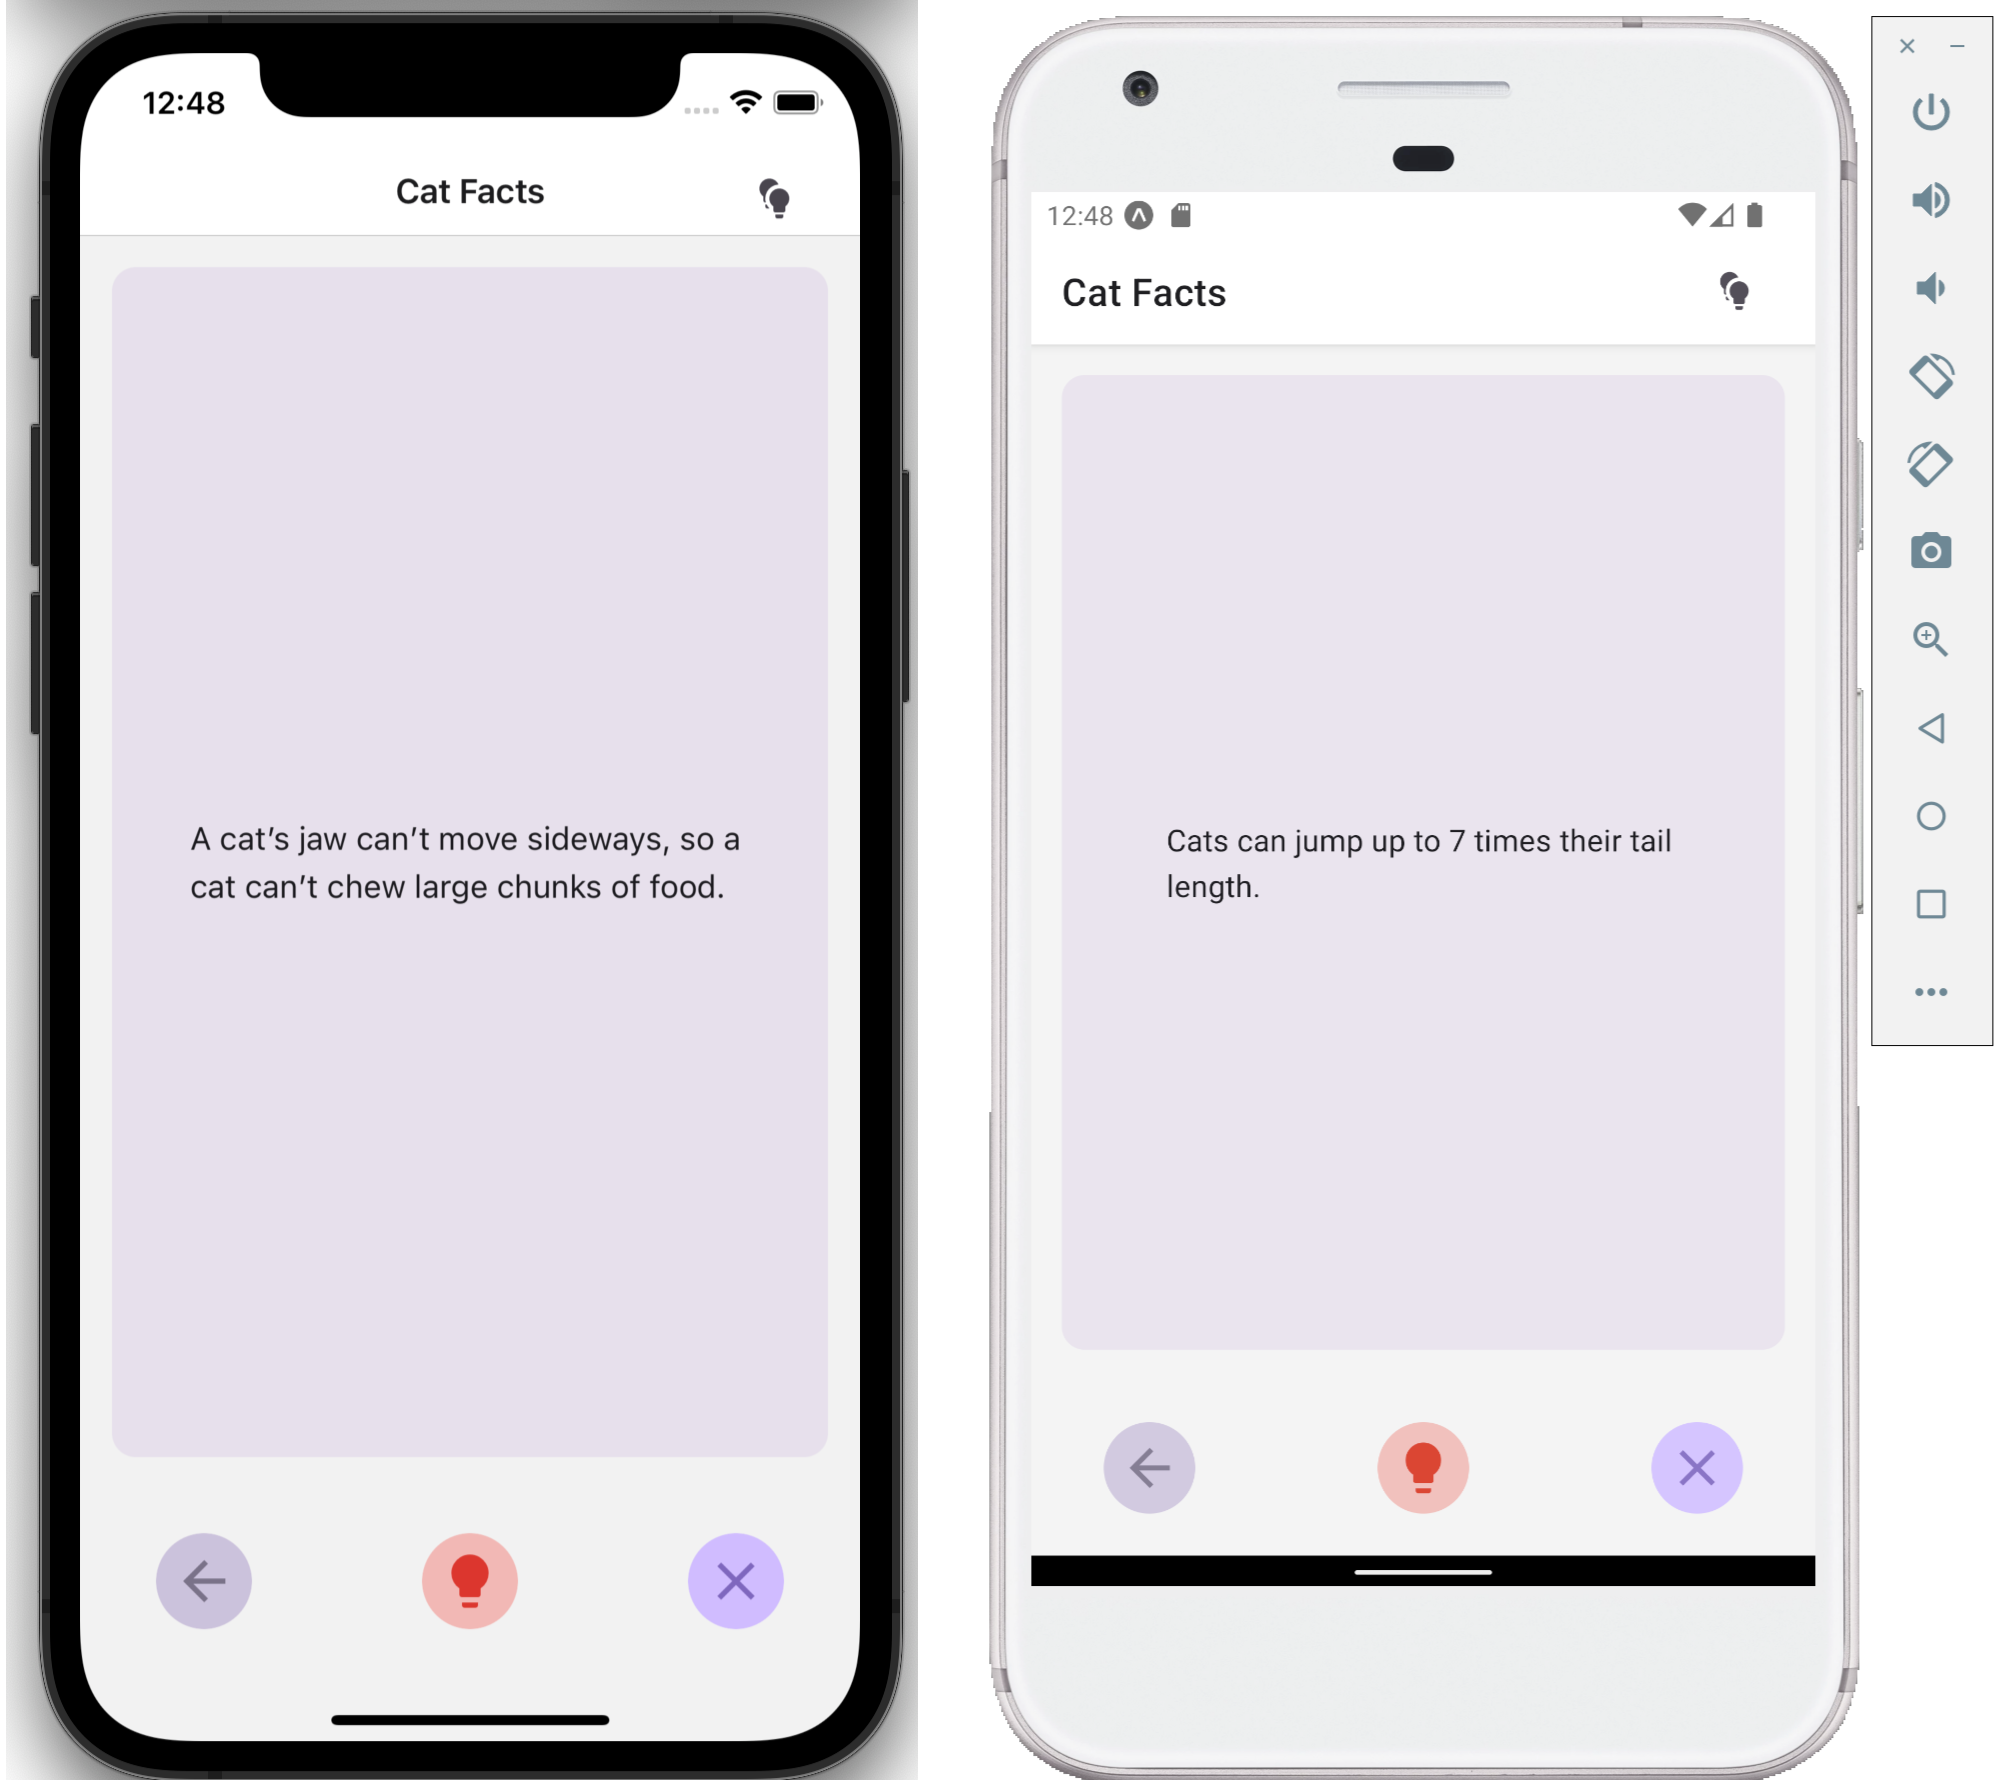
- How to build the sample page below in React Native / Expo with state management
- How to do unit testing
It will call an API and show a cat fact on the page, allowing users to like or dislike the data.

Github repo:
 xiongemi
/
nx-expo-monorepo
xiongemi
/
nx-expo-monorepo
a repo showing 2 apps created by @nx/expo
NxExpoMonorepo
This workspace is created using @nx/expo (Nx and Expo).
![]()
✨ This workspace has been generated by Nx, a Smart, fast and extensible build system. ✨
Workspace structure
It contains 2 apps:
- cats and its e2e (cypress/playwright)
- dogs and its e2e (cypress/playwright)
4 libs:
- models
- queries: tanstack react-query
- states: redux state management
- ui

Commands
-
nx start catsto start the cats app -
nx start dogsto start the dogs app -
nx build catsto build the cats app using EAS -
nx build dogsto build the dogs app using EAS -
nx test catsto test the cats app -
nx test dogsto test the dogs app -
nx lint catsto lint the cats app -
nx lint dogsto lint the dogs app -
npm run deployto deploy the cats app to github page -
nx e2e cats-cypressto run cypress e2e tests on cats app -
nx e2e cats-playwrightto…
Before We Start
From TanStack Query documentation, it says:
- TanStack Query is a server-state library.
- Redux is a client-state library.
What is the difference between the server state and the client state?
In short:
- Calling an API, dealing with asynchronous data-> server state
- Everything else about UI, dealing with synchronous data -> client state
Installation
To use TanStack Query / React Query for the server state, I need to install:
- Library: @tanstack/react-query
- Dev tools: @tanstack/react-query-devtools
I will use Redux for everything else.
- Library: redux, react-redux, @reduxjs/toolkit
- Dev tools: @redux-devtools/extension
- Logger: redux-logger, @types/redux-logger
- Storage: redux-persist, @react-native-async-storage/async-storage
To install all the above packages:
#npm
npm install @tanstack/react-query @tanstack/react-query-devtools redux react-redux @reduxjs/toolkit @redux-devtools/extension redux-logger @types/redux-logger redux-persist @react-native-async-storage/async-storage --save-dev

#yarn
yarn add @tanstack/react-query @tanstack/react-query-devtools redux react-redux @reduxjs/toolkit @redux-devtools/extension redux-logger @types/redux-logger redux-persist @react-native-async-storage/async-storage --dev

#pnpm
pnpm add @tanstack/react-query @tanstack/react-query-devtools redux react-redux @reduxjs/toolkit @redux-devtools/extension redux-logger @types/redux-logger redux-persist @react-native-async-storage/async-storage --save-dev
Server State with React Query
Setup Devtools
First, you need to add React Query / TanStack Query in the App.tsx:
import React from 'react';
import { QueryClient, QueryClientProvider } from '@tanstack/react-query';
import { ReactQueryDevtools } from '@tanstack/react-query-devtools';
import { Platform } from 'react-native';

const App = () => {
  const queryClient = new QueryClient();
  return (
    <QueryClientProvider client={queryClient}>
      { Platform.OS === 'web' && <ReactQueryDevtools />}
      ...
    </QueryClientProvider>
  );
};

export default App;
Note: the React Query Devtools currently do not support react native, and it only works on the web, so there is a condition: { Platform.OS === ‘web’ && <ReactQueryDevtools />}.
For the react native apps, in order to use this tool, you need to use react-native-web to interpolate your native app to the web app first.
If you open my Expo app on the web by running nx start cats and choose the options Press w │ open web, you should be able to use the dev tools and see the state of my react queries:

Create a Query
What is a query?
“A query is a declarative dependency on an asynchronous source of data that is tied to a unique key. A query can be used with any Promise-based method (including GET and POST methods) to fetch data from a server.” (https://tanstack.com/query/v4/docs/react/guides/queries)
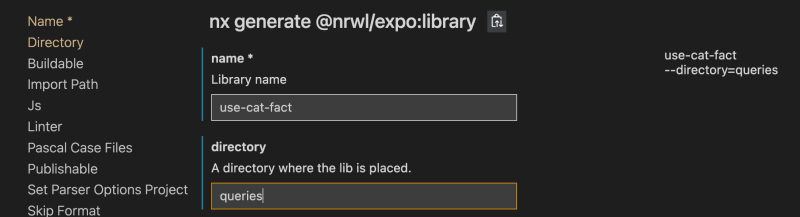
Now let’s add our first query. In this example, it will be added underlib/queries folder. To create a query to fetch a new fact about cats, run the command:
# expo workspace
npx nx generate @nx/expo:lib use-cat-fact --directory=queries

# react-native workspace
npx nx generate @nx/react-native:lib use-cat-fact --directory=queries
Or use Nx Console:
Now notice under libs folder, use-cat-fact folder got created under libs/queries:
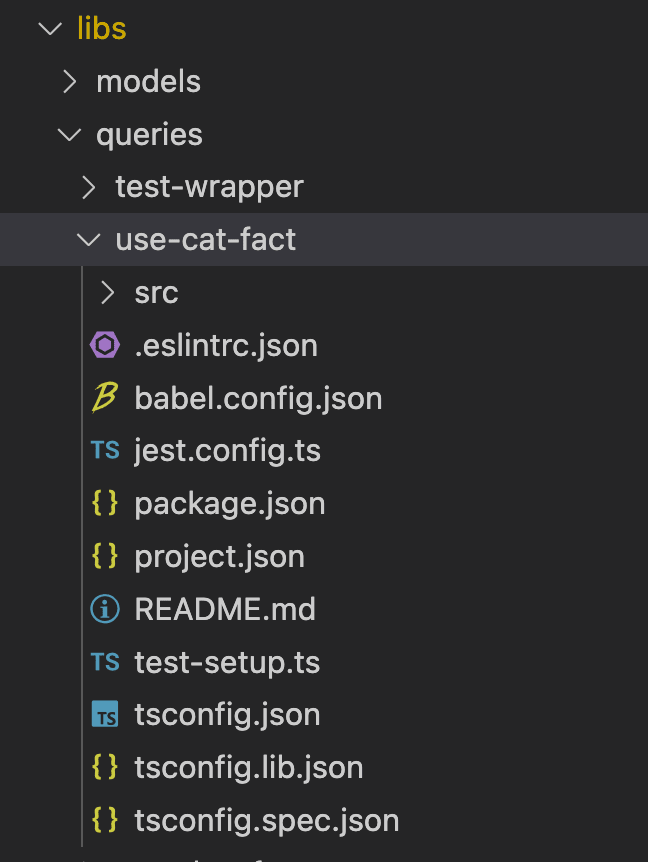
If you use React Native CLI, just add a folder in your workspace root.
For this app, let’s use this API: https://catfact.ninja/. At libs/queries/use-cat-fact/src/lib/use-cat-fact.ts, add code to fetch the data from this API:
import { useQuery } from '@tanstack/react-query';

export const fetchCatFact = async (): Promise<string> => {
  const response = await fetch('https://catfact.ninja/fact');
  const data = await response.json();
  return data.fact;
};

export const useCatFact = () => {
  return useQuery({
    queryKey: \['cat-fact'\],
    queryFn: fetchCatFact,
    enabled: false,
  });
};
Essentially, you have created a custom hook that calls useQuery function from the TanStack Query library.
Unit Testing
If you render this hook directly and run the unit test with the command npx nx test queries-use-cat-fact, this error will show up in the console:
 Invalid hook call. Hooks can only be called inside of the body of a function component. This could happen for one of the following reasons:
    1. You might have mismatching versions of React and the renderer (such as React DOM)
    2. You might be breaking the Rules of Hooks
    3. You might have more than one copy of React in the same app
    See https://reactjs.org/link/invalid-hook-call for tips about how to debug and fix this problem.
To solve this, you need to wrap your component inside the renderHook function from @testing-library/react-native library:
1. Install Library to Mock Fetch
Depending on which library you use to make HTTP requests. (e.g. fetch, axios), you need to install a library to mock the response.
- If you use
fetchto fetch data, you need to installjest-fetch-mock. - If you use
axiosto fetch data, you need to installaxios-mock-adapter.
For this example, since it uses fetch, you need to install jest-fetch-mock:
#npm
npm install jest-fetch-mock --save-dev

#yarn
yard add jest-fetch-mock --dev
You also need to mock fetch library in libs/queries/use-cat-fact/test-setup.ts:
import fetchMock from 'jest-fetch-mock';

fetchMock.enableMocks();
2. Create Mock Query Provider
To test out useQuery hook, you need to wrap it inside a mock QueryClientProvider. Since this mock query provider is going to be used more than once, let’s create a library for this wrapper:
# expo library
npx nx generate @nx/expo:library test-wrapper --directory=queries

# react native library
npx nx generate @nx/react-native:library test-wrapper --directory=queries
Then a component inside this library:
# expo library
npx nx generate @nx/expo:component test-wrapper --project=queries-test-wrapper

# react native library
npx nx generate @nx/react-native:component test-wrapper --project=queries-test-wrapper
Add the mock QueryClientProvider in libs/queries/test-wrapper/src/lib/test-wrapper/test-wrapper.tsx:
import { QueryClient, QueryClientProvider } from '@tanstack/react-query';
import React from 'react';

export interface TestWrapperProps {
  children: React.ReactNode;
}

export function TestWrapper({ children }: TestWrapperProps) {
  const queryClient = new QueryClient();
  return (
    <QueryClientProvider client={queryClient}>{children}</QueryClientProvider>
  );
}

export default TestWrapper;
3. Use Mock Responses in Unit Test
Then this is what the unit test for my query would look like:
import { TestWrapper } from '@nx-expo-monorepo/queries/test-wrapper';
import { renderHook, waitFor } from '@testing-library/react-native';
import { useCatFact } from './use-cat-fact';
import fetchMock from 'jest-fetch-mock';

describe('useCatFact', () => {
  afterEach(() => {
    jest.resetAllMocks();
  });

  it('status should be success', async () => {
    // simulating a server response
    fetchMock.mockResponseOnce(JSON.stringify({
      fact: 'random cat fact',
    }));

    const { result } = renderHook(() => useCatFact(), {
      wrapper: TestWrapper,
    });
    result.current.refetch(); // refetching the query
    expect(result.current.isLoading).toBeTruthy();

    await waitFor(() => expect(result.current.isLoading).toBe(false));
    expect(result.current.isSuccess).toBe(true);
    expect(result.current.data).toEqual('random cat fact');
  });

  it('status should be error', async () => {
   fetchMock.mockRejectOnce();

    const { result } = renderHook(() => useCatFact(), {
      wrapper: TestWrapper,
    });
    result.current.refetch(); // refetching the query
    expect(result.current.isLoading).toBeTruthy();

    await waitFor(() => expect(result.current.isLoading).toBe(false));
    expect(result.current.isError).toBe(true);
  });
});
If you use axios, your unit test would look like this:
import { TestWrapper } from '@nx-expo-monorepo/queries/test-wrapper';
import { renderHook, waitFor } from '@testing-library/react-native';
import { useCatFact } from './use-cat-fact';
import axios from 'axios';
import MockAdapter from 'axios-mock-adapter';

// This sets the mock adapter on the default instance
const mockAxios = new MockAdapter(axios);

describe('useCatFact', () => {
  afterEach(() => {
    mockAxios.reset();
  });

  it('status should be success', async () => {
    // simulating a server response
    mockAxios.onGet().replyOnce(200, {
      fact: 'random cat fact',
    });

    const { result } = renderHook(() => useCatFact(), {
      wrapper: TestWrapper,
    });
    result.current.refetch(); // refetching the query
    expect(result.current.isLoading).toBeTruthy();

    await waitFor(() => expect(result.current.isLoading).toBe(false));
    expect(result.current.isSuccess).toBe(true);
    expect(result.current.data).toEqual('random cat fact');
  });

  it('status should be error', async () => {
    mockAxios.onGet().replyOnce(500);

    const { result } = renderHook(() => useCatFact(), {
      wrapper: TestWrapper,
    });
    result.current.refetch(); // refetching the query
    expect(result.current.isLoading).toBeTruthy();

    await waitFor(() => expect(result.current.isLoading).toBe(false));
    expect(result.current.isError).toBe(true);
  });
});
Notice that this file imports TestWrapper from @nx-expo-monorepo/queries/test-wrapper, and it is added to renderHook function with { wrapper: TestWrapper }.
Now you run the test command nx test queries-use-cat-fact, it should pass:
 PASS   queries-use-cat-fact  libs/queries/use-cat-fact/src/lib/use-cat-fact.spec.ts (5.158 s)
  useCatFact
    ✓ status should be success (44 ms)
    ✓ status should be error (96 ms)
Integrate with Component
Currently userQuery returns the following properties:
-
isLoadingorstatus === 'loading'- The query has no data yet -
isErrororstatus === 'error'- The query encountered an error -
isSuccessorstatus === 'success'- The query was successful and data is available
Now with components controlled by the server state, you can leverage the above properties and change your component to follow the below pattern:
export interface CarouselProps {
  isError: boolean;
  isLoading: boolean;
  isSuccess: boolean;
}


export function Carousel({
  isSuccess,
  isError,
  isLoading,
}: CarouselProps) {
  return (
    <>
      {isSuccess && (
        ...
      )}
      {isLoading && (
        ...
      )}
      {isError && (
        ...
      )}
    </>
  );
}

export default Carousel;
Then in the parent component, you can use the query created above:
import { useCatFact } from '@nx-expo-monorepo/queries/use-cat-fact';
import { Carousel } from '@nx-expo-monorepo/ui';
import React from 'react';

export function Facts() {
  const { data, isLoading, isSuccess, isError, refetch, isFetching } =
    useCatFact();

  return (
    <Carousel
      content={data}
      isLoading={isLoading || isFetching}
      isSuccess={isSuccess}
      isError={isError}
      onReload={refetch}
    >
    ...
   );
}
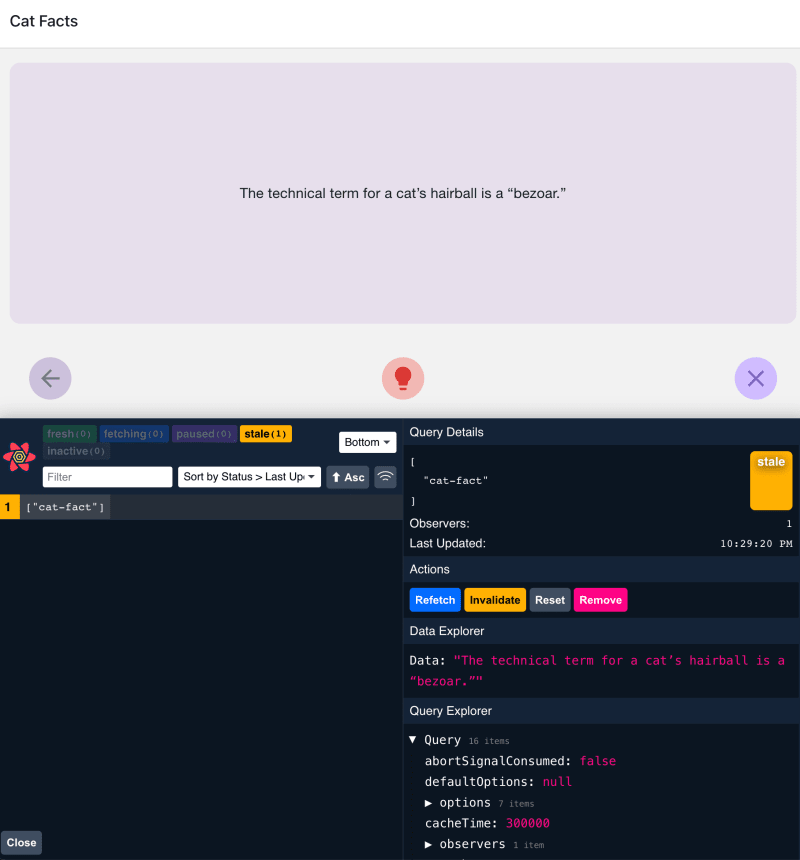
If you serve the app on the web and open the React Query Devtools, you should be able to see the query I created cat-fact and data in the query.
Redux
Create a Library
First, you need to create a library for redux:
# expo library
npx nx generate @nx/expo:lib cat --directory=states

# react native library
npx nx generate @nx/react-native:lib cat --directory=states
This should create a folder under libs:

Create a State
This app is going to track when users click the like button, so you need to create a state called likes.

You can use the Nx Console to create a redux slice:
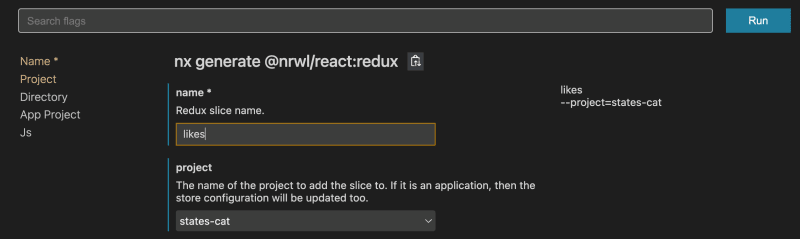
Or run this command:
npx nx generate @nx/react:redux likes --project=states-cat --directory=likes
Then update the redux slice at libs/states/cat/src/lib/likes/likes.slice.ts:
import {
  createEntityAdapter,
  createSelector,
  createSlice,
  EntityState,
} from '@reduxjs/toolkit';

export const LIKES\_FEATURE\_KEY = 'likes';

export interface LikesEntity {
  id: string;
  content: string;
  dateAdded: number;
}

export type LikesState = EntityState<LikesEntity>;

export const likesAdapter = createEntityAdapter<LikesEntity>();

export const initialLikesState: LikesState = likesAdapter.getInitialState();

export const likesSlice = createSlice({
  name: LIKES\_FEATURE\_KEY,
  initialState: initialLikesState,
  reducers: {
    like: likesAdapter.addOne,
    remove: likesAdapter.removeOne,
    clear: likesAdapter.removeAll,
  },
});

/\*
 \* Export reducer for store configuration.
 \*/
export const likesReducer = likesSlice.reducer;

export const likesActions = likesSlice.actions;

const { selectAll } = likesAdapter.getSelectors();

const getlikesState = <ROOT extends { likes: LikesState }>(
  rootState: ROOT
): LikesState => rootState\[LIKES\_FEATURE\_KEY\];

const selectAllLikes = createSelector(getlikesState, selectAll);

export const likesSelectors = {
  selectAllLikes,
};
Every time the “like” button gets clicked, you want to store the content of what users liked. So you need to create an entity to store this information.
export interface LikesEntity {
  id: string;
  content: string;
  dateAdded: number;
}
This state has 3 actions:
- like: when users click like
- remove: when users cancel the like
- clear: when users clear all the likes
Root Store
Then you have to add the root store and create a transform function to stringify the redux state:
Connect Redux State with UI
Then in apps/cats/src/app/App.tsx, you have to:
- wrap the app inside the
StoreProviderwith the root store to connect with the Redux state. - wrap the app inside
PersistGateto persist the redux state in the storage
import React from 'react';
import AsyncStorage from '@react-native-async-storage/async-storage';
import { PersistGate } from 'redux-persist/integration/react';
import { createRootStore, transformEntityStateToPersist } from '@nx-expo-monorepo/states/cat';
import { Loading } from '@nx-expo-monorepo/ui';
import { Provider as StoreProvider } from 'react-redux';

const App = () => {

  const persistConfig = {
    key: 'root',
    storage: AsyncStorage,
    transforms: \[transformEntityStateToPersist\],
  };
  const { store, persistor } = createRootStore(persistConfig);

  return (
    <PersistGate loading={<Loading />} persistor={persistor}>
      <StoreProvider store={store}>
        ...
      </StoreProvider>
    </PersistGate>
  );
};

export default App;
In your component where the like button is located, you need to dispatch the like action. I created a file at apps/cats/src/app/facts/facts.props.ts:
import { likesActions, LikesEntity, RootState } from '@nx-expo-monorepo/states/cat';
import { AnyAction, ThunkDispatch } from '@reduxjs/toolkit';

const mapDispatchToProps = (
  dispatch: ThunkDispatch<RootState, void, AnyAction>
) => {
  return {
    like(item: LikesEntity) {
      dispatch(likesActions.like(item));
    },
  };
};

type mapDispatchToPropsType = ReturnType<typeof mapDispatchToProps>;

type FactsProps = mapDispatchToPropsType;

export { mapDispatchToProps };
export type { FactsProps };
Now you have passed the like function to the props of the facts component. Now inside the facts component, you can call the like function from props to dispatch the like action.
Debugging
To debug redux with Expo, I can simply open the Debugger Menu by entering “d” in the console or in the app, then choose the option “Open JS Debugger”.

Then you can view my redux logs in the JS Debugger console:
You can see the redux logs in console now:

Or you can run nx serve cats to launch the app in web view. Then you can use Redux Devtools and debug the native app like a web app:

Summary
Here is a simple app that uses TanStack Query and Redux for state management. These 2 tools are pretty powerful and they manage both server and client state for you, which is easy to scale, test, and debug.
Nx is a powerful monorepo tool. Together with Nx and these 2 state management tools, it will be very easy to scale up any app.
- TanStack Query site: https://tanstack.com/query/latest
- Official @nx/expo plugin: https://nx.dev/packages/expo
- Official @nx/react-native plugin: https://nx.dev/packages/react-native

Top comments (3)
Hi @xiongemi, thank you for providing the documentation for state management. I'm trying to learn and experience nx. I have a question regarding micro front end architecture with global state management using Redux. I've created a template on GitHub (github.com/serifcolakel/nx-monorep...) which incorporates module federation with Webpack, Tailwind CSS, Shadcn and Redux (utilizing Redux Toolkit, Redux Persist, etc.). In this setup, I have a data layer for my services and a global state management solution packaged as an npm package. Could you please advise if this approach is recommended?
do you mean you publish your libraries and import libraries as an npm package dependency in your apps? This approach is pretty common, it is fine.
Thank you