
In this tutorial, we will learn how to display, update and delete shopping cart items in our demo e-commerce app
Introduction
We are building an e-commerce app from scratch using Vue.js in the frontend and Java with Springboot for the backend. You can check out the first frontend tutorial of this series here

We are building a shopping cart component for displaying and updating the cart items user has added to his cart.
We will use Vue.js to make a beautiful UI for the shopping cart.
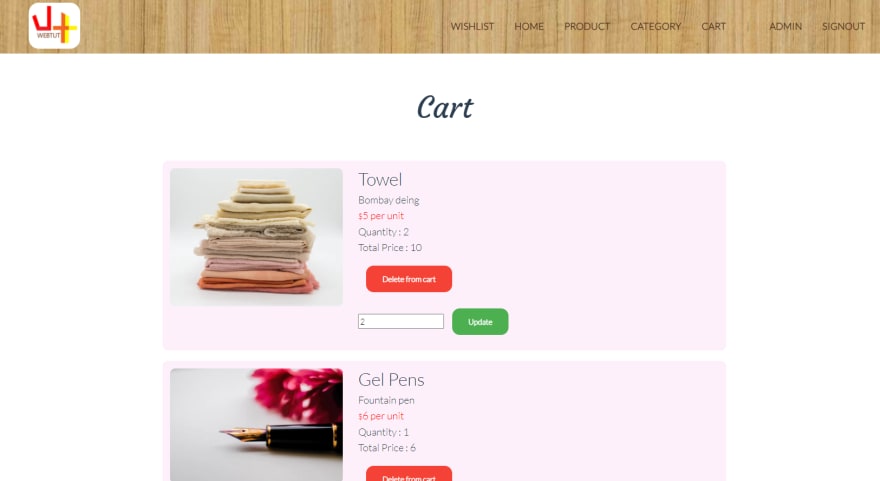
Demo of what we will implement
You can play with the e-commerce app here
You can find the complete code at Github.
Backend
Previously, we have built the backend of the shopping cart using Java and Springboot. You can find it here

Pre-requisites
Knowledge of Vuejs
Visual Studio Code **— **open-source (Recommended)
A good browser *— *(Chrome — recommended)
API description Summery
Before jumping to coding the frontend part, we have to discuss the API which we will be using for the frontend. You can find the backend code here
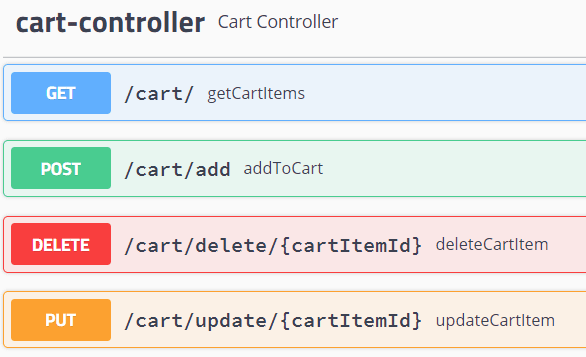
Add to cart (POST) :
In this method, we will have to send the id of the product and the quantity so that the given product can be added to the corresponding user’s cart. Hence, the body of the POST request should look like the following,

Get all cart items (GET) :
Now, to get all the items in the cart for a particular user, we need to have a GET request. In return, we will get all the product details, quantity and the total cost of items in the cart. The cartItems is the array of all products present in the cart and totalCost represents the overall cost of all the items in the cart.

Update an item (PUT) :
To update a particular product in the cart, we need the cart_item_id , quantity and user_token .
Delete the item from the cart (DELETE) :
To delete a particular product from the cart, we need the cart_item_id . We can delete that item by its id.
The flow of this tutorial
1. Add to cart
2. Display cart items
3. Update an item in the cart
4. Delete an item in the cart
Folder Structure
Go ahead and create a folder named Cart in the views folder of our Vue project and then create a vue.js file Cart file in the Cart folder.
The folder structure shall look like this

In this (Cart.vue) component we will be displaying the cart items the user has added to his cart.
Here the user will also be able to update the number of items in the cart or delete the item in the cart. Also, we will be displaying the cart price at the bottom of the page which will be updated each time user modifies the cart.
Users can also click on a particular item to view its details.
Now let’s get to coding
We will crate a Cart.vue file which like any Vue.js file has three components
template tag (for writing HTML tags)
a script tag (for coding the logic/functionalities )
a style tag(for adding CSS to the page).
In the script tags, we need to export the Cart component which can be rendered in some components by importing it.
1. Add to cart
We will be using the API:/cart/add we have seen above in the API description.
We have a showdetails component that displays the details of the product the user wishes to view or add to the cart.
So in this component, we have a button AddtoCart that calls the post method(addToCart) of our backend API which will have a post body of the product id and the quantity of that product.

2. Displaying the cart items
We will be using the API: /cart/getCartItems we have seen above in the API description.
For this, we will need data variables that we will be binding with HTML attributes
carts: for storing the response data which will be fetched from the API call,
token: user token to check if the user is logged in or not,
len: to store the length of the items in the cart
totalcost: to store the total cost of the items in the cart,
cartItem: an array of objects where each object contains the following data fields :
imgUrl: the image of the product
pName: product name,
pDescription: product description,
pPrice: product price,
pQuantity: product quantity,
id: item id,
-
userId: id of the user
From the App. vue file we pass down props to router-view components in this case Cart component receives the props therefore we store the baseURL received from the props.
Now, whenever the user is navigated to /cart i.e. Cart component is mounted/rendered we set the token value from the local storage.

listCartItems() function: will be used to get and display the items in the cart.
Since we want to fetch the items get method of Axios will be used and it will be passed the token of the user as a param. So our backend API, finds the user with the token provided and then according to the userID returns an array of items in his/her cart with a status code of success. But if the token provided is invalid i.e. the user is not logged in then it returns a response stating that the token is invalid.
If the response status of the API call we made is success then we store the data of the response in the carts data variable we created earlier. The response contains an array called cartItems which contains cartId, productId, userId, and a product array that contains the details of the product. Then the length of the “carts” array will give us the number of items in the cart which we will be stored in the variable “len”.
Now we iterate through the cart items using the for loop and store the details of each product in the “cartItem” array.
Displaying the details of a product
Whenever the user clicks an item in the cart, the user will be navigated to showDetails component where details of that item will be displayed.
showDetails() function: will receive a parameter i.e. the id of the product which will be passed as params in the push method of the router instance ($router) and then the user will be navigated to showDetails component which will show the details of the product according to id received. So when we click on the image or the name of the item it will show details of that item like below:
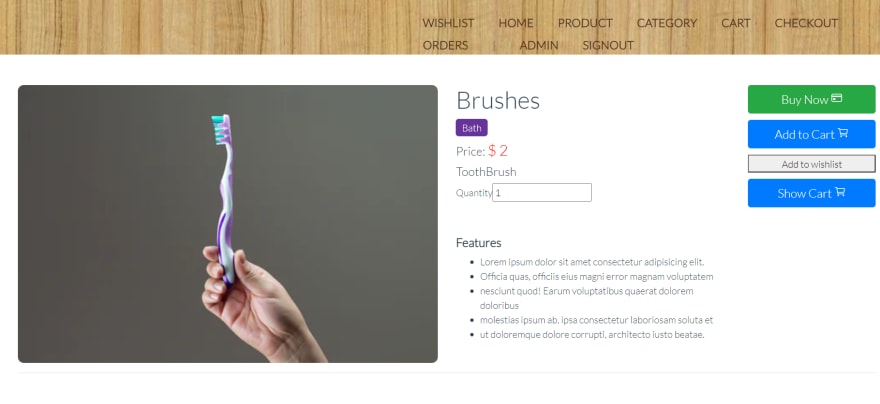
Don’t worry that we have not added the HTML part and you may be wondering how is it being displayed. The HTML part I have attached at the end is to give a visualization of what we are building, So stay tuned!
3. Updating a cart item

We will be using the API:/cart/update/{cartItemId} **we have seen above in the **API description.
**updateItem()*: *This function will receive an index of the product in the cartItem and a new quantity
First of all, we will find the itemId in our cartItems array by looping through it and then break the loop and store the index of the item found in the variable “i”.
Then update the quantity of the product with the new quantity received from the parameters. Also, we store the userId and productId in the variables since we need to pass the response body to our backend API call. Here in this backend API too first user authentication will be done and then the item with the itemId provided will be found and thus its quantity will be updated.
Since we are updating an entity we use the put method of Axios and pass itemId and token as params and itemId, userId, productId, quantity as the response body.
4.Deleting an item from the cart

We will be using the API:/cart/delete/{cartItemId} **we have seen above in the **API description.
deleteItem(): This function will receive an itemId
We call the delete method of Axios which will call the backend **API **for the respective URL mapping and it will be provided with the itemId and token as params. So this backend API will first find the user with the token provided and if the user is found then the cart item with the provided itemId will be deleted from the database. After deletion, the API sends the response status as 200 the product is deleted from the cart and we refresh the page.
Now one more point to be noted that when this component will be rendered/mounted the cart items should be displayed. Hence we call the listCartItems() method in the “mounted” method.
mounted() {
   this.token = localStorage.getItem("token");
   this.listCartItems();
}
The HTML part of our feature:
Now let’s start working on the HTML part. So in the template tags, we need to add our HTML attributes. Now we display the items if and only if the user has added them into the cart. So in general whenever conditional rendering is done we use the v-if directive of Vuejs. The block will only be rendered if the directive’s expression returns a truth value.
As we store the response data we get from our API in the “carts” variable it is used to determine whether or not to display the items i.e. if the “carts” value is not null then the div block with the v-if directive will be displayed.
Now since we may have more than one item in the cart we need to loop through the “cartItem” array and then display them. For this, we use the v-for directive which needs to be passed a key (required) to uniquely identify an item. Remember the length of cart items we stored in the “len” variable, it is used herein looping.
Now for each product we display its image with the help of the v-bind directive and on clicking that we call the showDetails() method.
Now using the two-way data binding concept of vuejs we display the name, description, price, quantity, the total price of that item.
Also, we need to add buttons for the delete and update method.

When the delete button will be clicked deleteItem will be called and the implementation of which we have seen earlier.
Since quantity can be updated we create a form that accepts the quantity and then submit it using the update button. We bind the input attribute with the “pQuantity” variable we created using the directive v-model.
This will call the function updateItem() which will be passed the index (recall that while implementing this method we accepted a parameter to find that product in the cart) and quantity of the product which needs to be updated.
Lastly, we display the total cost of the cart stored in the “totalcost” variable.
Congratulations!
You have now successfully displayed and updated the products added to the cart.
You can find the complete code in this GitHub Repo

Top comments (0)