
As your business gains traction, your success will inevitably bring its share of malicious actors who will try everything to breach your systems and considerably slow down your operations.
One such threat are distributed denial-of-service (DDOS) attacks whereby the perpetrator floods a server with high network traffic loads coming from multiple sources, effectively disrupting the service and preventing legitimate users from accessing it.
Startups and SMEs are particularly exposed because they seldom have the resources to prepare for the unexpected and the impact of something seen as unlikely is often underestimated if not completely overlooked.
This guide will help you mitigate the risk in no time with a hassle-free, fully-managed and affordable solution.
Meet Cloudflare
Security can be tricky and requires extreme meticulousness. A system is only as strong as its weakest component, and the slightest negligence can lead to disastrous consequences.
Going managed can be a sensible choice if you are not positive you can handle security on your own. It ensures your infrastructure security is kept to the highest quality standards as new threats keep emerging.
Cloudflare offers a battle-tested DDOS protection service trusted by major companies throughout the world. The set-up can be done in a jiffy and their pricing plans start with a free tier.
How it works
Cloudflare acts as a gatekeeper between your server and the end-user trying to access it. It analyzes incoming requests and validates them against well-known threats and other inferences it has made over time from its experience of dealing with vast amounts of traffic worldwide.

You can choose how to deal with suspicious traffic, for example by presenting the user with a CAPTCHA or by blocking requests that match certain characteristics.
Setting up Cloudflare
When configured properly, transitioning to Cloudflare can be done without any downtime. Please make sure to understand every step perfectly and prepare a contingency plan before proceeding.
You will need to have editor access to your Domain Name Server (DNS), typically found on your registrar’s dashboard. You may determine your registrar via WHOIS.
Create a Cloudflare account
Once on the dashboard, proceed to adding your domain by clicking on “Add a Site”.
Select the plan that you deem best fit to your needs. DDOS protection is included in the free plan. Other plans typically feature additional optimizations (caching, image compression etc) and more responsive support.
-
List your DNS records (in layman’s terms, instructions about how to handle requests passing through your domain). Clouflare will automatically try to scan your current configuration. However, please make sure that it matches the configuration you see on your DNS. Add missing records manually if needed. At this point the cloud icons should be greyed out, meaning Cloudflare is not yet proxying the traffic. You may skip the next screen about changing your nameserver for now; we’ll get back to it later.

-
IMPORTANT - Before moving on to the next steps, make sure to whitelist IP addresses necessary for the proper functioning of your service (typically those of other microservices or partners it needs to communicate with). Failing to do so might disrupt your services. To do so, head over to the “Firewall > Tools” section and add the set of IP addresses to allow.

-
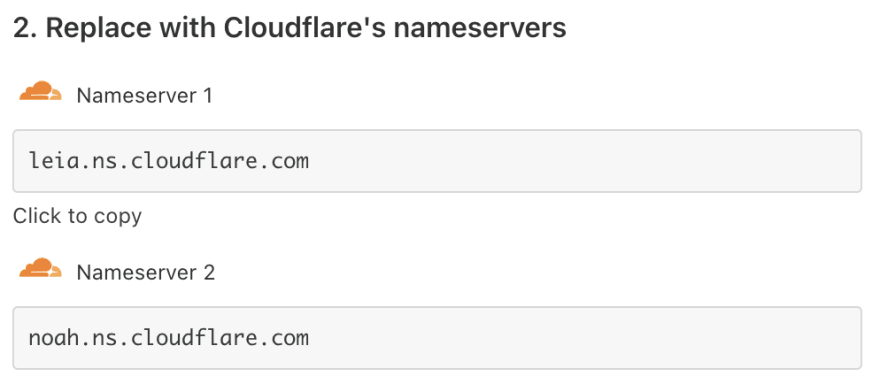
Now you’ll need to configure your DNS to point to the Cloudflare servers. This step might vary depending on your registrar (or DNS provider), but the interface should look similar. For example on Namecheap, you will need to switch to “Custom DNS” and replace the existing nameservers with Cloudflare’s.

Cloudflare’s nameservers you should be pointed at can be found in the “Overview” section (the values may differ from the ones in the screenshot).
The new DNS configuration takes some time to propagate (from a few minutes up to a couple of hours depending on your registrar).
-
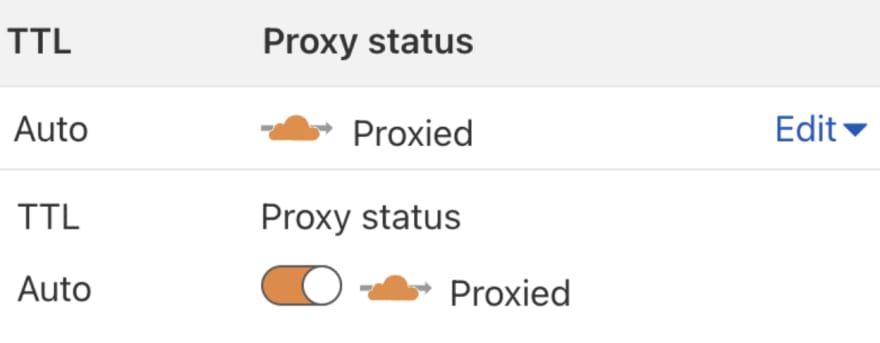
At this point you’re ready to activate Cloudflare. Until now, traffic was rerouted directly onto your servers without any filtering. Turning on Cloudflare’s proxy on the DNS records you listed in step 4 will effectively activate the protection. This is the step where it all comes together. Make sure everything is correct for the umpteenth time before proceeding. Once you are confident, head over to the “DNS” section and turn on the proxy on all the records. Cloud icons should now appear orange, meaning the DNS record is properly proxied by Cloudflare. If anything were to go wrong at this stage, immediately turn off the proxy on every DNS record.
You are almost done. Until now, your server’s IP address was directly exposed to the public. Cloudflare adds a new layer on top of your server and obfuscates its IP address to new users. However the original IP address is still accessible, and Cloudflare cannot do anything to protect you from direct-access attacks. A good strategy is to configure your server to only accept requests forwarded by Cloudflare. Additionally you might want to allocate a new IP address to your server for good measure.
Congratulations! You made it through and your server is now protected against DDOS attacks.
Please let me know if you run into any problems or if you’re interested in diving deeper into the subject. Cloudflare offers many more features you might be interested in such as caching and compression which can improve performance and eventually save money.


Top comments (2)
Thank you :D. I'm a big fan of Cloudflare.
Great stuff !! Many thanks @maxence