As I commented in an earlier post, one of the great features VASmalltalk has in the context of IoT, is a wrapper of the C library pigpio which allows us to manage GPIOs as well as their associated protocols like 1-Wire, I2C, etc.
In this post we will see the basic setup for getting this to work.
Liquid error: internal
Setting up pigpio library
The first step is to install the pigpio C library. The easiest way is to install it with a packager manager if the library is available:
sudo apt-get update
sudo apt-get install pigpio
If you want a different version than the one installed by the packager manager or the package is not available, then you can compile it yourself:
rm master.zip
sudo rm -rf pigpio-master
wget https://github.com/joan2937/pigpio/archive/master.zip
unzip master.zip
cd pigpio-master
make
sudo make install
To verify the library is installed correctly, you can execute pigpiod -v and that should print the installed version.
Setting up VASmalltalk
In this post I showed how to get a VASmalltalk ECAP release with ARM support. The instructions are as easy as uncompress the download zip into a desired folder.
The next step is to edit /raspberryPi/abt32.ini:

to include the following fields:
RaspberryGpio=libpigpio.so
RaspberryGpioDaemon=libpigpiod_if2.so
RaspberryGpioUltrasonicDaemon=libpigpioultrasonic.so
under the section [PlatformLibrary Name Mappings].
Then, fire up the VASmalltalk image by doing:
cd raspberryPi/
./abt32.sh
Once inside VASmalltalk, go to Tools -> Load/Unload Features… and load the feature VA: VAStGoodies.com Tools.

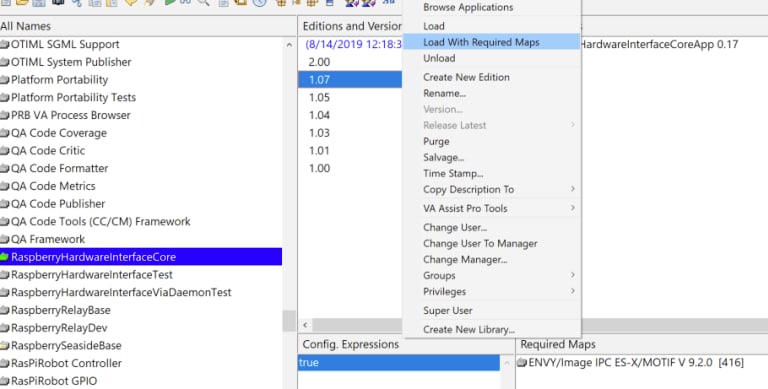
Then Tools -> Browse Configurations Maps, right click on the left pane (list of maps) and select Import from VAStGoodies.com. That will import the selected version into the connected ENVY manager.

After that, on the same Configurations Map Browser, you must go to RaspberryHardwareInterfaceCore and RaspberryHardwareInterfaceTest, select the version you imported, right click and then Load With Required Maps.
You are done! You have installed pigpio library and the VASmalltalk wrapper. Let’s use it!
Some GPIO utilities to help you started
Before starting with VASmalltalk, let me show you some Linux utilities that are very useful when you are working with GPIO.
One of the commands is pinout which comes with Raspbian. It shows you everything you need to know about your Pi!! Hardware information as well as a layout of the pins:

And yes, do believe the command line output and visit https://pinout.xyz. It is tremendously useful. A must have.
The other tool is gpio. This allows you to see the status of every pin and even pull up / down them right from there. Example below shows how to read all pins and then pull up BCM pin 17 (physical pin 11).
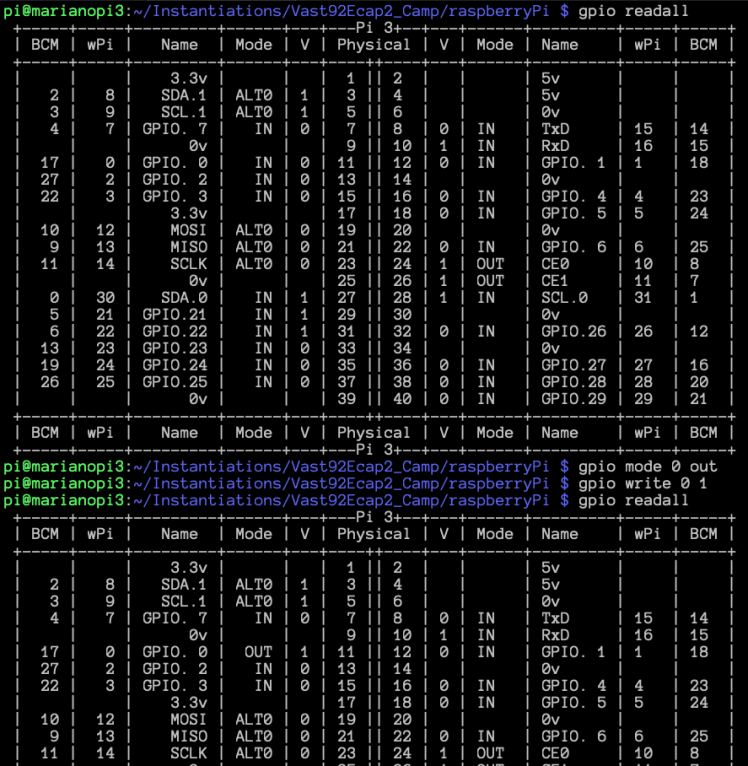
I don’t want to enter into the details in this post, but as you can see, each pin could have 3 different numbers: physical (the number on board), BCM and wPi (wiring Pi). And they also have a name. So…whenever you are connecting something you must be sure which “mode” they refer too. The number alone is not enough.
Managing GPIOs from Smalltalk!
In this post, we will see the most basic scenario of a GPIO which basically means pulling it up or down. When up, it outputs 3.3v (in the case of a Raspberry Pi), when down, 0. This is enough for you to play with LEDs, fans, and anything that doesn’t require “data” but just voltage.
The Smalltalk code for doing that is:
"This is an example of the VA tooling for accessing and dealing with the GPIOs.
Instructions to run:
1) Make sure you have pigpio installed and that deamon is running. You can start it
`sudo pigpiod` from a terminal.
2) On a terminal, run `pinout` and identify GPIO17 (phisical pin 11) and the GROUND
at phisical pin 14.
3) Take a volt meter and put it in DCV 10 or 20.
4) Put the negative (usually black) cable into the ground (phisical pin 14) and the positive
cable (usually red) into the GPIO17  (phisical pin 11). It should display 0V.
5) Run below snipped of code which in fact turns on pin GPIO17 for output.
6) Repeat number 4) but now you should get a 3.3V output"

| gpioInterface |
[gpioInterface := RaspberryGpioDaemonInterface raspberryGpioStart.
gpioInterface
    pinSetAsOutput: 17;
    pin: 17 write: 1.
] ensure: [
    gpioInterface shutDown
]
In the comment of above snippet you can see how you can validate that it actually worked… You can use a volt meter or use gpio readall to confirm the change. For the volt meter, set it in 10 / 20 volt (DCV) range. Then with the negative cable (usually black) touch any ground pin (for example, physical pin 6) and with the positive cable (usually red) touch GPIO pin 17 (physical pin 11). When the GPIO is on, then you should see the meter register about 3.3 volts and 0 when off. Welcome to the hardware debugger!
Conclusion
In this post you saw how to install pigpio C library, how to install the wrapper in VASmalltalk and see one basic example. In future posts we will see more advanced GPIO uses and protocols.
Liquid error: internal
Acknowledgments
The pigpio wrapper (RaspberryHardwareInterface) was a community pushed project. I think Tim Rowledge started with it in Squeak Smalltalk, then Louis LaBrunda started a port to VASmalltalk, and finally Instantiations helped to get that port finished up and running.

Top comments (0)