Welcome back to the finale of The DevOps Series with Buddy. This series has been a delight to write, as we cover essential DevOps concepts such as Continuous Integration, Continuous Delivery and Automation, and how to implement them with Buddy CI/CD.
If you are new to this series, feel free to check out the previous articles:
- Introduction to DevOps
- Managing Team and Roles in DevOps
- Automated Notification and Testing
- Unit and Integration Testing
- Continuous Delivery and Heroku
To wrap up this series, we will discuss the ultimate goal of DevOps: Continuous Deployment. We will explore what it is, how it compared with Continuous Delivery and how we can implement a Continuous Deployment pipeline with Buddy CI/CD.
What is Continuous Deployment?
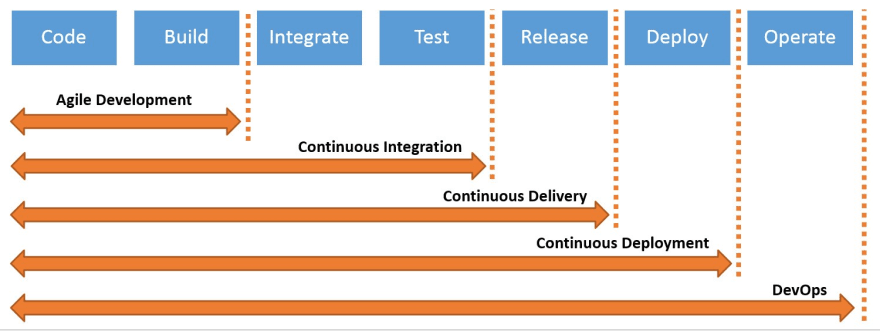
To understand what Continuous Deployment is, first let's recap the definition of Continuous Delivery. In short, it is the practice of automating the steps to building a software until deployment-ready, with an additional manual confirmation to trigger the release to the production server.
On the other hand, Continuous Deployment is the ultimate goal of DevOps. It is where the entire process from building and testing the application to deploying it is fully automated without human intervention.
Benefits of Continuous Deployment
The reason why this practice is sought after in DevOps is because Continuous Deployment allows the software to be directly pushed to its users faster than Continuous Delivery, increasing the speed to market process. For companies in a competitive market, time is everything. Therefore, eliminating any delays that could arise between development and the end customer can be a huge benefit.
Also, by practicing Continuous Deployment, teams can better respond to customer feedback and deploy necessary changes immediately. Any updates or new features of the software can reach the customer as soon as the code gets pushed.
Continuous Deployment vs Continuous Delivery
It is often easy to get confused between the 2 as both are abbreviated as CD and may be used by non-technical or uninformed team members incorrectly. As mentioned earlier, the distinguishing difference is that Continuous Delivery involves manual approval to release the software to production while Continuous Deployment takes it a step further by completely removing that manual process.
Thorough Testing and Robust Pipelines
Another difference between them, it is much harder to integrate Continuous Deployment in practice because it requires robust and separated pipelines for the following:
- Unit Tests in Development Environment
- Integration Tests in Staging Environment
- Post-Deploy Tests in Production Environment
These tests are predefined in the pipeline which drives the automation process and speeds up the time taken for the software to reach users. In order to achieve Continuous Deployment, the software must be fully automated. Hence, thorough testing with good coverage is needed to make sure that the software is really ready for customers to use.
Once the software is so well-tested by the time it is production-ready, it can be deployed without manual review and approval from the developers. It is the result of good Continuous Integration and Delivery practices that establishes an excellent Continuous Deployment culture in the company.
Please check out how to set up Continuous Integration and Continuous Delivery in the previous articles of this series.
Continuous Integration
Despite the differences, both Continuous Deployment and Continuous Delivery require a solid foundation which is Continuous Integration. It is the practice of integrating code into a single repository as frequently as possible to detect errors and integration problems quickly as they arise.
The practice of Continuous Integration consists of automating builds and tests to ensure that the process is streamlined and seamless. Without a proper Continuous Integration pipeline, there is no way to achieve Continuous Delivery or Deployment.
Continuous Deployment with Buddy
Buddy CI/CD offers easy implementation for Continuous Deployment. In this example, I will be showing you how to set up a Continuous Deployment pipeline with Buddy CI/CD. Keep in mind that this example assumes the team already have an established work culture with tests thoroughly covered, and ready to move from Continuous Delivery to Continuous Deployment.
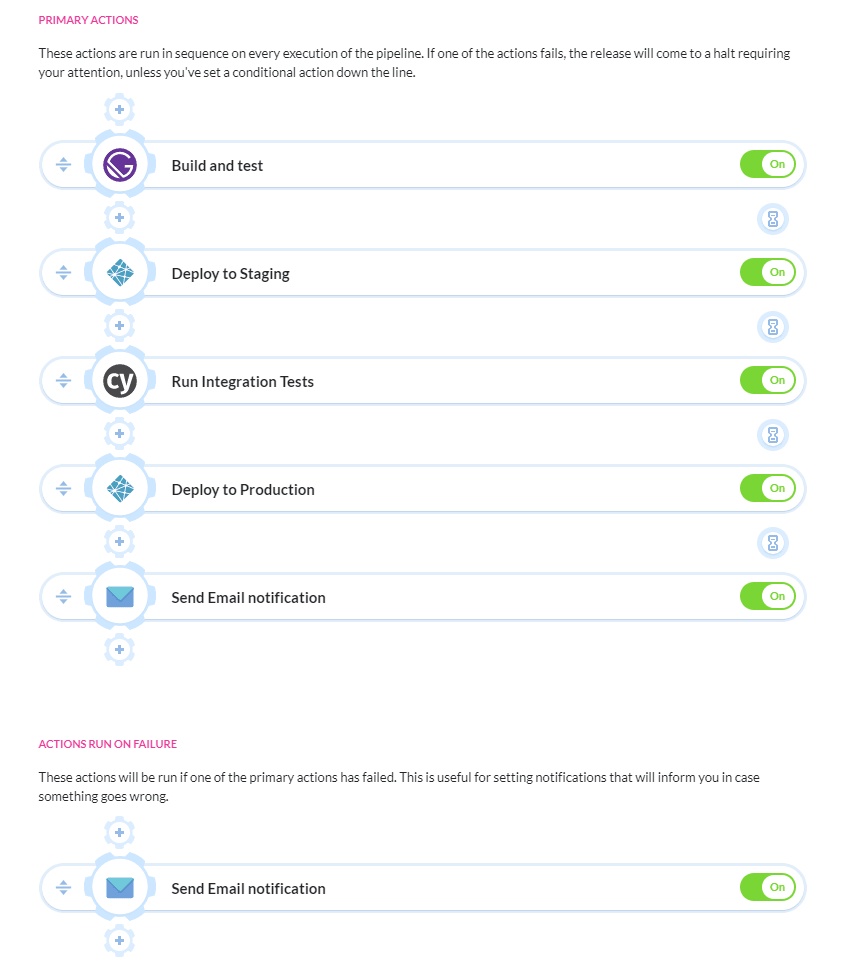
The following represents the standard actions in a Continuous Deployment Pipeline:
- Build and run unit tests
- Deploy to stage environment
- Run integration tests
- Deploy to production
Step 1: Add a New Pipeline
Log into Buddy CI/CD or create an account. Once you have a project in Buddy's workspace, create a new pipeline with the following configurations:
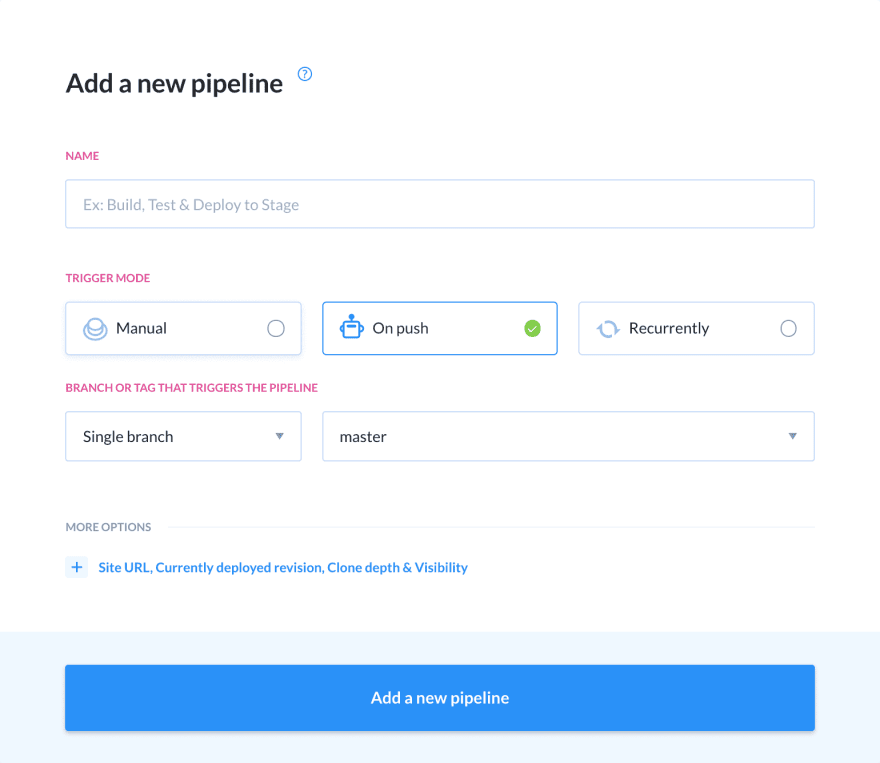
- Trigger mode: On push so that the pipeline will execute every time changes are made to the project's repository
- Trigger branch: master as we want to deploy this app to its live server once all tests passed
Step 2: Build and Run Unit Tests
For this example, I'll use a Gatsby project and deploy it to Netlify.
Add a Gatsby CLI action to the pipeline as shown in the image below:
Here, we add the npm install command to install any packages in our package.json.
Then we run gatsby build to test and build our site.
To learn more on how to build tests, please check out Unit and Integration Testing .
Step 3: Deploy to Stage
After all unit tests have passed successfully, we can proceed with deploying it to stage environment. Your app should already have a staging branch created in Netlify.
To do so, head to Netlify where your project is hosted. Go to Settings>Build & Deploy>Continuous Deployment>Deploy Contexts. Create a branch called 'staging' as shown in the image below.
Also, make sure that you click on Stop auto publishing button so Buddy can handle the Continuous Deployment.
Now let's add a Netlify action to the pipeline. Allow Buddy to access your Netlify account.
Set the Netlify action configurations as the following:
This is to deploy the website to the staging branch we created on Netlify earlier.
To learn more details on creating a brach deploys with Netlify, see their documentation.
Step 4: Run Integration Tests
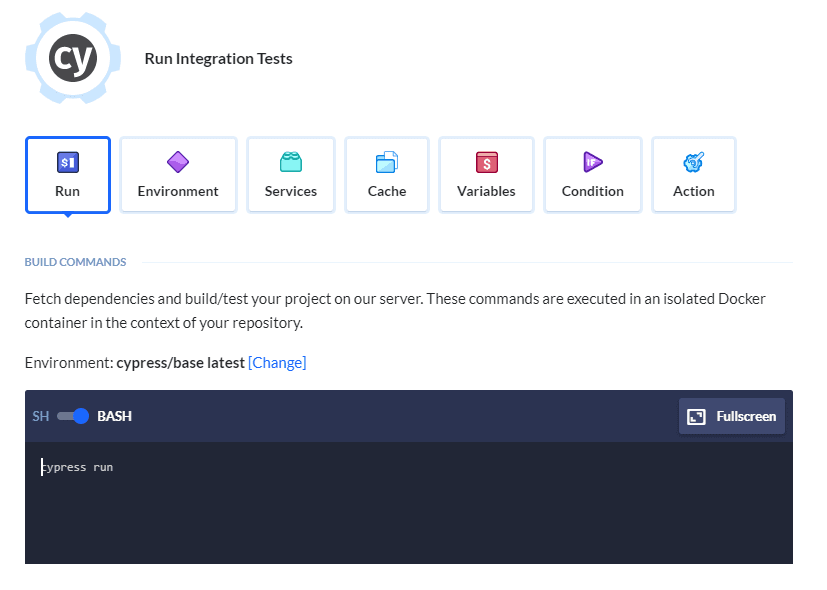
Next, in the stage environment, we run various tests such as integration and cross-browser tests to make sure that the app is production-ready.
For this example, I'm using Cypress. To learn how to integrate Cypress with Gatsby, please read their documentation.
Buddy CI/CD includes many actions, including Cypress. We can add a Cypress action to the pipeline to run the tests.
Step 5: Deploy to Production
If the tests are successful and there are no errors, the app is ready to be deployed to the production environment. Just like before, add a Netlify action.
This time, we will run the following command to deploy to the production branch:
netlify deploy --prod
Step 6: Notifications
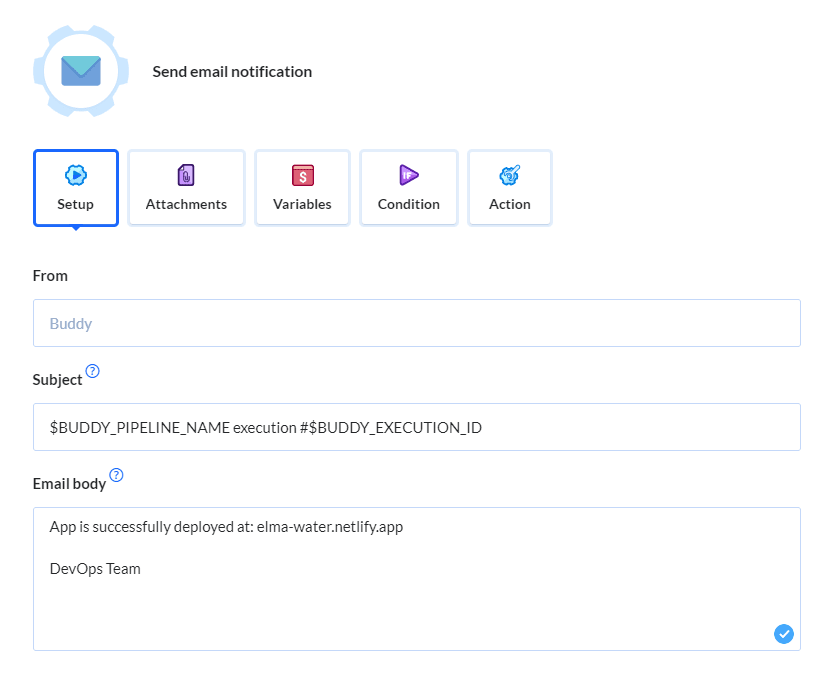
Once that the app is deployed, a notification should be sent to the team to let them know. Buddy has many communication actions like Slack, Discord or email.
For this example, let's add an Email action with the following configurations to simply notify the team that the app has been deployed:
Conditional Notification
We should add an Email notification action too under the ACTIONS RUN ON FAILURE section in the pipeline so that the team will be notified when an error in the pipeline occurred, preventing the deployment of the app.
We can set the message body to $BUDDY_FAILED_ACTION_LOGS to show the error logs in the email.
For more details about notification actions in Buddy, please read their documentation.
Our final pipeline should look like:
Run Pipeline!
If there are no errors, the app should be successfully deployed to Netlify live without any manual approval like we saw in the previous article on Continuous Delivery.
And to confirm our deployment is successful, we will receive the email.
Next Steps
And that's a wrap for this introductory series to DevOps with Buddy CI/CD! I hope it has been helpful and insightful to you.
In this series, we've discussed some common jargons and concepts in DevOps such as Pipelines, Automation, Continuous Integration, Continuous Delivery, Continuous Deployment and more. We've also implemented our understanding of these concepts with example pipelines using Buddy CI/CD, a very simple to use and intuitive tool.
Thank you for reading. Please feel free to leave a like or share any thoughts in the comments below. Cheers!
What's Next
- Create an account on buddy.works to start automating your project for builds, tests and deployment
- Explore Buddy's actions in their documentation
- Discover how to build and test apps
- Learn more about pipelines
- Read more on Continuous Deployment








Top comments (0)