Hello everyone! Welcome back to the The DevOps Series with Buddy, a series dedicated for beginners to get started with DevOps concepts and integrating them into their projects. This is the 4th article of the series.
If you are new to this series, please check out the articles in the following order:
For this article, we will continue the topic of automated testing in DevOps by introducing more testing actions you can do with Buddy CI/CD. In particular, we will be diving into unit testing and integration testing.
Unit Testing
The basic principle of unit testing is to be able to test the smallest unit of code (i.e. function) to make sure it is fit for use. Unit testing isolates each function as independent code blocks, allowing developers to test whether an individual function can perform what it is intended to do without affecting the rest of the code. This allows faster bug detection and more efficient error fixes.
Implement Unit Testing with Buddy
With Buddy, we can implement unit tests easily into our apps using these test frameworks and libraries. For this tutorial, I will demonstrate how to integrate automated Mocha tests into a unit converter API.
In JavaScript, Mocha is a commonly used framework to build tests. We will use it with Chai, a test assertion library designed to provide descriptive syntax for tests. For details on how to write unit tests with Mocha/Chai, please read this article.
Step 1: Add a new pipeline
If you haven't created a Buddy account, go to buddy.works to set up an account and read the first article to learn how to get started.
Then, we can import a new project to our Buddy workspace and click on 'Add a new Pipeline'.
Automating the process
To run our unit tests every time new changes are pushed, we can do so by setting the Trigger Mode to On push under the Settings tab of our pipeline. This allows for faster error detection by saving us time from manually running unit tests every time we add new functions to our project.
Step 2: Add a Node.js Action
Let's add a Node action into the pipeline. Click on 'Actions' and as seen in my image below, Buddy detects that my API is a Node.js app and immediately recommends that action. Alternatively, I can search for 'Node' and the action will show up too.
Click on the Node action and let's start configuring it.
Step 3: Configure Action
Under the 'Run' tab of the Node action, we will see 2 lines by default:
npm install
npm test
We can write additional npm commands to run tests in our project. In my case, I added a cd (change directory) command because my project is enclosed inside the folder named "Unit Converter". Then, I replaced 'npm test' to npm run unit-test because I want to run only my unit tests for this action.
Note that the npm run unit-test command will run our unit-test script. So make sure that the "scripts" key inside the package.json of our project does contain the unit-test script which has the command to run Mocha like so:
"scripts": {
    "unit-test": "mocha ./tests/unit-tests.js"
  },
Useful Tip: Caches
Instead of adding a
cd "Unit Converter"
command in our Node action, Buddy allows us to set up a working directory by entering it in the 'Cache' tab.
For more information, please visit Buddy's documentation on cache.
Conditional Notifications
Additionally, we can add a Notification action to our pipeline so that the team can be notified and view the execution logs if there is an error in the pipeline.
Read Automated Notification and Testing with Buddy article for more details on how to add notifications.
Here's the full view of our pipeline:
Step 4: Run the pipeline
We can run the pipeline and our test action. Let's see the results:
Great! We have successfully passed all our unit tests! Our functions are working properly as individual units. Any functions that fail the tests would show an error in our pipeline and send the team the email with the error logs.
Integration Testing
A higher level of testing that is often performed after unit testing is known as Integration Testing. Instead of testing individual functions as independent units, integration testing combines these units and tests them as a group. This type of testing allows developers to check whether individual app components can work together and produce the output as intended.
In a JavaScript setting, integration testing typically involves checking the external services and server-side end of the app. For integration tests, we can use Mocha and Chai again to write them.
For details on how to write integration tests with Mocha and Chai, please read this article.
Step 1: Add a new pipeline
The reason why we add a new pipeline is to implement the tests separately. Integration testing is often done recurrently, every 12 or 24 hours. So we automate this new pipeline to run every 24 hours instead of 'On Push'.
Step 2: Add and Configure Action
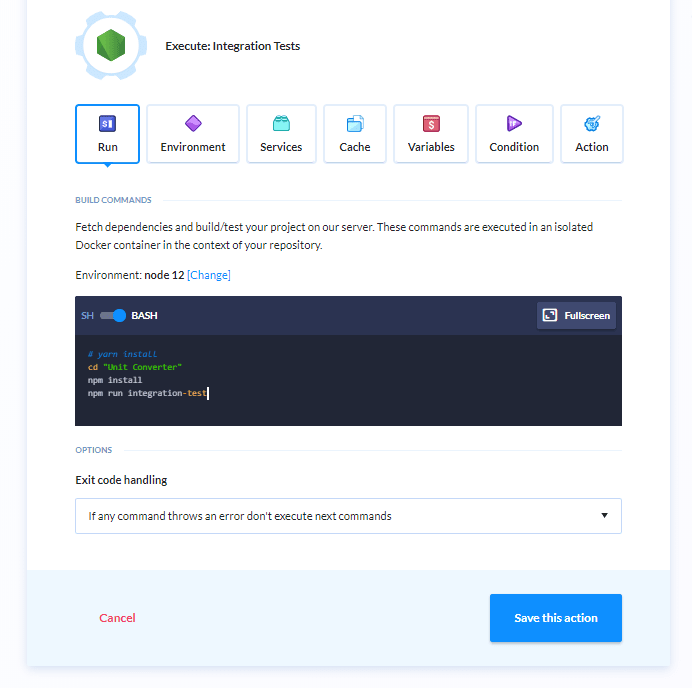
Just like what we did for our unit testing, add a Node action and head to the 'Run' tab of our action. Our npm commands should be:
cd "Unit Converter"
npm install
npm run integration-test
Here's what our integration testing Node action should look like:
This time, we are running our integration-test script instead of the unit-test. Again, make sure the script exists in the package.json with the Mocha command like:
"scripts": {
    "unit-test": "mocha ./tests/unit-tests.js",
    "integration-test": "mocha ./tests/integration-tests.js
  },
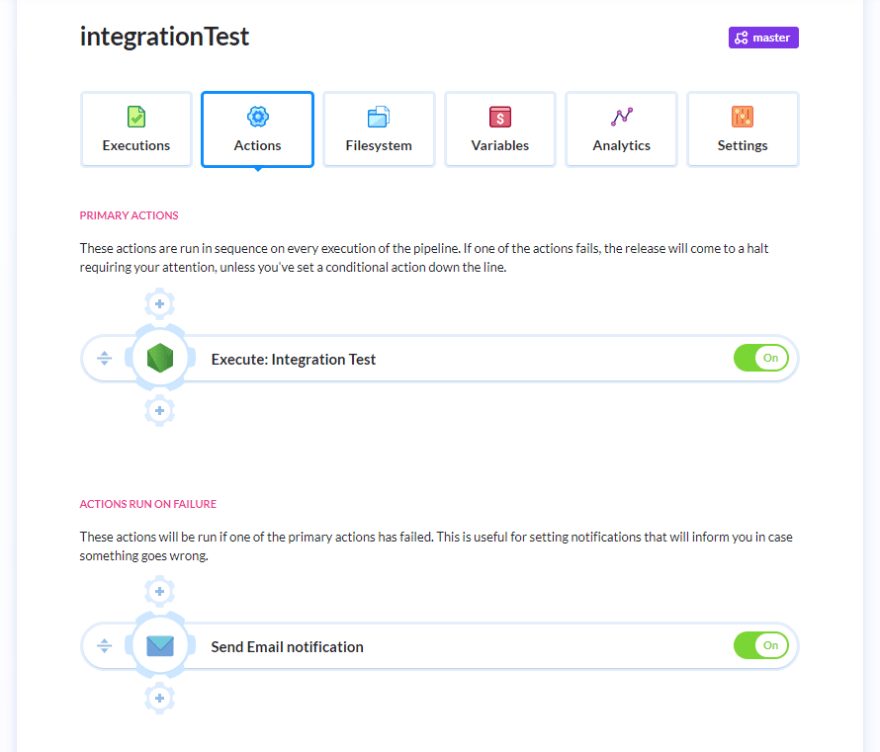
Here's the full view of our integration test pipeline:
Step 3: Run Pipeline
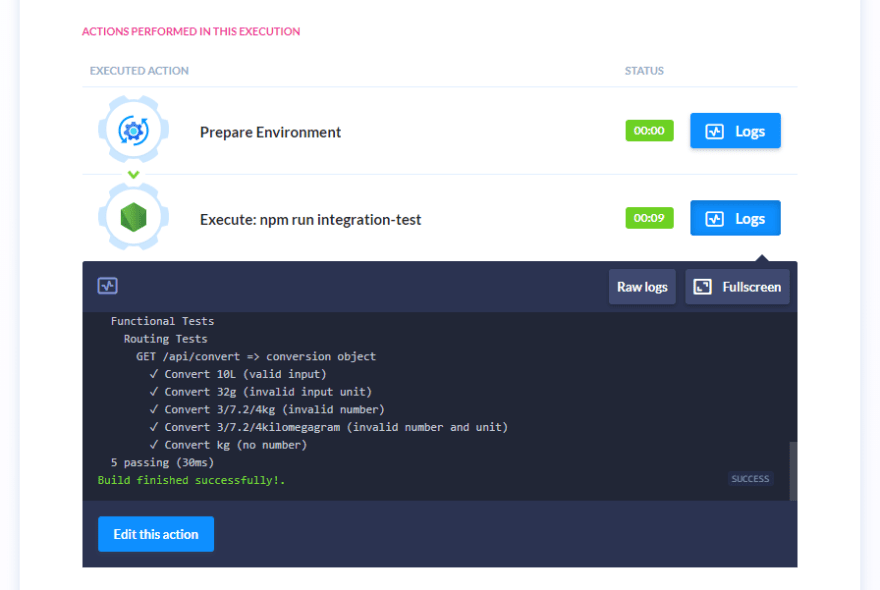
Now, we are ready to run the integration test pipeline.
Wonderful! Our project successfully passed both tests in each pipeline, which are fully automated.
As mentioned earlier in the previous article of this series, automated testing reduces the time and effort of having to manually run tests. It also ensures a thoroughly efficient and smooth workflow by allowing early error detection in the project.
Next Steps
Congratulations! You now know more testing actions that can be easily implemented into Buddy CI/CD for automation! Automated testing is a crucial part of the DevOps principle of continuous delivery and integration. I hope this article has been helpful in introducing unit and integration testing, and how they can help increase your projects functionality and reliability for production.
For more information on Buddy CI/CD and its wide variety of actions, visit buddy.works or read its documentation here. In the final article of this series, I will be demonstrating how to implement continuous deployment into your pipeline for your apps. Thank you for reading, cheers!


Top comments (0)