Briefing
In summary, game development is not my main activity. It's a hobby that I mainly pursue during my free time at DZ9 Games, during sleepless nights, or on weekends. However, I realized that this journey was becoming impossible to pursue alone, so I decided to invite an illustrator and a scriptwriter to join the #theagent team, both of whom eagerly accepted the challenge.
If you want to know more details about the game and its progress, you can find them here, here, or here.
The Problem
As the Demo version (which is currently in progress) approaches, we are starting to work on social media and explore potential marketing channels. However, we face a challenge as nobody on the team is dedicated full-time to this role. The time required for this "marketing," "advertising," and "engagement" work directly conflicts with tweaking game mechanics, artwork, and overall improvements.
Once again, it is impossible to juggle and accomplish all these tasks with a minimum level of quality.
The Solution Was Close
During the development phase, we faced the need to solve our marketing challenges. We considered various options, such as hiring an agency, a social media specialist, or even an intern, but these alternatives mainly involved additional costs 😭. With every new idea, it seemed like the impossible always stood before us.
However, a simple and unassuming suggestion emerged and proved to be perfect: "What if we automate this somehow?" Most social media platforms provide APIs and integration methods for post publishing, but creative work and the team's time were still required.
AI as a Facilitator!
By witnessing the rapid evolution of AI on a daily basis, it became evident how it can streamline the resolution of our problems. In this tutorial, I will demonstrate how we implemented the automatic and efficient generation of tweets on our profile.
It's important to emphasize that despite automating tweet generation, we still actively monitor and respond to all comments. So, if you come across posts on our Twitter profile, rest assured that we are there! 😄😄😄
Step 1 - Twitter Developer Platform
The first step was to activate our account on the developer portal and create a project in the free tier, which allows us to generate approximately 1500 tweets per month. Then, we selected the read and write option under App permissions, and proceeded to create an application to generate the authentication keys: Consumer Keys/API Key and Secret, and Authentication Tokens/Access Token and Secret.


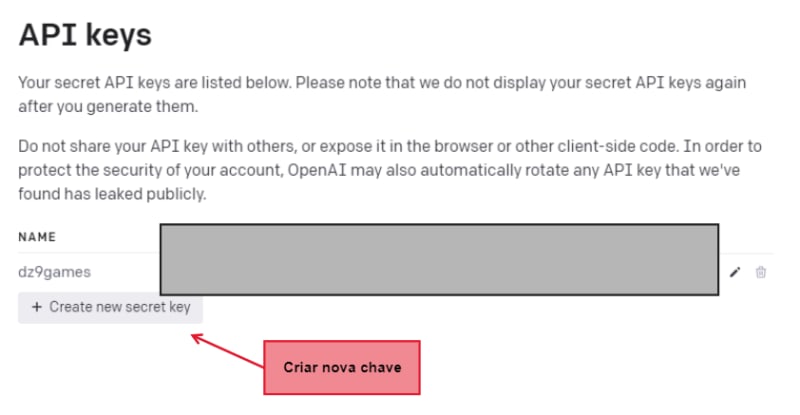
Step 2 - OpenAI API
The second step involves generating the access key for your OpenAI account. When you create an account, you will receive a $5 credit for testing API requests. Later on, you will need to acquire a plan to access the public APIs.
Once you have the access key, it's time to prepare the request for v1/chat/completions.
Step 3 - Preparing the Model
Before we proceed with the API requests, we can prepare our model directly in the browser at chat.openai.com.
Use this template and insert the information about your game. Provide details and make adjustments multiple times until you achieve a satisfactory result.

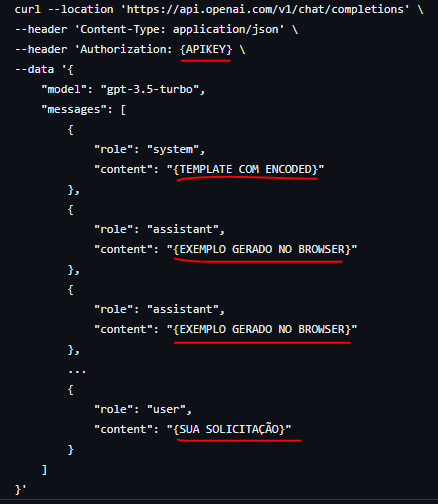
Step 4 - Postman + OpenAPI
Import the curl template into Postman, and replace the values with:
- API KEY: Replace this value with the API key you generated in Step
- ENCODED TEMPLATE: Format your refined prompt text from Step 3 using an online Escape/Unescape tool. Replace this value with the formatted text.
- YOUR MODEL: List all the generated models from the browser in Step 3 that met your needs. Include them here without any limitations. This will help refine and make the response more aligned with your request.
- YOUR REQUEST: Simply provide your request here, specifying the type of tweet you need. For example: "I need a tweet," "I need a tweet in French," or "I need a tweet in English."
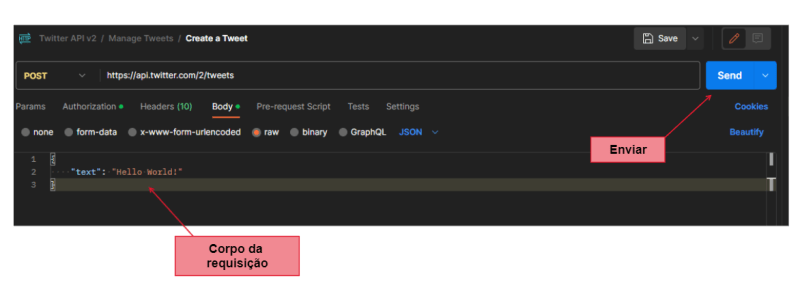
Step 5 - Postman + Twitter
Import the request api.twitter.com/2/tweets from the collection.
Replace the values generated in Step 1 in the Authorization tab:
- Consumer Key: Key generated in the Consumer Keys/API Key and Secret group
- Consumer Secret: *Key generated in the Consumer Keys/API Key and Secret group
*- Access Token: Key generated in the Authentication Tokens/Access Token and Secret group
- Access Token Secret: Key generated in the Authentication Tokens/Access Token and Secret group
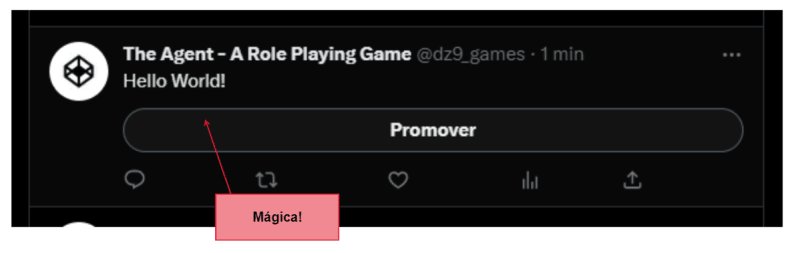
Next, fill in the request body with the world's most famous test string: "Hello World" and click on "Send".
When the magic happens, your profile will be fully integrated with the APIs.


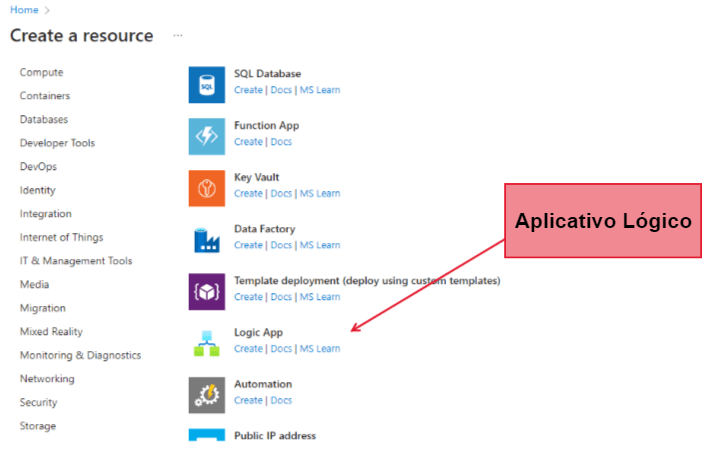
Step 6 - Azure AppLogic
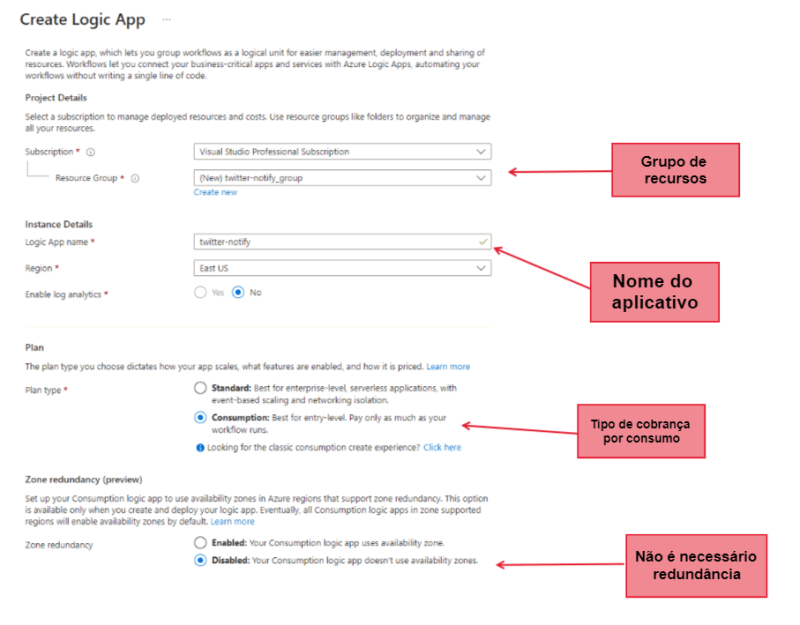
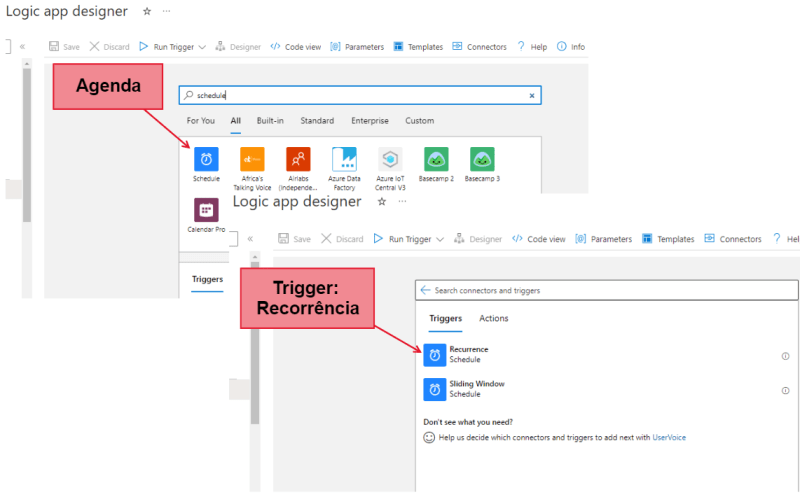
Access your account through the Azure Portal and create a new Logic App.
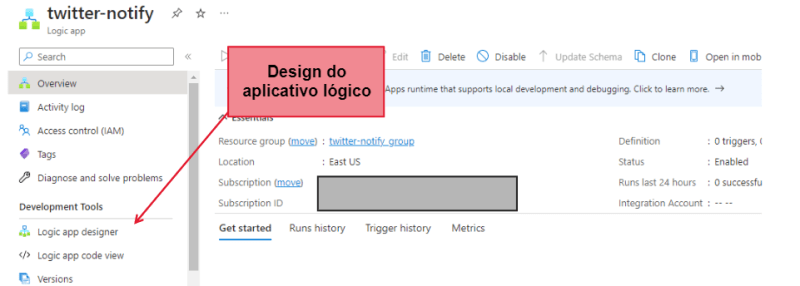
After deploying the application, click on the "Design" option. This is where we will start configuring the recurrence of tweets.
Select 'Blank App Logic / Scheduler / Recurrence'. On the next screen, define the desired time interval. For this example, since we are using free/trial tiers, it is recommended to set the execution between 6 and 12 hours.
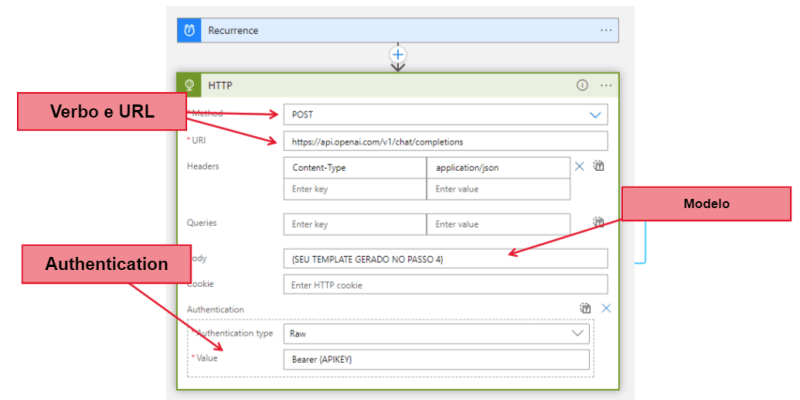
Now, create a new step of type 'HTTP' and copy the values used in Postman, as shown in Step 4. At this point, it is important to remember to add the access authorization, as demonstrated in the images below. (If you encounter difficulties with this task, you can use the file located here to configure it).
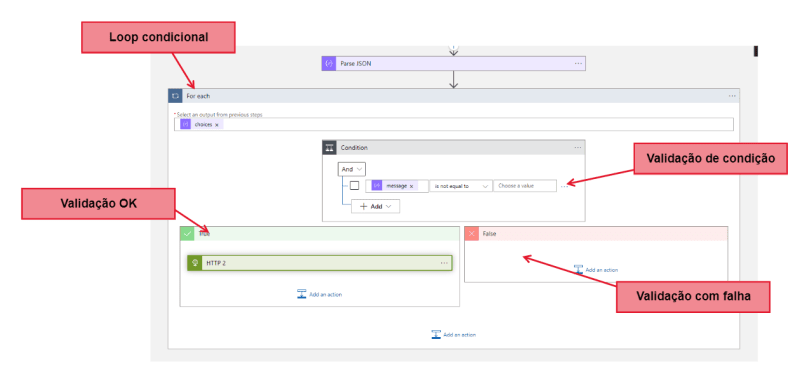
The next task is of type 'Data Operations/Parse JSON'. Here, we need to define the structure of the API response. Select the option 'Use sample payload to generate schema' and past your response body to automatically map the structure.
With the response structure ready, let's manipulate the data. Create a task of type 'Control/For each', selecting the 'choices' node (where the fields we need are located). Then, create a task of type 'Control/Condition' and validate whether the 'message' field is filled or not.
If the field is not filled, no action is required. However, you can customize this task: redo the steps, send an email, or send a predefined tweet. The choice of what to do in this flow depends on your desire/need. In my case, I simply end the execution.
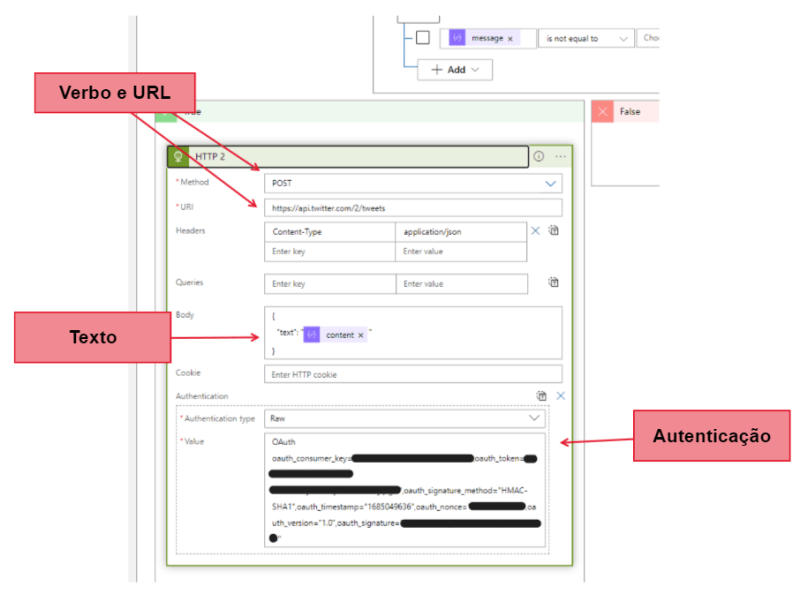
If the 'message' field is correctly filled, the last step is to send the request to the Twitter API. Create a new task of type 'HTTP' and fill in the same values used in Step 5 (configuration of the task here, if necessary). Don't forget to fill in the authentication values.


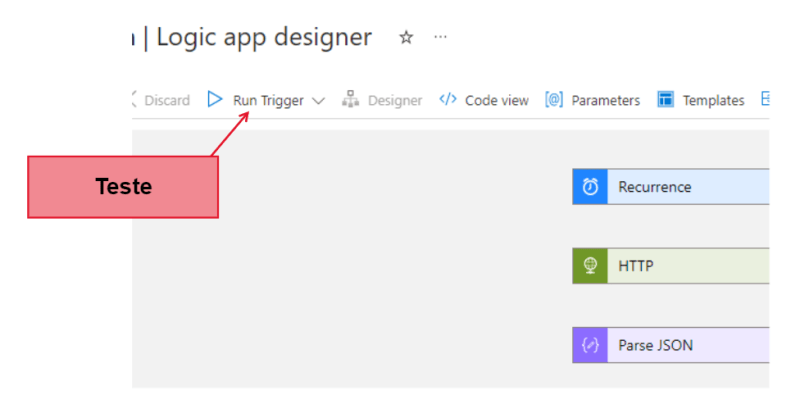
Step 7 - Testing
To test your application, simply select the 'Run Trigger' option and monitor the execution log to check the status. In case of successful execution, just access your Twitter profile to see the update.
Remember that, according to the time configured in step 6, you will have a new post!
Important:
You may need to continue refining your model by including new information and adjusting the values of temperature, top_p, frequency_penalty, presence_penalty, and max_tokens. To understand these parameters, you can refer to the OpenAPI documentation, test them in Postman, and then update your HTTP task in step 6.

Step 8 - Final Considerations
In this article, I aimed to provide detailed steps so that non-developers or individuals without familiarity with cloud environments or programming languages can easily configure the tasks!
If you want to learn more about the game "The Agent - A Role Playing Game" and its development, you can find more details here, here, or here.
To stay updated with our tweets, you can follow our page here.
Furthermore, if you have any questions during the process, feel free to reach out. I'm available to assist and clarify any doubts that may arise.
I hope this detailed guide proves useful in keeping the independent gaming community engaged and up-to-date with the latest developments. 🎮
Together, we can drive the growth and success of this passionate community! 😍 ❤️
Best regards!

Top comments (0)