This tutorial covers how to build a fullstack application that allows users to sign up or login, then post tweets to a global feed. You can find the code for the completed app here.
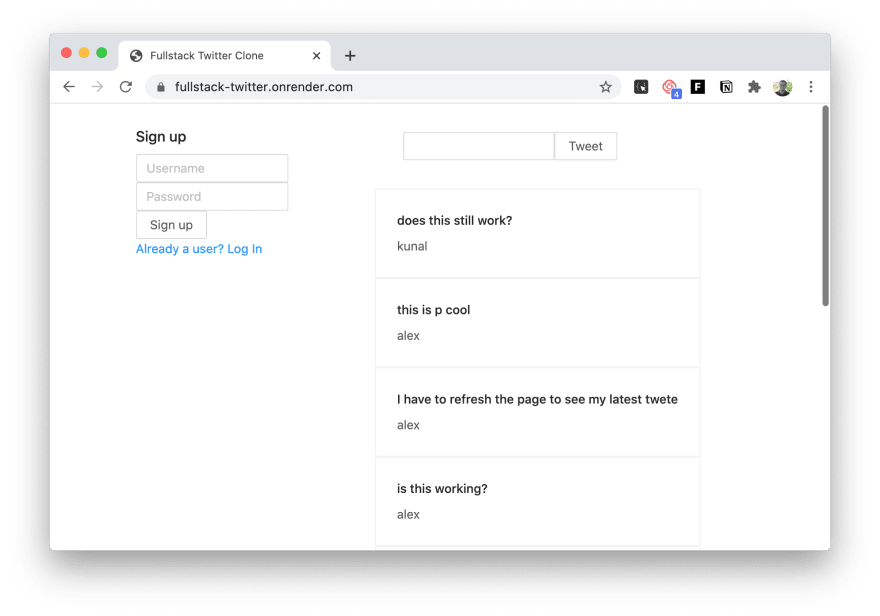
A demo of what we'll be building is currently deployed at https://fullstack-twitter.onrender.com
Prerequisites
Before we get started, make sure you have node and yarn installed.
At the time of writing, prisma migrate is still an experimental feature and should not be used on production. You can still use the this tutorial to bootstrap your database schema, but consider using Hasura to create, update, and manage tables when supporting production user data.
Getting Started
First, create a new npm project
mkdir fullstack-twitter-clone
cd fullstack-twitter-clone
npm init -y
Now, add dependencies for next.js and react, as well as some typed development dependencies
yarn add next react react-dom
yarn add --dev typescript @types/react @types/node
Now, we create our first page, using the designated pages directory that next.js uses for file-based routing
mkdir pages
touch pages/index.tsx
Then add the following component to our first page
export default () => <div> hello, world! </div>
Now, run the next development server
npx next
and visit http://localhost:3000 to see our first component in action. We should have a barebones unstyled webpage with "hello, world!" in the top left.
The backend
Now that our react code has the client up and running, let's use Next.js's API routes to write a backend handler in the designated api directory within pages
mkdir pages/api
Create a file, feed.ts within the api directory and create a simple function that returns a timestamp
export default (req, res) => res.json({ feed: [] })
Head to http://localhost:3000/api/feed and you should see some json within your browser.
// localhost:3000
{
  "feed": []
}
Let's make this more interesting by adding some fake tweets to feed.ts
export default (req, res) => {
  const feed = [
    {
      text:
        "Wow not having to configure and transpile typescript is one of the best parts of next.js",
      author: { username: "john" },
    },
    {
      text:
        "I'm a firm believer that dark mode should be a universal default on the web",
      author: { username: "jill" },
    },
  ]
  res.json(feed)
}
Put the two together
The real power with this approach is that we can write frontend and backend code in the same place, with the same language, and split the logic accordingly.
To pull them together, we query the new api/feed endpoint from the pages/index.tsx page, and show our list of tweets to the user. We're going to user a small library called SWR for our data fetching, which handles caching, locally changing data during POST requests, and revalidation. The power of SWR and it's ability to make handling cached data on the frontend will soon become obvious.
Also, we want our app to be beautiful on more than just the inside, so let's use Ant Design to boostrap our interface's styles.
First, we install both libraries
yarn add swr antd
Create a top-level components directory, and a util directory within that. Inside util, create fetcher.tsx and hooks.tsx.
Within fetcher.tsx we have
// components/util/fetcher.tsx

export const fetcher = (url, data = undefined) =>
  fetch("http://localhost:3000" + url, {
    method: data ? "POST" : "GET",
    credentials: "include",
    headers: {
      "Content-Type": "application/json",
    },
    body: JSON.stringify(data),
  }).then(r => r.json())
This basically abstracts away the complexity of POST and GET requests when using SWR, so the requests within the components themselves won't clutter up our react code.
In hooks.tsx we add
// components/util/hooks.tsx
import useSWR from "swr"
import { fetcher } from "./fetcher"

export function useFeed() {
  const { data: feed } = useSWR("/api/feed", fetcher)
  return { feed }
}
Finally, let's pull this all together in components/Feed.tsx, rendering each Tweet in Ant Design's Card component
import { Card } from "antd"
import { useFeed } from "./util/hooks"

export const Feed = () => {
  const { feed } = useFeed()
  return feed ? (
    <>
      {feed.map((tweet, i) => (
        <Card key={i}>
          <h4>{tweet.text}</h4>
          <span>{tweet.author.username}</span>
        </Card>
      ))}
    </>
  ) : null
}
which will give us the same contents as the value of the json endpoint, demonstrating that the data is being retrieved correctly. Finally, we can render the feed in pages/index.tsx
ah
// pages/index.tsx
import { Col, Row } from "antd"
import { Feed } from "../components/Feed"

export default () => (
  <Row>
    <Col md={{ span: 10, offset: 8 }}>
      <Feed />
    </Col>
  </Row>
)
For one last detail, let's import Ant Design's CSS stylesheet in a specially-designed file in the pages directory titled _app.js, which next uses to wrap all other pages
// pages/_app.js

import "antd/dist/antd.css"

export default function MyApp({ Component, pageProps }) {
  return <Component {...pageProps} />
}
Note: you'll have to restart your development server for changes to
_app.jsto take effect.
Now visit http://localhost:3000 and we'll see the naked data from our backend being rendered
Creating new tweets
Our twitter app won't work if all users can do is read tweets, so we need to give them a way to create them too. Let's add a form component that users can useto add new tweets. Inside components create CreateTweetForm.tsx.
Notice the naming conventions, which are entirely for the sake of organization and can be changed to your liking:
- Components are capitalized TSX files (
Feed.tsx)- Pages are lowercased TSX files (
index.tsx)- API routes are lowercased TS files (
feed.ts)
In CreateTweetForm.tsx we call the same useFeed() hook as in Feed.tsx, and we additionally make use of the mutate export from swr. This allows us to change the local state of our feed to reflect the change, even before it's registered by the server, so the user can see their new tweet right away.
import { Button, message } from "antd"
import { mutate } from "swr"
import { fetcher } from "./util/fetcher"
import { useState } from "react"
import { useFeed, useMe } from "./util/hooks"

export const CreateTweetForm = () => {
  const [input, setInput] = useState("")
  const { feed } = useFeed()
  return (
    <form
      style={{ padding: "2rem" }}
      onSubmit={async e => {
        e.preventDefault()

        // we include "false" here to ask SWR not to revalidate the cache with
        // the feed returned from the server. we'll remove this after the next section
        mutate("/api/feed", [{ text: input, author: me }, ...feed], false)
        setInput("")
      }}
    >
      <input value={input} onChange={e => setInput(e.target.value)} />
      <Button htmlType="submit">Tweet</Button>
    </form>
  )
}
Be sure to test this on localhost to ensure you can spam your feed with every thought with which you desire.
The only problem, you may have noticed, is that tweets don't stick around if you refresh your browser. So, now we need a way for:
- Tweets to stick around if you refresh the browser or go take a nap.
- Your friends to be able to see your tweets on their computers.
Enter: sqlite + Prisma
Now that we've got our app working nicely on single-player single-sesion instances, we need to make it immune to the effects of time and refreshes by storing all of our users' data somewhere persistent. We do this by bringing in our old friend, the database. With it, we'll use Prisma to handle the datamodel, access the data, and give us type safety throughout the application.
We start by adding prisma to our project
yarn add --dev @prisma/cli
Then initialize the prisma project with
npx prisma init
You'll notice that a prisma directory was created, and within it a schema.prisma file and a .env. You can ignore the latter for now, since we'll be using sqlite to get started and prototype faster, and switching to postgres later as we prepare for deployment.
To configure prisma to use sqlite and to point the prisma client to a local sqlite file on your machine, update the datasource and client attributes within schema.prisma
datasource sqlite {
  provider = "sqlite"
  url      = "file:./dev.db"
}

generator client {
  provider      = "prisma-client-js"
  binaryTargets = ["native"]
}
Now, we can add a model for new tweets
model Tweet {
  id        Int      @id @default(autoincrement())
  createdAt DateTime @default(now())
  updatedAt DateTime @default(now())
  text     String
}
When creating a tweet, the id will be automatically generated and assigned an integer, starting from 1 and incrementing from there, and the createdAt and updatedAt fields will automatically be filled with timestamps at the moment of creation. So, all we need to do is pass a valid string into the text field, and we'll have created our first Tweet entry.
So, we can create a tweet with
const tweet = await prisma.tweet.create({ data: { text: "Hello, Twitter!" } })
Now let's put this to use to allow users to create tweets.
Generate the prisma client
Before we begin, let's add some scripts to package.json to make it easier for us to call prisma migrate commands, as well a few more to facilitate the build process for when we deploy our app to production.
"scripts": {
    "migrate:save": "prisma migrate save --experimental",
    "migrate:up": "prisma migrate up --experimental",
    "postinstall": "prisma generate",
    "generate":"prisma generate",
    "dev": "next",
    "start": "next start",
    "build": "next build"
},
Now that we're set up, we can create the sqlite database file, run the migration to create the new table, and then generate the prisma client to create and access tweets.
First, we create the sqlite file and save the migration.
yarn migrate:save
Respond Yes when asked if you'd like to create a new sqlite file, then give your migration a name, like "Create tweet model". Then, we run the migration against our database.
yarn migrate:up
Finally, we can generate the prisma client, which lives in the node_modules directory and is generated on the fly (usually in a postintall hook) to give us up-to-date typesafe access to our data.
Create the client by running
yarn generate
Which peaks into our schema file for the models defined, generates the client in node_modules/@prisma/client and concludes with some output dictating exactly how we can use it in our code.
Actually creating tweets
Within the api directory, create another directory tweet, and within that create.ts. This will be another backend serverless function that takes some text and gives us back a tweet object.
import { PrismaClient } from "@prisma/client"
const prisma = new PrismaClient()

export default async (req, res) => {
  const { text } = req.body
  const tweet = await prisma.tweet.create({ data: { text } })
  res.json(tweet)
}
Notice that we are assuming the text to be attached to the body of the request.
Now, lets try calling this function from our frontend. After the call to mutate in our index page, add
fetcher("/api/tweet/create", {
  text: input,
})
Remember to import { fetcher } from "./util/fetcher" at the top of the file.
Now, try creating another tweet in the browser and head to the Network tab of the console to see the results. You should see a request titled create, after the suffix of the endpoint, and click it to view the resposne. If the response worked, you'll see a response JSON object with an id, createdAt, and text fields.
Feed 2.0
Now that we can create tweets in our database, let's change our feed API function to retrieve tweets from the database instead of giving us back hardcoded data. Open pages/api/feed.ts and change the contents to
import { PrismaClient } from "@prisma/client"
const prisma = new PrismaClient()

export default async (req, res) => {
  const tweets = await prisma.tweet.findMany({})
  res.json(tweets)
}
and you'll now be able to create tweets, refresh the page, and see them live on.
One last detail: change the prisma call in the feed to
const tweets = await prisma.tweet.findMany({
  orderBy: { createdAt: "desc" },
})
To return them in chronological order.
Authentication
Our app can't compete with twitter if you can't log in and no one knows who's posts are whose, can it? Let's fix this by giving users a way to log in.
We're going to allow users to sign up, encrypt their passwords with bcrypt then authorize their device by attaching a server-side HttpOnly cookie to their requests.
Basically, we're gonna build a safe and secure way to allow users to sign in with passwords while making sure they or we don't get hacked.
First, we introduce the User model in schema.prisma
model User {
  id          Int      @id @default(autoincrement())
  createdAt   DateTime @default(now())
  username    String @unique
  password    String
  tweets      Tweet[]
}
You'll notice that every user has a tweets field that corresponds to an array of Tweets. This allows us to access a users tweets as simply as with user.tweets. But let's not get ahead of ourselves, since we still need to save and apply the database migration.
yarn migrate:save
yarn migrate:up
yarn generate
Then, we add our new dependencies
yarn add bcrypt jsonwebtoken cookie
We're going to handle authentication and reflect this to the user by rendering a Profile component on the page, which will show the user's details if they're logged in, and a SignupForm otherwise.
Let's start by creating Profile.tsx
// components/Profile.tsx
import { Row, Col, Button, message } from "antd"
import { SignupForm } from "./SignupForm"
import { useMe } from "./util/hooks"
import { useState } from "react"

export const Profile = () => {
  const { me } = useMe()
  const [loading, setLoading] = useState(false)
  if (!me) return null

  return (
    <Row style={{ padding: "1.5rem" }}>
      {!me.username ? (
        <SignupForm />
      ) : (
        <Col>
          Logged in as: <strong>{me.username}</strong>
          {/* TODO: we'll add a logout button here */}
        </Col>
      )}
    </Row>
  )
}
You'll notice we're using a new hook, useMe. As you can guess, this will return the currently authenticated user. Let's go ahead and add this hook to our hooks utility.
// components/util/hooks.tsx
import { User } from "@prisma/client"

// useFeed function

export function useMe() {
  const { data: me }: { data?: User } = useSWR("/api/me", fetcher)
  return { me }
}
Notice that we're importing the User interface from prisma and applying it to the return type of the hook. This will give us typesafety through the frontend when working with our data, and is one of the most powerful advantages of using Prisma with React Hooks.
Also, our use of SWR will automatically deduplicate uses of useMe since they have the same key, /api/me. This means we can call useMe in several different components, and our app will only make a single request to the backend.
We'll implement the /api/me endpoint right after we've built the signup form and endpoints.
The SignupForm
Then we can create the form itself
// components/SignupForm.tsx
import { Row, Col, Button, message, Input } from "antd"
import { useState } from "react"
import { mutate } from "swr"
import { fetcher } from "./util/fetcher"
export const SignupForm = ({}) => {
  const [username, setUsername] = useState("")
  const [password, setPassword] = useState("")
  const [login, setLogin] = useState(false)
  const [loading, setLoading] = useState(false)
  return (
    <Row>
      <Col>
        <h3>Sign up</h3>
        <form
          onSubmit={async e => {
            e.preventDefault()
            if (username.length === 0 || password.length === 0) {
              message.error(
                "Uh oh: you can't have a blank username or password."
              )
            }
            setLoading(true)
            const { data, error } = await fetcher(
              `/api/${login ? "login" : "signup"}`,
              {
                username,
                password,
              }
            )
            if (error) {
              message.error(error)
              setLoading(false)
              return
            }
            await mutate("/api/me")
          }}
        >
          <div>
            <Input
              value={username}
              onChange={e => setUsername(e.target.value)}
              type="name"
              placeholder="Username"
            />

            <Input
              value={password}
              onChange={e => setPassword(e.target.value)}
              type="password"
              placeholder="Password"
            />
          </div>
          <div>
            <Button htmlType="submit" loading={loading}>
              {login ? "Login" : "Sign up"}
            </Button>
          </div>
          <div>
            <a onClick={() => setLogin(!login)}>
              {login ? "New? Sign Up" : "Already a user? Log In"}
            </a>
          </div>
        </form>
      </Col>
    </Row>
  )
}
Notice that our Signup form also serves as a login form, and can switch between the two. Also, it will post to the endpoint /api/signup if the user is signing up, and to /api/login otherwise. As you may have guessed, now we'll have to create these two API files to handle the signing up and logging in process themselves.
Let's start with signup which
- Salts and hashes the
passwordwith Bcrypt - Creates a User in the database with prisma
- Signs a
jsonwebtokenwith theidandusernameof the user and theJWT_SECRETfrom the environment. - Sets an httpOnly cookie
// pages/api/signup.ts
import bcrypt from "bcrypt"
import jwt from "jsonwebtoken"
import cookie from "cookie"
import { PrismaClient } from "@prisma/client"
const prisma = new PrismaClient()

export default async (req, res) => {
  const salt = bcrypt.genSaltSync()
  const { username, password } = req.body
  let user
  try {
    user = await prisma.user.create({
      data: {
        username,
        password: bcrypt.hashSync(password, salt),
      },
    })
  } catch (error) {
    res.json({ error: "A user with that username already exists 😮" })
    return
  }
  const token = jwt.sign(
    { username: user.username, id: user.id, time: new Date() },
    process.env.JWT_SECRET,
    {
      expiresIn: "6h",
    }
  )

  res.setHeader(
    "Set-Cookie",
    cookie.serialize("token", token, {
      httpOnly: true,
      maxAge: 6 * 60 * 60,
      path: "/",
      sameSite: "lax",
      secure: process.env.NODE_ENV === "production",
    })
  )
  res.json(user)
  return
}
Now, we can a similarly-structured login route
// pages/api/login.tsx
import { PrismaClient } from "@prisma/client"
const prisma = new PrismaClient()
import bcrypt from "bcrypt"
import jwt from "jsonwebtoken"
import cookie from "cookie"

export default async (req, res) => {
  const { username, password } = req.body

  const user = await prisma.user.findOne({
    where: { username },
  })

  if (user && bcrypt.compareSync(password, user.password)) {
    const token = jwt.sign(
      { username: user.username, id: user.id, time: new Date() },
      process.env.JWT_SECRET,
      {
        expiresIn: "6h",
      }
    )

    res.setHeader(
      "Set-Cookie",
      cookie.serialize("token", token, {
        httpOnly: true,
        maxAge: 6 * 60 * 60,
        path: "/",
        sameSite: "lax",
        secure: process.env.NODE_ENV === "production",
      })
    )

    res.json(user)
  } else {
    res.json({ error: "Incorrect username or password 🙁" })
    return
  }
}
Before we forget, create a .env file in the top-level directory and add
JWT_SECRET=appsecret123
Replace appsecret123 with some less-guessable combination of characters, and restart your development server.
The Me Endpoint
Finally, we can build /api/me
// pages/api/me.ts
import jwt from "jsonwebtoken"
import { PrismaClient } from "@prisma/client"
const prisma = new PrismaClient()

export default async (req, res) => {
  const { token } = req.cookies

  if (token) {
    const { id, username } = jwt.verify(token, process.env.JWT_SECRET)
    const me = await prisma.user.findOne({ where: { id } })
    res.json(me)
  } else {
    res.json({})
  }
}
Also, we can return the author of each tweet in the feed, so that we can render their usernames
// pages/api/feed.ts
import { PrismaClient } from "@prisma/client"
const prisma = new PrismaClient()

export default async (req, res) => {
  const tweets = await prisma.tweet.findMany({
    orderBy: { createdAt: "desc" },
    include: { author: true },
  })
  res.json(tweets)
}
If you hover over the tweets variable, typescript will show us that the feed is now of type
const tweets: (Tweet & { user: User })[]
So we can update our useFeed hook to return the same type, the same as we did for useMe earlier.
// components/util/hooks.tsx
import { Tweet, User } from "@prisma/client"
import useSWR from "swr"
import { fetcher } from "./fetcher"

export function useFeed() {
  const { data: feed }: { data?: (Tweet & { author: User })[] } = useSWR(
    "/api/feed",
    fetcher
  )
  return { feed }
}
export function useMe() {
  const { data: me }: { data?: User } = useSWR("/api/me", fetcher)
  return { me }
}
Attaching tweets to authors
One last thing: we need to attach the logged in user to each tweet that's created as it's author. We do this by using the token the same way we do in /api/me, and then using the prisma client's connect property.
// pages/api/tweet/create.ts
import { PrismaClient } from "@prisma/client"
import jwt from "jsonwebtoken"
export default async (req, res) => {
  const prisma = new PrismaClient()

  const { token } = req.cookies

  if (token) {
    // Get authenticated user
    const { _id, username } = jwt.verify(token, process.env.JWT_SECRET)
    const { text } = req.body

    const tweet = await prisma.tweet.create({
      data: { text, author: { connect: { username } } },
    })
    res.json(tweet)
  } else {
    res.json({ error: "You must be logged in to tweet." })
  }
}
Now, test the app on localhost to make sure you can sign up and create new tweets.
Final Touches
It would be nice if users could delete their tweets after they've posted them, as well as log themselves out. Let's create some button components to facilitate this.
To know if a user can delete a tweet, we need to check if the user is the tweet's author. Then we can make a call to a new API endpoint for deleting a tweet, and then locally mutate the cache to remove the tweet from the feed.
Create a new component DeleteTweetButton.tsx in components.
// components/DeleteTweetButton
import { Button } from "antd"
import { mutate } from "swr"
import { fetcher } from "./util/fetcher"

export const DeleteTweetButton = ({ tweet, feed }) => (
  <Button
    style={{ float: "right" }}
    danger
    type="dashed"
    onClick={async () => {
      await fetcher("/api/tweet/delete", { id: tweet.id })
      await mutate(
        "/api/feed",
        feed.filter(t => t.id !== tweet.id)
      )
    }}
  >
    x
  </Button>
)
and import and render it in the feed component.
// components/Feed.tsx
+ import { DeleteTweetButton } from "./DeleteTweetButton";
...

 <Card key={i}>
+  {me && tweet.author.id === me.id && (
+    <DeleteTweetButton tweet={tweet} feed={feed} />
+  )}
  <h4>{tweet.text}</h4>
  <span>{tweet.author.username}</span>
 </Card>
Now, let's create the backend half of the equation. Create a new API route for /api/tweet/delete that takes the id from the body of the request, then passes it to prisma's delete method, and returns the (now empty) tweet.
// pages/api/tweet/delete

import { PrismaClient } from "@prisma/client"
const prisma = new PrismaClient()

export default async (req, res) => {
  const { id } = req.body

  const tweet = await prisma.tweet.delete({
    where: { id },
  })

  res.json(tweet)
  return
}
Test to make sure you can now delete your own (and only your own) tweets.
Great! Now let's follow the very same process to facillitate logging out.
Create a LogoutButton.tsx
// components/LogoutButton.tsx
import { Button, message } from "antd"
import { mutate } from "swr"
import { fetcher } from "./util/fetcher"
import { useState } from "react"
export const LogoutButton = () => {
  const [loading, setLoading] = useState(false)
  return (
    <Button
      loading={loading}
      onClick={async () => {
        setLoading(true)
        const { data, error } = await fetcher("/api/logout")
        if (error) {
          message.error(error)
          setLoading(false)
          return
        }
        await mutate("/api/me")
      }}
    >
      Log Out
    </Button>
  )
}
Then import and render it in Profile
// components/Profile.tsx
+ import { LogoutButton } from "./LogoutButton";
...

 <Col>
    Logged in as: <strong>{me.username}</strong>
    <br />
+   <LogoutButton  />

 </Col>
Try and logout, and behold that our app is complete.
Need help?
Don't hesitate to DM me on twitter or email me at me@kunal.sh 🙂


Top comments (2)
Thanks for that great article! Why did you choose to use Nextjs for this? I’m other words, what’s the main advantage of using Nextjs in such case? If you had to build a new Twitter clone today, would you still use Nextjs?
How should we exclude password field either from create response or finds queries?
I think in your sample we will send hashed password in json response.