
I hope you understood concept of interaction between controller and user interface and how blades files can be used for user interface creation.
Let see, a simple user creation and sending data to controller then to model; flow,
Lets Begin,
first create a 'route' called addData,
Route::get('addData', [DataController::class,'addData']);
then, add addData() function in our DataController Class, it returns our blade file addData.blade.php; Ok
 public function addData() {
    return view('addData');
 }
create addData.blade.php file under resources->views folder,
and add this code to it
<html>
    <body>
        <div>
            <h3>Add Data</h3>
            <form method="GET" action="{{ url('saveFormData') }}">
                <label>Name</label>
                <input type="text" name="name" />
                <label>Age</label>
                <input type="number" name="age" />
                <button type="submit">Save</button>
            </form>
        </div>
    </body>
</html>
its just a simple HTML form right ?
form is of get method and it will be submitted to the route 'saveData' .
route can be referred using url() function inside our blade files. it then resolves full URL while loading a DOM.
Now hit 'addData' route from your browser; You can see this window,

right ?
inspect (right click ->inspect) this page and search for form element/tag, you can observe its action 'url'.

Now, create an another route 'saveData' that receives the form data submitted by addData blade file,
Route::get('saveFormData', [DataController::class,'saveForm']);
create saveForm() method in our DataController Class,
add these code to it;
public function saveForm(Request $request) {
   dd($request);
}
Observe, here our method can accept $request parameter of Request type, Laravel carries any request data in this Request Object,
to access this Request object , you need to use/add this instruction after namespace statement in our Class file, (exists by default add it if you can't find it)
use Illuminate\Http\Request;
then, in saveForm() method, I have mentioned dd($request); it shows request data on our screen, Ok
Fill out that form and hit save; you can see this right ?
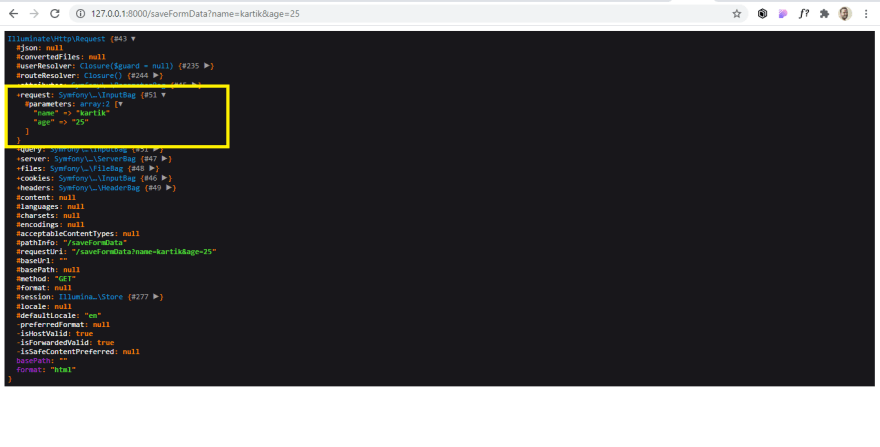
Look into the request index; you can observe submitted data through form, under parameters array; Correct ?
it confirms that submitted data is reaching our controller;
Now, create an array that contains submitted 'name' and 'age' as its keys, in our saveForm() function. Using $request variable we can access those name and age; make dd() of that created array too,
public function saveForm(Request $request) {
    $data = [
        'name' => $request->name,
        'age' => $request->age
    ];
    dd($data);
}
fill out the form and save it again, you can see this window,

You are now done with creation of an array that is required to insert data into the databaserevisit if possible (in my one of the previous article you came across this ; but there you just added/hardcoded dummy data into the array; but now you are getting actual data from user interface)
add create statement to insert it into the database;
public function saveForm(Request $request) {
   $data = [
        'name' => $request->name,
        'age' => $request->age
   ];
   $insertData = Data::create($data);
}
$insertData holds insert status of the data(holds table inserted array/data), if it got successfully inserted then a sure $insertData contains a ky 'id' returned by database table;
Let's make its dd(), to confirm about it;
public function saveForm(Request $request) {
   $data = [
        'name' => $request->name,
        'age' => $request->age
   ];
   $insertData = Data::create($data);
   dd($insertData);
}
you can see this window after refreshing/reloading our browser page (form submits again),

attributes index holds the response status of the database create operation,
now, if the 'id' present in the response I need to show a response message on user interface; for that I will add a logic isset()
this will check whether prescribed data exist or not, returns a Boolean true or false,
if(isset($insertData['id'])) {
    $message = "Success";
} else {
    $message = "Failed";
}

$response = [
    'message'=>$message
];

return view('response',$response);
it will check for isset status, then if it returns true then set $message variable's value as "Success" , else "Failed".
then making this $message variable as an index of $response array and sending that to a blade file "response.blade.php".
Now create a blade file called 'response.blade.php', and add this code into it;
<html>
    <body>
        <div>{{ $message }}</div>
    </body>
</html>
is shows data present in the $message variable on our browser page,
Now, Fill that form again and hit save, I hope you can see this window;

Bingo, You just submitted the form through user interface and that data got saved to the database and you got its response back to the user interface :)
If you wish you can even pass 'name', 'age' indexes present in the $insertData array along with the message to show them too on your browser window. Like,
$response = [
      'message'=>$message,
      'name'=>$insertData['name'],
      'age'=>$insertData['age'],
];
I hope you understood this flow of sending data from user interface and saving it into the database;
Enjoyed learning it;
Lets learn about concept of Request & Response in my next article.
Bye :)

Top comments (2)
I think you should revisit this post and change the form method from GET to POST. A form with the GET method has no CSRF protection whatsoever and it is easily exploitable.
Yeah, But I am introducing that concept in my next article, here just to understand how actually data flow from user interface to backend, purposefully I kept it as GET, not to mess with @csrf concept at this stage itself;
:)
Thank You