
This is the eighth article in the series, Udacity: SUSE Cloud Native Foundations. This is an extension of the previous section on Kubernetes. Here we'll be focusing on the Kubernetes resources.
Deploying an Application
We've learned how to package applications using Docker and we've also learned how to provision a Kubernetes Cluster. Next step would be to deploy the application to the cluster.
Kubernetes provides a rich collection of resources that are used to deploy, configure, and manage an application. Some of the widely used resources are:
- Pods
- Deployments and ReplicaSets
- Services and Ingress
- Configmaps and Secrets
- Namespaces
- Custom Resource Definition (CRD)
You'll also learn about the different Rolling Out Strategies.
A series of useful kubectl commands are also provided at the end of this section.
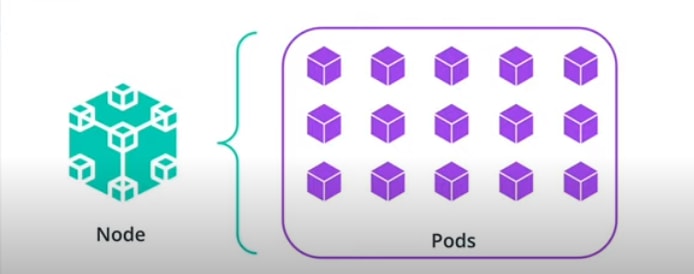
🟨 Pods
- smallest manageable units in a Kubernetes cluster.
- provides the execution environment for an application
- each pod has a container within it, that executes an application from a Docker image (or any OCI-compliant image).
- there can be 2-3 containers run within the same pod,
- recommended to keep the 1:1 ratio between your pods and containers.
- all the pods are placed on the cluster nodes
- a node can host multiple pods for different applications.
- in a cluster, every pod is allocated with one unique IP
- IP is only accessible within the cluster

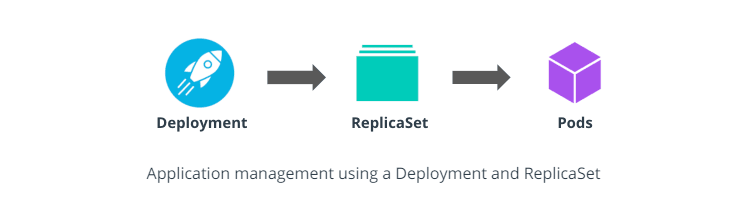
🟨 Deployments and ReplicaSets
- oversees the set of pods for the same application
- contains specifications that describe the desired state of the application
- ensures any difference are reconciled
- Deployment resource manages pods by using a ReplicaSet
- ReplicaSet ensures the desired amount of replicas at all times
To create a deployment,
# create a Deployment resource
# NAME - required; set the name of the deployment
# IMAGE - required;  specify the Docker image to be executed
# FLAGS - optional; provide extra configuration parameters for the resource
# COMMAND and args - optional; instruct the container to run specific commands when it starts

kubectl create deploy NAME --image=image [FLAGS] -- [COMMAND] [args]

# Some of the widely used FLAGS are:

-r, --replicas - set the number of replicas
-n, --namespace - set the namespace to run
--port - expose the container port
You can also create headless pods - these are standalone pods and are not managed through a ReplicaSet. This is not recommended but can be useful for testing.
# create a headless pod
# NAME - required; set the name of the pod
# IMAGE - required;  specify the Docker image to be executed
# FLAGS - optional; provide extra configuration parameters for the resource
# COMMAND and args - optional; instruct the container to run specific commands when it starts

kubectl run NAME --image=image [FLAGS] -- [COMMAND] [args...]

# Some of the widely used FLAGS are:

--restart - set the restart policy. Options [Always, OnFailure, Never]
--dry-run - dry run the command. Options [none, client, server]
-it - open an interactive shell to the container
Rolling Out Strategies
This ensures that no downtime is encountered when a new version of the application is released. Currently, there are 2 rolling out strategies:
- RollingUpdate - updates the pods in a rolling out fashion (e.g. 1-by-1)
- Recreate - kills all existing pods before new ones are created
For example, in this case, we upgrade a Go hello-world application from version 1.0.0 to version 2.0.0:

Where:
- Application is running version v1.0.0 in a pod managed by a ReplicaSet
- The version of Go hello-world application is set to v2.0.0
- New ReplicaSet is created that controls a new pod.
- The new has application running in version v2.0.0
- Traffic is directed to the pod running v2.0.0
- Pod with the old configuration (v1.0.0) is removed
Once deployment is created, you can use the commands below to inspect the objects.
# Gets deployments, ReplicaSet, and pods
kubectl get deploy
kubectl get rs
kubectl get pods

# Edits deployment
kubectl edit deploy {{ Name }} -o yaml

# Access an application locally
kubectl port-forward {{ Resource }} {{ Ports }}
🟨 Services and Ingress
- ensures connectivity and reachability to pods
- recall that each pod has one IP that is only accesible within the cluster
if one pod dies, workload going to that pod will fail. To prevent this, we use services which uses a single service IP for all the pods within the cluster. The services will then assign the workload to the available pod/s.

There are 3 widely used Service types:
-
ClusterIP
- exposes the service using an internal cluster IP.
- If no service type is specified, a ClusterIP service is created by default.
-
NodePort
- expose the service using a port exposed on all nodes in the cluster.
-
LoadBalancer
- exposes the service through a load balancer from a public cloud
- allows external traffic to reach services within the cluster securely.
To create a service for an existing deployment,
# expose a Deployment through a Service resource
# NAME - required; set the name of the deployment to be exposed
# --port - required; specify the port that the service should serve on
# --target-port - optional; specify the port on the container that the service should direct traffic to
# FLAGS - optional; provide extra configuration parameters for the service

kubectl expose deploy NAME --port=port [--target-port=port] [FLAGS]

# Some of the widely used FLAGS are:

--protocol - set the network protocol. Options [TCP|UDP|SCTP]
--type - set the type of service. Options [ClusterIP, NodePort, LoadBalancer]
🟨 Ingress
This enables the external user to accesss services within the cluster.
- exposes HTTP and HTTPS routes to services within the cluster
- uses a load balancer provisioned by a cloud provider
- use rules to map HTTP(S) endpoints to services running in the cluster
To keep the Ingress rules and load balancer up-to-date an Ingress Controller is introduced.

- Customers will access the go-helloworld.com/hi HTTP route,
- HTTP route is managed by an Ingress
- The Ingress Controller examines the configured routes and
- directs the traffic to a LoadBalancer
- LoadBalancer directs requests to the pods using a dedicated port
🟨 Configmaps and Secrets
Separating the configuration from the source code increases the portability of an application as it can cover multiple customer use cases. Kubernetes has 2 resources to pass data to an application: configmaps and secrets.
🟨 Configmaps
ConfigMaps are objects that store non-confidential data in key-value pairs and can be consumed by a pod as an
- environmental variable,
- configuration files through a volume mount, or as
- command-line arguments to the container
To create a Configmap,
# create a Configmap
# NAME - required; set the name of the configmap resource
# FLAGS - optional; define  extra configuration parameters for the configmap

kubectl create configmap NAME [FLAGS]

# Some of the widely used FLAGS are:

--from-file - set path to file with key-value pairs
--from-literal - set key-value pair from command-line
🟨 Secrets
Secrets are used to store and distribute sensitive data to the pods.
- Pods can consume secrets as environment variables or as files
- Kubernetes will encode the secret values using base64.
To create a Secret,
# create a Secret
# NAME - required; set the name of the secret resource
# FLAGS - optional; define  extra configuration parameters for the secret

kubectl create secret generic NAME [FLAGS]

# Some of the widely used FLAGS are:

--from-file - set path to file with the sensitive key-value pairs
--from-literal - set key-value pair from command-line
🟨 Namespaces
Since kubernetes clusters can host multiple applications, namespaces provide logical separation between applications and their resources.
- provides the application context,
- defining the environment for a group of Kubernetes resources
- can define amount of CPU, memory, and access per project
- Each team or business vertical is allocated a separate Namespace
- eliminates the "noisy neighbor" - all resources are consumed by a team
To create a Namespace,
# create a Namespace
# NAME - required; set the name of the Namespace

kubectl create ns NAME

# get all the pods in the  Namespace

kubectl get po -n NAME
Useful kubectl commands
Kubectl provides a rich set of actions that can be used to interact, manage, and configure Kubernetes resources. Below is a list of handy kubectl commands used in practice.
Note: In the following commands the following arguments are used:
- RESOURCE is the Kubernetes resource type
- NAME sets the name of the resource
- FLAGS are used to provide extra configuration
- PARAMS are used to provide the required configuration to the resource
To create resources,
kubectl create RESOURCE NAME [FLAGS]
To describe resources, use the following command:
kubectl describe RESOURCE NAME
To get resources, use the following command, where -o yaml instructs that the result should be YAML formated.
kubectl get RESOURCE NAME [-o yaml]
To edit resources, use the following command, where -o yaml instructs that the edit should be YAML formated.
kubectl edit RESOURCE NAME [-o yaml]
To label resources,
kubectl label RESOURCE NAME [PARAMS]
To access resources through port-forward,
kubectl port-forward RESOURCE/NAME [PARAMS]
To access logs from a resource,
kubectl logs RESOURCE/NAME [FLAGS]
To delete resources,
kubectl delete RESOURCE NAME
If you'd like to read more about the Kubernetes resources, here are some links you can check out:
- Kubernetes Pods
- Kubernetes Deployments
- Kubernetes ReplicaSets
- Kubernetes RollingOut Strategies
- Kubernetes Services
- Kubernetes Ingress
- Kubernetes Configmap
- Kubernetes Secrets
- Kubernetes Namespaces
Brace yourself! There are 8 Kubernetes labs going your way!
But before we proceed with the exercises, let's tackle one last important concept about deploying Kubernetes resources in a declarative manner.

If you enjoy this write-up and would like to learn more, make sure to hit the Follow just below and bookmark the series. I'll also be glad to connect with you on Twitter.
See you there! 😃


Latest comments (0)