
Video Chat with Unity3D and AR Foundation — Chapter 3: Remote Assistant App
Previously, we had shown two relatively simple sample applications on how to do video chat with AR Foundation on Unity. Here are the links to the blogs:
Chapter 1: Video Chat with Unity3D, the AR Foundation Version
Chapter 2: Video Chat with Unity3D and AR Foundation — ScreenSharing
Questions continue to come up:
“How do I share AR objects from the sender’s AR camera?”
“Also, I don’t want to share my HUD UIs, how do I do that with screen sharing?”
To address these technical challenges, we will make a more sophisticated application on the basis of knowing how to utilize AgoraIO’s Video SDK. Some of you may have already seen from this blog about a Remote Assistant App on iOS. We will make a similar App on Unity3D with AR-Foundation.
Prerequisites
Unity Editor (Version 2019.2 or above)
2 devices to test on (one to broadcast, one to view)
Broadcast device will be a mobile device to run AR scene: Apple device of iOS 11 or above; Android device with API level Android 7 or above.
Viewing device does not need AR capability — pretty much any device with Windows, Mac, Android, or iOS operating systems will work
A developer account with Agora.io
Getting Started
To start, we will need to integrate the Agora Video SDK for Unity3D into our project by searching for it in the Unity Asset Store or click this link to begin the download.
Figure 0. Video SDK on Asset Store
This project should be compatible with latest SDK. In case this tutorial could not keep to date, you may fall back to the current SDK archive here.
After you finish downloading and importing the SDK into your project, you should be able to see the README files for the different platforms the SDK supports. You should be familiar with the set up for the demo by following the previous tutorials.
Unity AR Packages
On UnityEditor (2019), open Package Manager from the Window tab. Install the following packages:
AR Foundation 3.0.1
ARCore XR Plugin 3.0.1
ARKit XR Plugin 3.0.1
If you use other versions of Unity Editor please check with the README file on GitHub for the verified setups. Or you may want to try different versions, since AR Foundation is changing a lot between versions.
Project Set Up
Please follow this link to download the completed project “RemoteAssistantAR” on Github.
Open the project in Unity Editor. Go to the Unity Asset Store page to import Agora Video SDK. When importing the Agora Video SDK, unselect “demo” from the list since those file names are modified in the Github repo. Switch to iOS or Android platform and follow the README instruction on how to set up the build environment for AR Foundation.
Open up the Main scene, and your project should look like this:
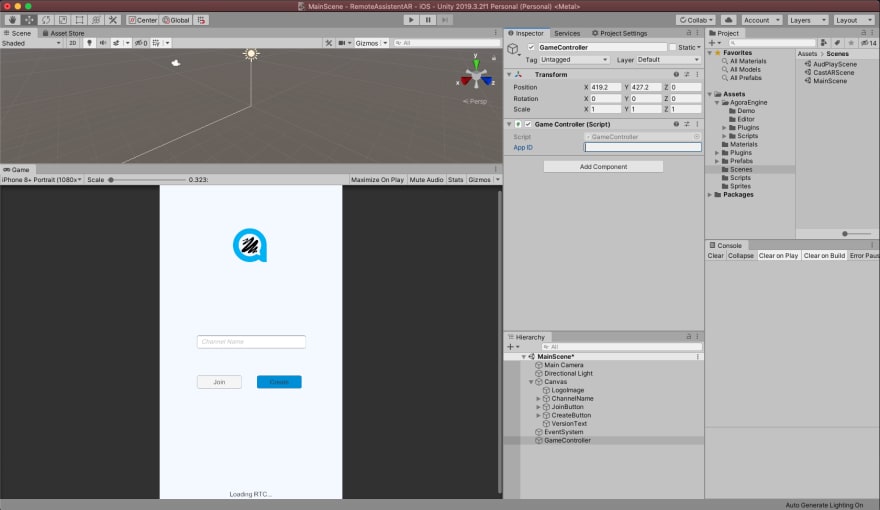 Figure 1. Main Scene
You should fill your App ID into the field of the GameController object on this screen. You may then build the project for iOS or Android to run on device. Just like the previous chapter, you will need a mobile device to run as the broadcaster and another mobile or desktop device (include Unity Editor) to run as the audience.
Project Architecture
The RemoteAssistantAR project consists of three scenes. Here are their descriptions:
Main — the entry screen with buttons to open the two screens for different purposes.
AudPlay —audience client, in which the user sees the the remote client’s video stream on the main screen; the user can choose color and draw things on the screen.
CastAR — the AR camera client, in which the user sees the real world on the back camera, mixed with AR objects; the user casts what he/she sees to the audience client.
This picture shows relationship among the scenes:
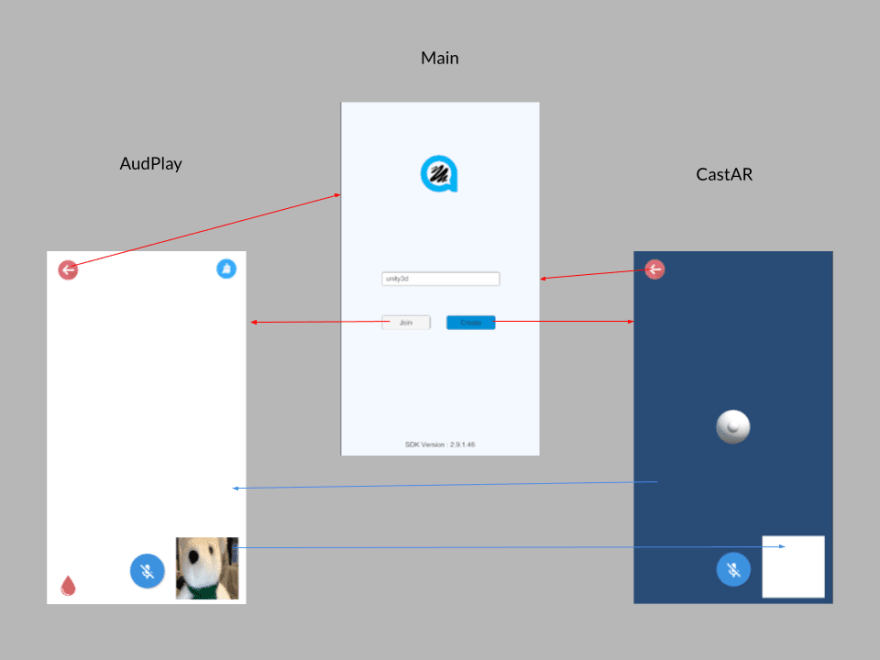 Figure 2. Scenes
Shared Interfaces
The AudPlay client and the CastAR client share the programming interface IVideoChatClient. As you can see from Figure 2, the two clients also share a common user interface in the prefab ChatCanvasUI, as depicted below:
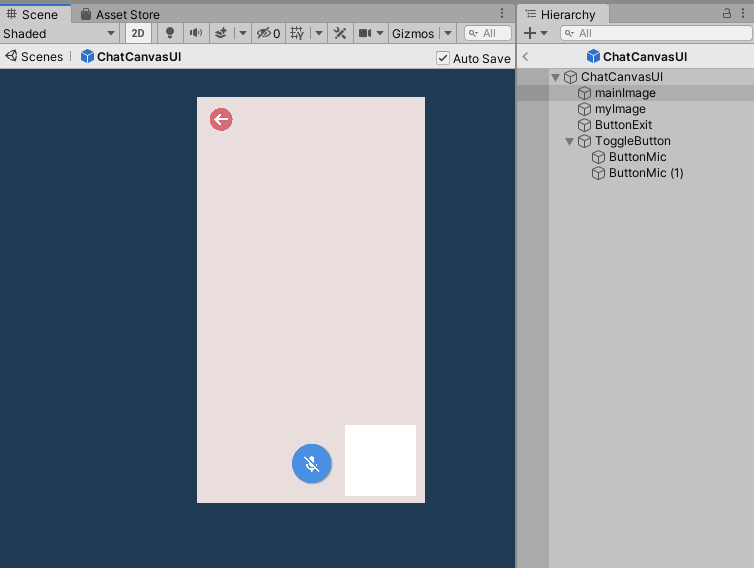 Figure 3. ChatCanvasUI Prefab
Color Controller
A color controller is the additional UI controller that the AudPlay client contains. User may tap the ink droplet and get a list of color to pick. The follow picture shows the construct of this prefab:
 Figure 4.1 Color Controller
BroadCast View Controller
The BroadCast View Controller (or “BroadcastVC”), in most sense, is the equivalent client to the Chapter 2’s “ARClient”. You may go back to read about how to use external video source to share the video frames to the receiver. However, in this controller, we capture the AR camera image in a different way. We are actually getting the raw image data from a RenderTexture, in this method:
RenderTexture is the key to answer those questions at the beginning of this tutorial.
An Approach to Share AR Screen
So far, we’ve discovered two ways to share screens. The first way, is to share the entire screen as if you are continuously making screen capture of your devices and send it. This is shown in the blog “How to Broadcast Your Screen with Unity3D and Agora.io”. The second way was discussed in my previous tutorial. The view from the AR Camera was shared without AR objects. What we want for this application is in between — we want the AR camera and AR objects (called it “AR Screen”) but not the HUD/UI elements. There could be different ways to achieve this. One way is the use of RenderTexture. In summary, it will follow these steps:
Create multiple cameras that uses different culling masks.
Assign everything under the Canvas UI to the “UI” layer.
Label/assign in code the AR Objects to another layer, e.g., “ARLayer” (anyhow, I picked the built-in “Ignored Raycast” for convenience, see Figure 4.2 and the DrawDot function in Figure 7.3).
Assign “Target Texture” field in the AR Camera to a Rendered Texture.
Assign the same Rendered Texture to another Camera (“Render Camera”) that will render the AR Objects.
Create a Material to use the Render Texture.
Create a Quad to use the Material from the last step.
Create a camera (“View Camera”) to render the quad texture.
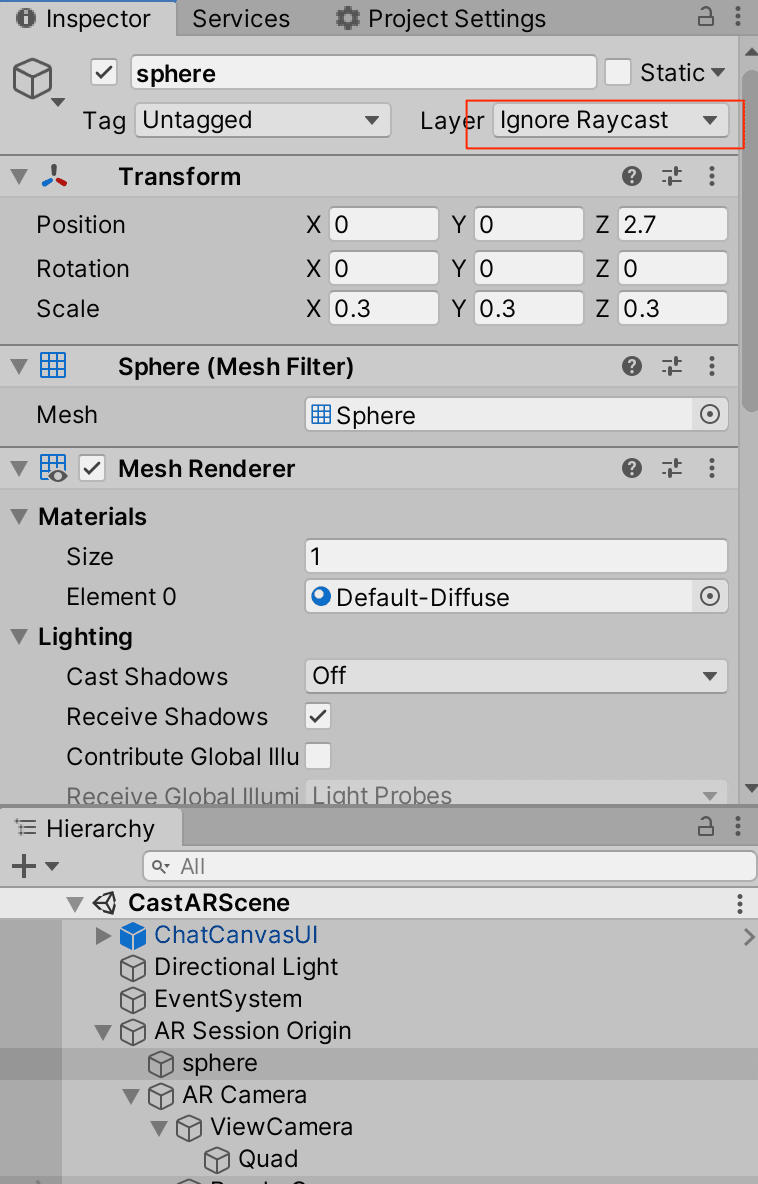 Figure 4.2 Layer
Cameras
So far, there are three cameras being used in the CastAR scene. They are laid out in the following wireframe:
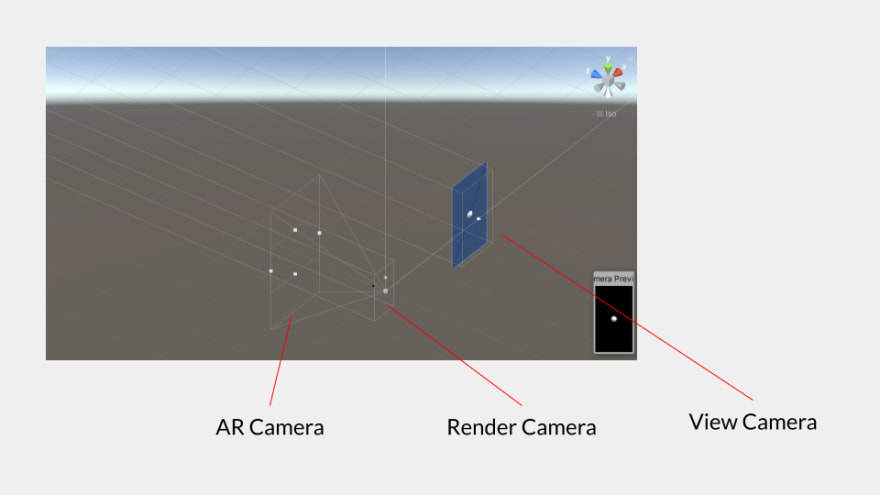 Figure 5. Wireframe of the Cameras
AR Camera: Takes the actual physical back camera from a device as input, sets each frame as output to a RenderTexture, e.g., CasterRenderTexture. Figure 6.1 illustrates the important parameters for this camera:
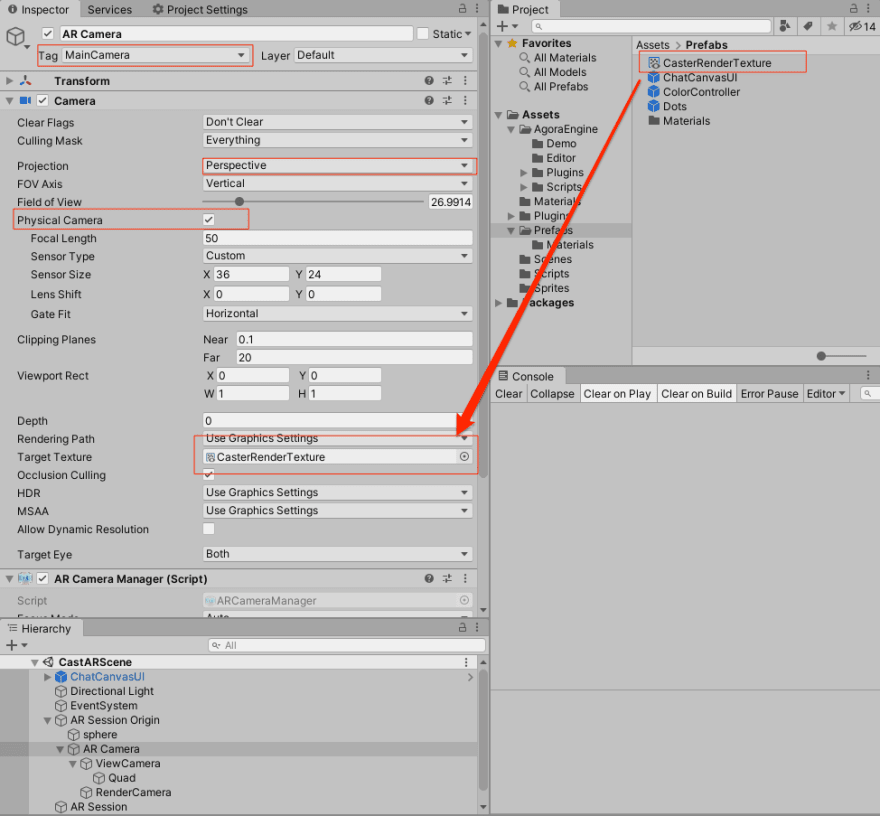 Figure 6.1 — AR Camera
Render Camera: **Renders *3D AR objects. One may ask, why can’t AR Camera be used for 3D object rendering? The reason being, is that the AR Camera is a physical camera. As we can see from the last tutorial, the 3D objects are not captured in this camera. Our Render Camera is placed on the same world position as the AR Camera. And its output is also being sent to the same RenderTexture — *CasterRenderTexture. See figure 6.2:
 Figure 6.2 — Render Camera
View Camera: Looks at the quad, which uses a material that “reads” from the shared RenderTexture CasterRenderTexture. This camera provides the actual “view” for the user using this device. Note that since both AR Camera and Render Camera are rendering to the RenderTexture, the image is not rendered to the screen itself. That’s why this View Camera came into place. Moreover, the positions of View Camera and Quad are separated from AR Camera and Render Camera, so that the Quad object is not taken into the Render Camera’s view.
From the Hierarchy view in Figure 6.2, we may also see that View Camera *parents *Quad, so Quad turns and changes position with the camera’s movement. Same parent-child relationship applies to AR Camera and both View Camera *and *Render Camera. Their view angles and positions are kept in-sync this way.
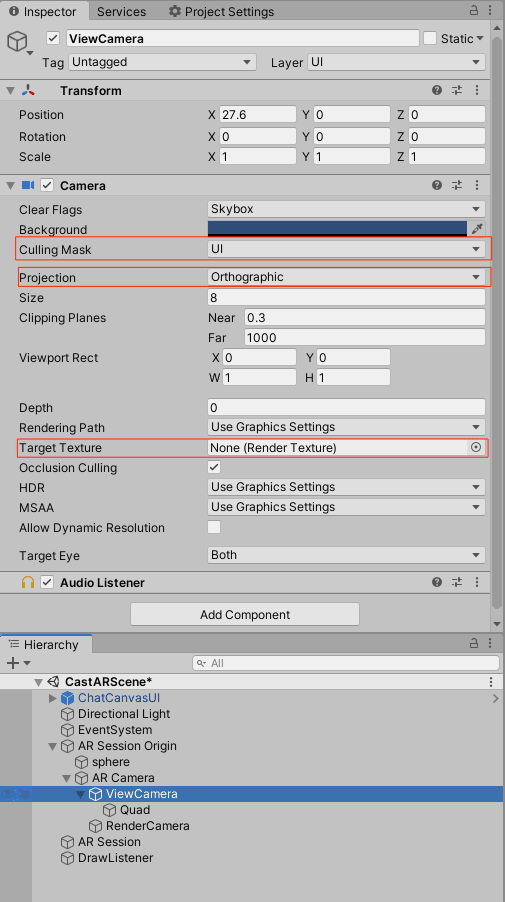 Figure 6.3 — View Camera
The follow diagram illustrates the relationships between the cameras and the client views:
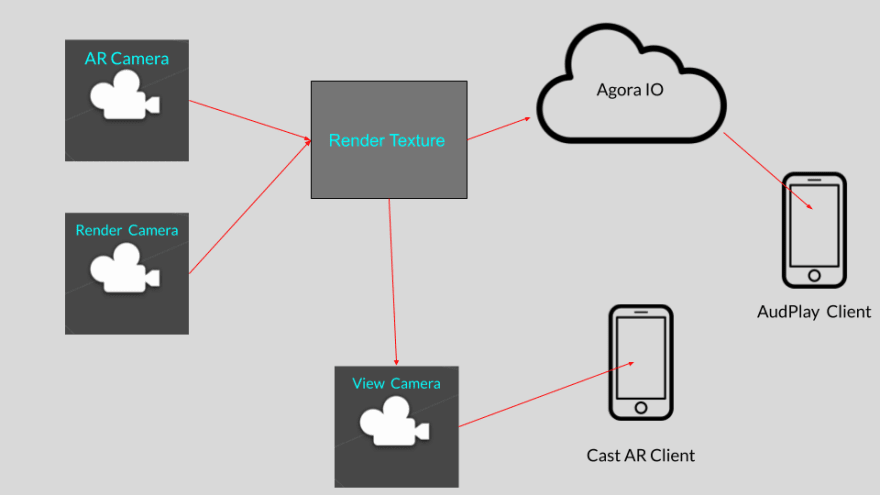 Figure 6.4 — Relationship Diagram
Next we will discuss the details about the remote assistant Part.
Remote Assistant
The idea about the remote assistant app, is that a field operator may be out to an area to work on something, but he needs some guidance on where the things to look at from a help elsewhere. Our CastAR client will be used the field operator in this scenario; and a help operator uses the AudPlay client to draw an outline of the important part on the screen. Technically, we will need to do this in the following steps:
Capture the finger motion on AudPlay client’s screen and record the touch points.
Send the touch points to CastAR client.
CastAR client receives the data points, and renders the outline in its 3D space.
Data model
We will use a small sphere to represent a dot, and the user’s dragging motion will create a series of small colored spheres. We will establish the model for our remote drawing data:
Unlike the iOS version of this App, we don’t need to worry about the offset of screen points for different devices. We will convert the points from the Screen Space to ViewPort Space for the transport. This page will help you to refresh your memory about the different point systems in Unity. A point from screen touch is “normalized” in this line:
Vector3 vp = Camera.main.ScreenToViewportPoint(screenPos)
We use a buffer list to accumulate the touch points to limit the number of the data stream call, which can be a bit of overhead adding to the performance measure.
Data Stream
On the AudPlay client side, one of the initialization steps in AudienceVC involves the creation of the data stream, in the following line:
dataStreamId = rtcEngine.CreateDataStream(reliable: true, ordered: true);
The dataStreamId is later used in the send stream message method as following:
On the CastAR client side, we dedicated a game object “DrawListener” to listen to the data stream and process the request.
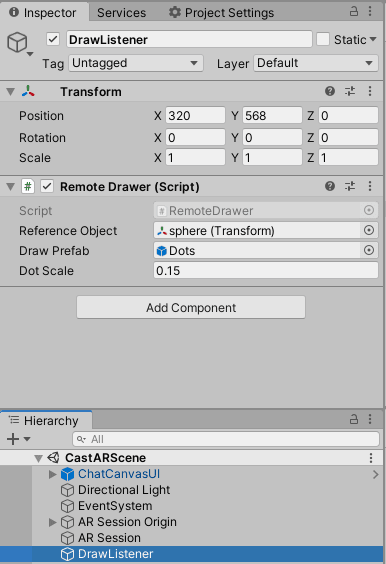 Figure 7.1 — DrawListener
The DrawListener’s controller script RemoteDrawer registers a callback to handle the data stream event:
rtcEngine.OnStreamMessage += HandleStreamMessage;
The data passing between the two ends is in character string, which is a JSON formatted string. And we invoke this method to draw the dots in the CastAR client’s 3D world:
Here the referenceObject is the sphere. It shares the same parent of the container of the dots to be drawn. The DeNormalizedPosition() function on line 19 does the opposite of what we did previously in Normalize():
camera.ScreenToWorldPoint(pos);
The important thing here, is to use the correct camera for the viewport space. Since the Render Camera is responsible to render the AR 3D objects, it is used for the conversion here.
Conclusion
Linking all the information above should provide you a better understanding of the design and the technical implementation of the RemoteAssistantAR project in Unity.
Some known issues here:
We skipped the “Undo” feature that exists in the iOS sample project, instead, we have the “Clear” button to clear all the drawing once.
The drawn outline may not “stay” on the object if the camera keeps moving around. This is due to the hardcoded z-space for the drawing object. A possible fix may be using RayCast to determine where to place the Z position at.
There is a lag after both devices joining a channel to start the video streaming.
Video recording of the app (through iOS controls or desktop Quicktime Player) causes longer lags.
There are definitely plenty room of improvement here. And the multi camera solution for AR screen sharing is not the only valid approach. Please let me know if there is any suggestion or even better — make a Pull Request of your modification on Github will be very welcomed!
Other Resources
The complete API documentation is available in the Document Center.
For technical support, submit a ticket using the Agora Dashboard or reach out directly to our Developer Relations team devrel@agora.io
Come join the Slack community: https://agoraiodev.slack.com/messages/unity-help-me

Top comments (0)