Cloud Recording for Unity Video Chat
In this advanced real-time engagement topic, we show you how the Agora Cloud Recording API can be called to handle the task for Unity applications. You should be familiar with the basic setup of a simple video chat app in Unity. If not, you can follow the tutorial in this blog, which will get you ready in 30 minutes. We further expand the logic to control the clouding recording with a custom server.
Prerequisites
Clone the quick start repo as the base project to work on.
Fulfill the dependencies on the quick start project, such as getting an Agora App Id*.
Set up a working Amazon S3 Bucket. Be sure you verify that you can upload files to it by scripting.
-
Have basic server-side coding knowledge and environment.
** Note: This guide does not implement token authentication which is recommended for all RTE apps running in production environments. For more information about token based authentication within the Agora platform please refer to this guide: https://bit.ly/3sNiFRs*
Architecture
We will create a simple client-server system to simulate common usage of the feature. Here are the parts as depicted in figure1:
Unity App client 1: the commanding client, which controls the start and stop of the video recording
Unity App client 2: the normal client, which chats with client 1
App Server: a trusted server that stores secret keys, takes command from client 1 and makes RESTFul API calls to the SD-RTN back end
SD-RTN back end: the Agora network process video that makes magic happen (Software Defined Real Time Network)
Amazon S3 Bucket: the cloud storage with APIs for the video upload
 Figure 1: Project Architecture
Note: Theoretically, we can omit the app server from this architecture and put the secret keys and RESTFul API calls directly in the client. But that wouldn’t be the best practice.
Project Overview
This project has three major steps:
Environment: This involves enabling the feature on your Agora account and setting up client-server and an S3 account.
Server: The code is written in PHP.
Client : A Unity application built on the basic video chat project.
Environment Setup
First, familiarize yourself with the background description from the documentation page. Follow the steps in the QuickStart section on how to enable the service from your Agora developer account console. You’ll need a customer Id *and a *customer secret from the console. Adding the setup from the basic video chat project, you should have the following tokens so far:
App Id: **Created with a new project. **I chose not to use a certificate for this tutorial.
App token: Only if you enabled certificate for your AppId.
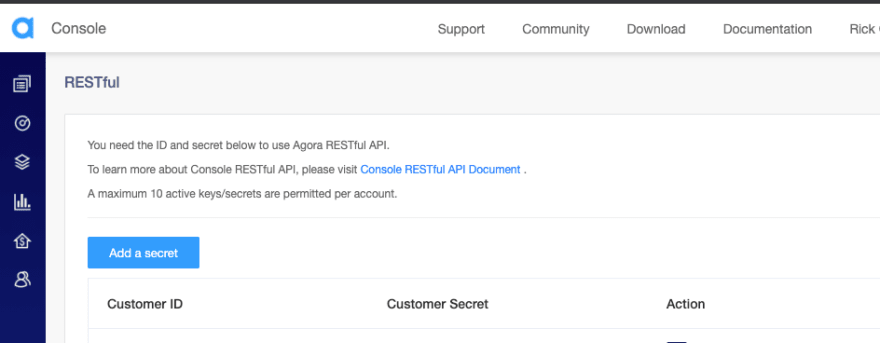
**Customer Id: **Press “Add a secret” to get one (figure 2).
**Customer secret: **After getting the customer Id, the console generates a secret token for download.
 Figure 2: Agora RESTful Console
Amazon S3 Credentials
You will need the following information for the clouding recording configuration:
Bucket name: In my example from figure 3, the name is “agoracdn”.
Region: **Since **my bucket is in “us-west-1”, it is mapped to “2” according to this table.
*User access key: **Get this from AWS IAM under *Users (figure 4).
*User Secret key: **Get this from AWS IAM under *Users.
 Figure 3: S3 Management Console
 Figure 4 : IAM Management Console
Server Environment
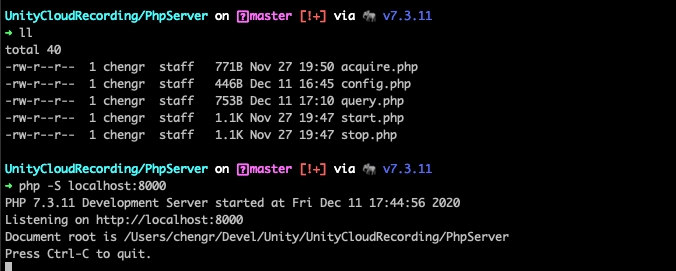
You should use the server framework that you are most familiar with. I run a quick PHP server on the localhost from my MacBook. I use this command to start the server from my PHP source code directory:
$ php -S localhost:8000
For more information, such as how to do the same on Windows machines, check the PHP manual page.
Server Implementation
The main goal of our server is to separate the necessary credential keys away from the client and relay the RESTful API calls to the Agora SD-RTN back end. The Cloud Recording Quick Start documentation shows the following essential steps for its life cycle:
Acquire
Start
Query
Stop
These four steps are mapped to four PHP scripts running from our test server. They will share the configuration that we gather from the Environment Setup step above.
Configuration
Here is the code of config.php. You need to fill into your credential tokens in the empty space and set the region number for your Amazon S3 bucket. The script combines the Customer Id and the Customer Secret token into an Authorization Secret (AuthSecret), which will be used throughout the API calls. You should create an integer string for the RecUID (Recorder User Id). This Id is different from the clients’ user Ids.
Acquire
The Aquire step initializes a Cloud Recording request to the Agora SD-RTN. In return, the RTN provides a resourceId. The channel name is passed from the client in a POST body. As a result, the resourceId is sent to the client. The client should maintain that id in its memory for the next steps.
Start
After you obtain a resourceId, you can tell the SD-RTN when the recording starts. The SD-RTN sends chunks of video data in .ts format to your S3 bucket. The resourceId and the channel name are passed from the client in a POST body. If the call is successful, you should get back the same resourceId and a sid (Session Id).
Query
It is important to know if a Recording is in session or the Start failed due to an AWS authentication issue. The Query command checks the current status with the stored resourceId and sid. The server responds with the current video name for the file list (m3u8) and other information.
Stop
When you decide the recording is done, call Stop to complete the cloud recording session.
Note: If you set up your Agora project with the certificate enabled, you need to add a token field into the CURLOPT_POSTFIELDS in the Acquire, Start, Stop, and Query API calls. Since my project was set up without one, I removed the field from the list.
Checkpoint
So far, the server code and configuration are set up. You can test the recording manually before the client code is created. To do so, simply assign the necessary values by hand instead of getting the values from the POST body.
If you are interested in learning more about the RESTful calls, you can use the Agora-RESTful-Service project to test cloud recording on the Postman app. In fact, the scripts and JSON body that I used in the PHP code above are inspired by the Postman app. You can quickly create the corresponding code for your chosen framework and language. See figures 5 and 6.
Unity Client
As discussed in the Architecture section, there are two clients. Client 1 is the commanding client that controls the start and stop of the recording. Client 2 is a normal chat client. The original VideoChat project applies to client 2. We update the project with new features to support the commanding client.
The commanding feature is a good example application for the MVC design pattern. We will write the Unity C# code for the Model, the View and the Controller.
Model
From observation of the returning JSON output from the SD-RTN, we find the following sample structure covers the response body for Acquire, Start, Stop, and Query:
{“resourceId”:”xxxx”, “sid”:”yyy”, “serverResponse”:{“status”:5,”fileList”:”zzzz.m3u8",”fileListMode”:”string”,”sliceStartTime”:1606357122528} }
Turning that into C# classes, we have the following implementation:
View
We will update the Video Chat demo scene to the following:
Add a Start/Stop button to the lower-left side of the view area. Name it “RecordButton”. Set the text to display “Start”. Later, we modify the text to display “Stop” in the controller logic.
Add a Query button below the Start/Stop button. Make the RecordButton its parent in the hierarchy.
 Figure 7: The Cloud Record Commanding Client
Controller
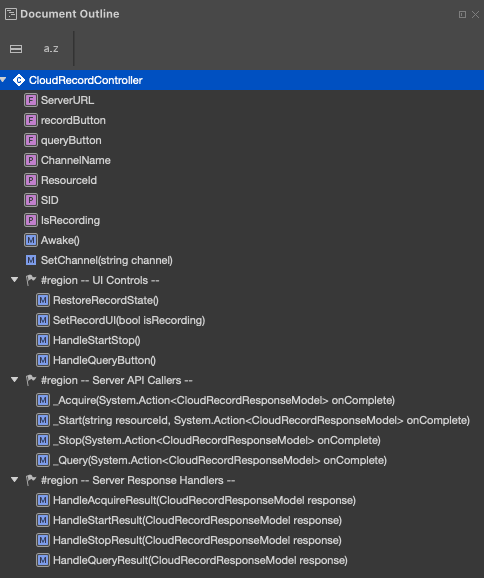
A CloudRecordController class responds to the button events and encapsulates the networking logic to drive the cloud recording sequence. Here is a top-down outline of the class structure:
Fields
ServerURL
recordButton
queryButton
Properties
ChannelName: Set by main controller (VideoChat.cs),
ResourceId: Get from server message,
SID: Get from server message,
IsRecording: Indicates if recording is in progress.
UI Controls
HandleStartStop(): Responds to the RecordButton click and toggles between the two states. The RecordButton is visible only after the user joins a channel and it appears as a Start button. When the user taps the Start button, the client sends an Acquire command to the server first. If the Acquire is successful, then Start begins automatically in the response handler to Acquire. The Start button becomes a Stop button. The Stop button stops the recording upon tapping by the user.
HandleQuery(): Responds to the QueryButton click. The output prints to the console.
RestoreRecordState(): Helps to maintain states between two Unity client sessions. If a recording is in progress but the user quits, the Start state is saved in the device’s persistent memory (PlayerPrefs). This function gets called at the Awake step of the hosting object.
SetRecordUI(): Changes the UI appearance for the Start state and the Stop state.
Server Interaction
The client interacts with the server with the four API calls defined earlier. It is easy to see that there are four API callers and four matching server response handlers for Acquire, Start, Stop, and Query.
The four functions use the same logic flow for the caller and the handler. We use the UnityWebRequest *class to package and send the POST request and parse the result using the model we defined for *CloudRecordResponseModel. At the end, invoke the callback to the handler to finish the processing. Figure 9 shows an example from the _Start function.
_Start() runs separately from the Main thread in Unity in a coroutine so that the network calls won’t block the execution of the UI display.
The complete code listing for CloudRecordController class:
Integration
Now we have the MVC components all defined. Let’s integrate everything. We need a game object to host the CloudRecordController. We simply add that as an extra component to the RecordButton.
First, go back to the Unity Editor and drag the CloudRecordController.cs script to RecordButton. Second, assign the RecordButton and QueryButton to their fields. Third, enter the following URL in the Server URL field:
You Inspector should look like this:
 Figure 10: Record Button as a Controller
We update the main controller logic to link to the CloudRecordController.
Update the AgoraTest.cs script with a new serialized field for CloudRecordingObject (see figure 11).
In the Start() method, hide the CloudRecordingObject (see figure 11).
 Figure 11: New Code in AgoraTest Class
- In the OnJoinChannelSuccessHandler() method, update the code to pass the channel information to CloudRecordController (see figure 12)
 Figure 12: Passing Channel Name
- In the Unity Editor, drag and drop the RecordButton into the CloudRecordingObject field of AgoraTest inside GameController (see figure 13).
 Figure 13: Linking Recording Object
Test
First, start the server by going to the Terminal and entering the php command, as shown in figure 14.
Run the project from the Unity Editor, and execute in the following order:
Join
Start
Query
Stop
Leave
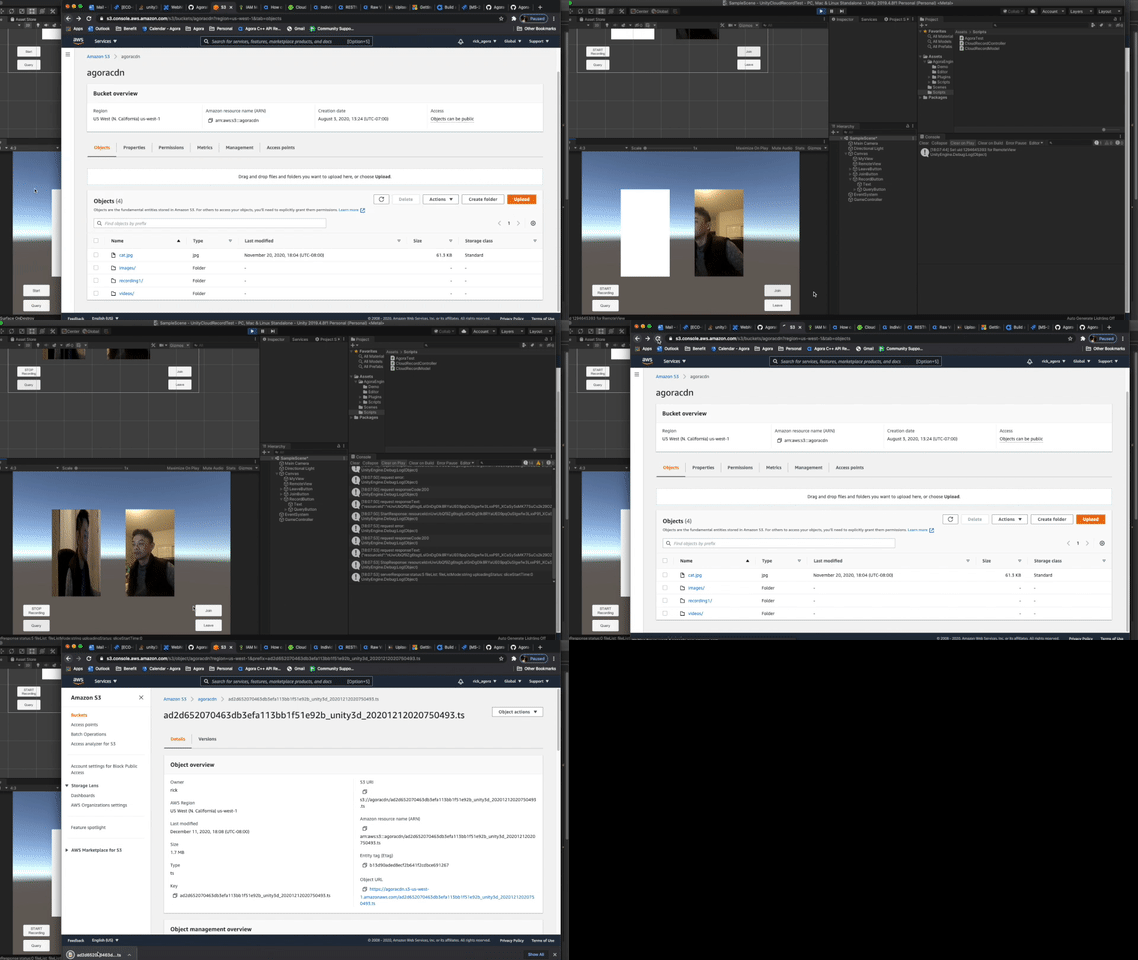
When you are done, head over to your AWS S3 account to check the files. You should find a list of .ts files uploaded. Here is the quick test I just did:
Conclusion
This project is a bit complex, with various depending configurations to set up. Thank you for following my post up to the end. The completed project can be found in our community Github repo.
Other Resources
For more information about Agora.io applications, take a look at the Agora Video Call Quickstart Guide and Agora API Reference.
I also invite you to join the Agoira.io Developer Slack community.


Top comments (0)