
Trackers are devices or technology that monitor users' activities, events, or page views on a platform. In the proper context, it involves collecting information and monitoring how a user interacts or uses an application.
Over the years, trackers have been adopted by major applications like food ordering apps, e-commerce, wellness apps, e.t.c, to help their users monitor activities, provide insights, and build consistency.
In this post, we will learn how to build a Gym Tracker to describe daily activities using Next.js and Xata.
GitHub and Deployment link
The project source codes and deployment link are below:
Prerequisites
To follow along with this tutorial, the following requirements apply:
- Basic understanding of JavaScript and React
- A Xata account for storing data. Signup is completely free
Getting started
We need to create a Next.js starter project by navigating to the desired directory and running the command below in our terminal.
npx create-next-app gym-tracker && cd gym-tracker
The command creates a Next.js project called gym-tracker and navigates into the project directory.
Installing TailwindCSS
TailwindCSS is a utility-first CSS framework packed with classes to help us style our web pages and make them responsive to various screens. To use it in our application, run the command below:
npm install -D tailwindcss postcss autoprefixer
npx tailwindcss init -p
The command installs TailwindCSS and its dependencies and generates tailwind.config.js and postcss.config.js files.
Next, we need to update tailwind.config.js file with the snippet below:
module.exports = {
  content: [
    './app/**/*.{js,ts,jsx,tsx}',
    './pages/**/*.{js,ts,jsx,tsx}',
    './components/**/*.{js,ts,jsx,tsx}',
  ],
  theme: {
    extend: {},
  },
  plugins: [],
}
Finally, we need to add TailwindCSS directives to our application. The directives give our application access to TailwindCSS utility classes. To do this, navigate to the styles folder and update the globals.css files in it with the snippet below:
@tailwind base;
@tailwind components;
@tailwind utilities;
Set up a Database on Xata
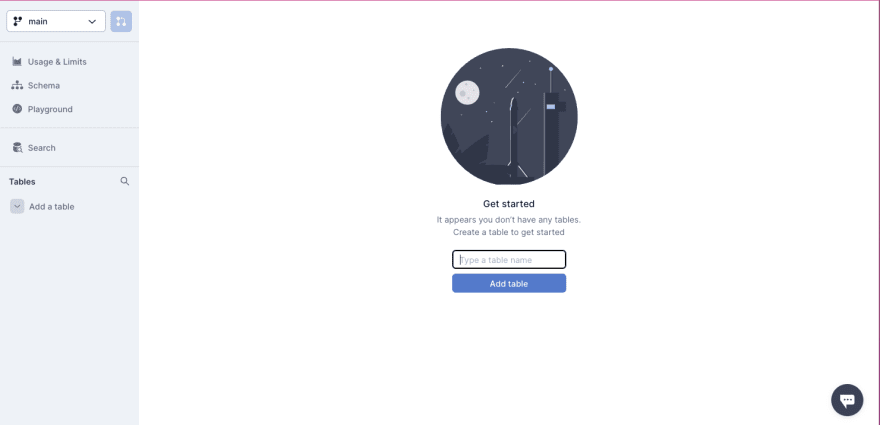
To create a database for storing our gym activities data, we need to log into our Xata’s workspace, click the Add a Database button, input gym as the database name, and Create.


Next, we need to create a table in our database. To do this, click the Start from scratch menu, input tracker as the table name, and Add table.

PS: Xata auto-generates an ID column (a unique identifier) for our table.
With that done, we need to add a description of type String and created_on of type Date columns to our table. To do this, click the Plus icon, select type accordingly, input column name, and Create column.


After creating the columns, our updated table should be similar to the screenshot below:

Get Database URL and set up API Key
By default, Xata provides a unique and secure URL for accessing the database. To get our database URL, click the Get code snippet button, copy the URL, and then click the Set up API key button to generate API key. We need the API key for authentication when using the database.

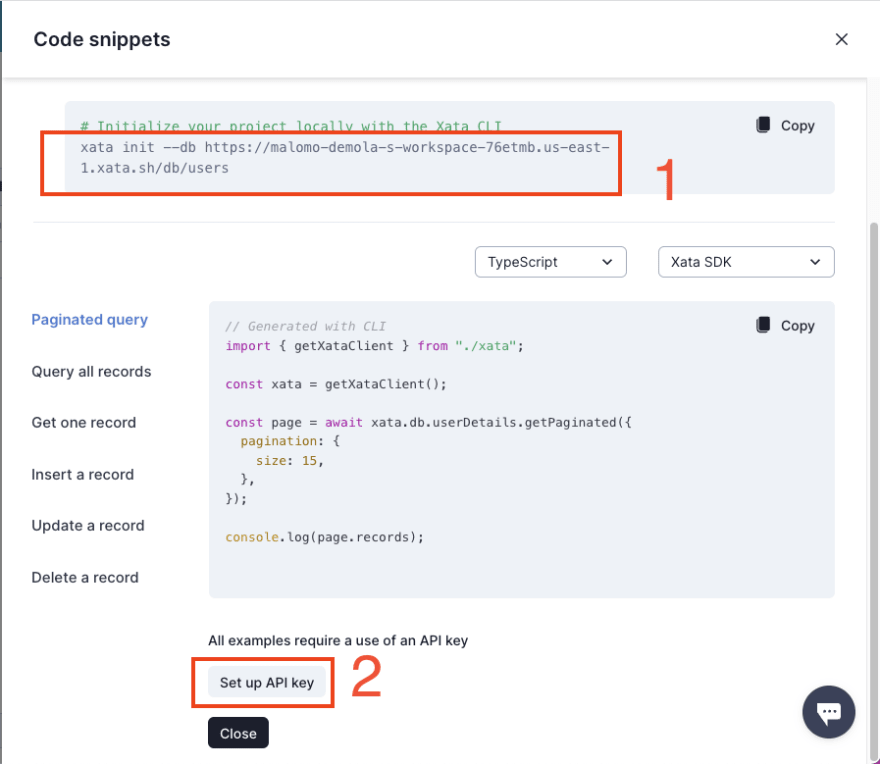
PS: The URL we need to copy starts from the https://…… section
Click the Add a key button, input xata-function as the name, and Save.


Setup environment variable
Next, we need to add our database URL and the API as an environment variable. To do this, we need to create a .env file in the root directory and add the snippet below:
NEXT_PUBLIC_XATA_URL=<REPLACE WITH THE COPIED DATABASE URL>
NEXT_PUBLIC_XATA_API_KEY=<REPLACE WITH THE COPIED API KEY>
Create the Gym Tracker in Next.js
Create application logic
To get started, we’ll navigate to our project root directory and create a components folder; here, create a services.js file and add the snippet below:
export const createTrack = async (description) => {
    const body = {
        description,
        created_on: new Date(),
    };

    const resp = await fetch(
        `${process.env.NEXT_PUBLIC_XATA_URL}:main/tables/tracker/data`,
        {
            method: 'POST',
            body: JSON.stringify(body),
            headers: {
                'Content-Type': 'application/json',
                Authorization: `Bearer ${process.env.NEXT_PUBLIC_XATA_API_KEY}`,
            },
        }
    );

    return resp;
};

export const getTrackers = async () => {
    const body = {
        page: {
            size: 20,
        },
    };

    const resp = await fetch(
        `${process.env.NEXT_PUBLIC_XATA_URL}:main/tables/tracker/query`,
        {
            method: 'POST',
            body: JSON.stringify(body),
            headers: {
                'Content-Type': 'application/json',
                Authorization: `Bearer ${process.env.NEXT_PUBLIC_XATA_API_KEY}`,
            },
        }
    );

    return resp;
};
The snippet above does the following:
- Creates a
createTrackfunction that takes indescriptionas a parameter to describe gym activity for the day. The function also does the following:- Line 2 - 5: Creates the request body with the required parameters
-
Line 7 - 17: Makes
POSTrequest to Xata by modifying the database URL to include the branch, table name, and query type. It also passes the API key as an authorization header. - Line 19: Returns the response
- Creates a
getTrackersfunction to get the list of activities. The function also does the following:- Line 23 - 27: Creates a request body to paginate the requested data
-
Line 29 - 39: Makes
POSTrequest to Xata by modifying the database URL to include the branch, table name, and query type. It also passes the API key as an authorization header. - Line 41: Returns the response
The Xata database URL used above was constructed by passing in the branch, table name, and endpoint type.
process.env.NEXT_PUBLIC_XATA_URL:<BRANCH NAME>/tables/<TABLE NAME>/ENDPOINT TYPE
We can get the required details from our workspace

In our case, we filled it using an environment variable. Adequately filled URLs are below:
createTrack
process.env.NEXT_PUBLIC_XATA_URL:main/tables/trackers/data
getTracker
process.env.NEXT_PUBLIC_XATA_URL:main/tables/trackers/query
Building the User Interface
With that done, we can start using our application logic to build our application. To get started, first, we need to create a Nav.js file in the components folder and add the snippet below:
import Link from 'next/link';
import { useRouter } from 'next/router';

export default function Nav() {
    const router = useRouter();
    return (
        <nav className='border-b-gray-300 h-10 border-b flex mb-6'>
            <img
                src='https://res.cloudinary.com/dtgbzmpca/image/upload/v1667430832/Gym-logo.png'
                alt='gym logo'
                className='mr-4'
            />
            <Link
                href={'/'}
                className={`font-medium text-sm ml-4 ${
                    router.pathname == '/'
                        ? 'border-b-[4px] border-teal-600 text-teal-600'
                        : ''
                }  `}
            >
                Home
            </Link>
            <Link
                href={'/history'}
                className={`font-medium text-sm ml-4 ${
                    router.pathname == '/history'
                        ? 'border-b-[4px] border-teal-600 text-teal-600'
                        : ''
                }  `}
            >
                History
            </Link>
        </nav>
    );
}
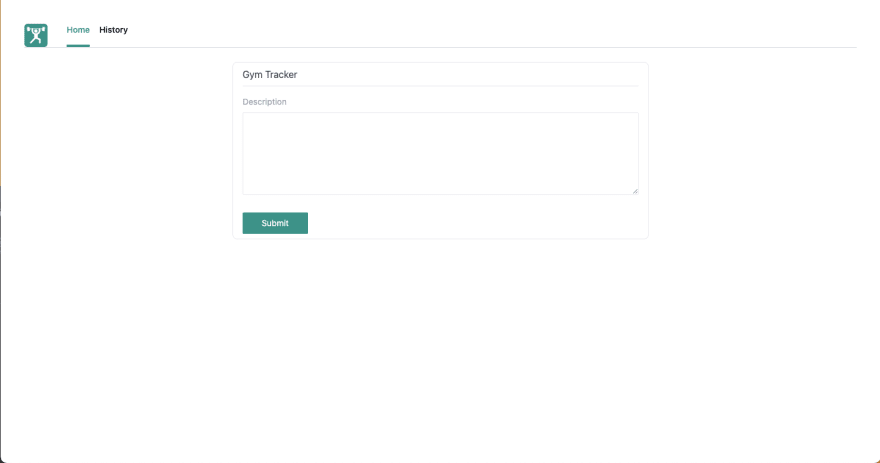
The snippet above creates the application navigation and sets the active tab accordingly. We also leverage the power of Cloudinary to seamlessly host and deliver our application logo.
Secondly, we need to update the index.js file inside the pages folder as shown below:
import Head from 'next/head';
import { useState } from 'react';
import Nav from '../components/Nav';
import { createTrack } from '../components/services';

export default function Home() {
    const [description, setDescription] = useState('');
    const [isLoading, setIsloading] = useState(false);

    const handleSubmit = (e) => {
        setIsloading(true);
        e.preventDefault();
        createTrack(description)
            .then((resp) => {
                alert('Tracker created successfully!');
                setDescription('');
                setIsloading(false);
            })
            .catch((e) => {
                alert('Error creating tracker!');
                setIsloading(false);
            });
    };
    return (
        <div>
            <Head>
                <title>Gym Tracker</title>
                <meta
                    name='description'
                    content='Generated by create next app'
                />
                <link rel='icon' href='/favicon.ico' />
            </Head>
            <main className='py-4 px-4 lg:py-10 lg:px-10 w-full'>
                <Nav />
                <section className='flex justify-center'>
                    <div className='px-4 py-2 border rounded-lg w-full lg:w-2/4'>
                        <div className='border-b h-8 mb-4'>
                            <h3 className='text-gray-700'>Gym Tracker</h3>
                        </div>
                        <form onSubmit={handleSubmit}>
                            <fieldset>
                                <label className='text-sm text-gray-400 mb-2 block'>
                                    Description
                                </label>
                                <textarea
                                    name=''
                                    id=''
                                    rows='5'
                                    className='border w-full rounded-sm mb-6 p-2'
                                    required
                                    value={description}
                                    onChange={(e) =>
                                        setDescription(e.target.value)
                                    }
                                />
                            </fieldset>
                            <button
                                className='text-sm text-white px-8 py-2 rounded-sm bg-teal-600 hover:bg-teal-700'
                                disabled={isLoading}
                            >
                                Submit
                            </button>
                        </form>
                    </div>
                </section>
            </main>
        </div>
    );
}
The snippet above does the following:
- Imports the required dependencies
- Lines 7-8: Create state properties to manage application state
-
Lines 10-23: Create an
handleSubmitfunction that uses thecreateTaskhelper function to create an activity - Adds the UI to use the state and function to create a gym track
Lastly, we need to create a history.js file in the same pages folder to show the history of the gym activities.
import Head from 'next/head';
import Nav from '../components/Nav';
import { getTrackers } from '../components/services';

export async function getServerSideProps() {
    const response = await getTrackers().then((resp) => resp);
    const data = await response.json();

    return { props: { data } };
}

export default function History({ data }) {
    return (
        <div>
            <Head>
                <title>Gym Tracker</title>
                <meta
                    name='description'
                    content='Generated by create next app'
                />
                <link rel='icon' href='/favicon.ico' />
            </Head>
            <main className='py-4 px-4 lg:py-10 lg:px-10 w-full'>
                <Nav />
                <section className='flex justify-center'>
                    <div className='px-4 py-2 border rounded-lg w-full lg:w-2/4'>
                        <div className='border-b h-8 mb-4'>
                            <h3 className='text-gray-700'>History</h3>
                        </div>
                        <ul>
                            {data.records.length > 0 ? (
                                data.records.map((record) => (
                                    <li
                                        key={record.id}
                                        className='h-auto border rounded-sm px-4 py-2 mb-2'
                                    >
                                        <p className='text-sm text-gray-500 mb-2'>
                                            {record.description}
                                        </p>
                                        <p className='text-xs text-gray-500 mb-2'>
                                            {record.created_on.slice(0, 10)}
                                        </p>
                                    </li>
                                ))
                            ) : (
                                <p className='text-sm text-gray-500 mb-2 text-center'>
                                    You currently do not have any data in your
                                    tracker!.
                                </p>
                            )}
                        </ul>
                    </div>
                </section>
            </main>
        </div>
    );
}
The snippet above does the following:
- Imports the required dependencies
- Gets data from Xata using the
getServerSidePropsand thegetTrackershelper functions - Updates the UI to show data dynamically from the returned
dataproperty
With that done, we can restart our development server using the command below:
npm run dev

Conclusion
This post discussed how to quickly build a responsive Gym Tracker to describe daily activities using Xata and Cloudinary.
These resources might be helpful:

Oldest comments (0)