
Let's make a habit of starting with a quote in order to get in the right headspace for development.
“Don’t let anything stop you. There will be times when you’ll be disappointed, but you can’t stop.” — Sadie T. M. Alexander
Creating a React app is a tedious process. There are tools that make it quicker to do so and it is possible to look up many of them online. For the purpose of this series, I will perform most of the work (most likely all, but covering my bases) on Code Sandbox. They offer an easy-to-use React IDE that we can utilize to create a simple app.
We'll eventually get into what we'll be making but this week I'd like to walk you through the setup.

🏖️ Code Sandbox 🏖️
Last week, I linked you to a Code Sandbox. The website you want to use is exactly that: Code Sandbox
You should go through the standard process of creating an account that is linking to your GitHub. After that, you're presented with a dashboard. You're likely to want to click on Create React Sandbox. Don't do that.
Click the Create Sandbox button:
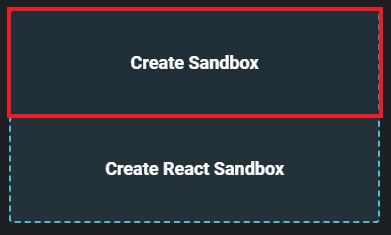
If you do it this way, you'll be able to rename your sandboxes in the future. From there, you can select React to create a React app.

Once created, you'll be faced with a screen that looks like this:

You can edit the name by clicking where the red box is. You now have a running React app. Let's make some changes to make things easier for next week.
📋 Changes 📋
Inside App.js you'll see the following code:
import React from "react";
import "./styles.css";

export default function App() {
  return (
    <div className="App">
      <h1>Hello CodeSandbox</h1>
      <h2>Start editing to see some magic happen!</h2>
    </div>
  );
}
Let's convert that to a class. Why? A class was the old way of initializing the container that renders the App's components. I say old because recently (February 16, 2019, to be exact) React 16.8 came out with something called Hooks. Hooks allow us not to use classes anymore, and I will cover them later, but for now, let's introduce you to classes so you'll be familiar with them.
We need to convert the function to a class. To do so, we need to make it look like this:
import React, { Component } from "react";
import "./styles.css";

class App extends Component {
  constructor() {
    super();
    this.state = {};
  }
  render() {
    return (
      <div className="App">
        <h1>Hello CodeSandbox</h1>
        <h2>Start editing to see some magic happen!</h2>
      </div>
    );
  }
}

export default App;
There's a lot of changes we made there, so we can break it down line by line. The first line has changed because we need to label that we are importing Component from React in Code Sandbox. So we import, as I've heard many times:
Import big React from little react
We do that and import Component. The second line imports the stylesheet.
We convert the function to a class that extends Component and create a constructor inside it to manage state. We'll talk about state later as well.
We then need to call the render function and return what we want to be rendered. Finally, we export the App. After you make these changes, you should see the same screen in the preview section. I recommend playing around with the stylesheet and making changes in React after this but to get you started, we are going to create our own custom component.
To do so, let's follow standard practice and make a new folder by clicking on the circled button below.

We want to make a new folder called src/Farm. After creating the Farm directory, create a file called Farm.js. In this file, we need to set up the component so we can use it in the app. This is done by importing big React from little react, importing the stylesheet, creating a function, and then exporting it. So let's create the framework.
import React from "react";
import "../styles.css";

const Farm = props => (
   <div></div>
);

export default Farm;
We imported React and the stylesheet, we created a function called Farm and we exported it. There is something unique here: props. Props are properties that are passed between components. They can only be passed down and they must be passed to parents before children. That means that if there is another Component inside Farm, we would have to pass properties to Farm before that child component. Finally, each Component must only present one element. The element can have many children elements but it must resolve to a singular <div>, <article>, etc.
We can now add some code to our Farm. Let's add four <p> elements for things on the farm. Your code should now look something like this.
import React from "react";
import "../styles.css";

const Farm = props => (
  <div>
    <p>Barn</p>
    <p>House</p>
    <p>Granary</p>
    <p>Field</p>
  </div>
);

export default Farm;
If it does, then great! We can use this export inside App.js to render our new Component. Let's go back to App.js and import our new Farm component by adding import Farm from "./Farm/Farm"; right below our styles import.
We then need to do something really cool. We have to add the component to our return statement inside our App class. All components inside React are self-closing if you want them to be. For instance, we can write a div as <div />. So we can add our Farm inside our div as <Farm />. Your App.js should look like this when you are done.
import React, { Component } from "react";
import "./styles.css";
import Farm from "./Farm/Farm";

class App extends Component {
  constructor() {
    super();
    this.state = {};
  }
  render() {
    return (
      <div className="App">
        <h1>Welcome to My Farm</h1>
        <h2>We have the following:</h2>
        <Farm />
      </div>
    );
  }
}

export default App;
You should then see the four <p> elements you added inside the preview. Congrats! Feel free to tweak it or add more components. A link to the code is below. Next week we will begin to pass props down to other components.

This has been me, sharing React from a Bootcamper's perspective.
Til next week. ~💠Aaron💠


Top comments (0)