
Ever since OpenAI has released ChatGPT, the science behind AI has become more of a question. There have been many questions on how exactly AI works and what it is. Large language models (LLM) like GPT (Generative Pre-trained Transformer) take the AI spotlight. This is because this model is able to generate text in an extraordinary way. Such technology being a website away to access, it allows people to gather information in a more efficient way. Similarly, when search engines were made like the one from Google, it allowed a more efficient way to gather information during those times, now since technology has advanced, there is the coming of AI which essentially serves the same purpose.
In this article, I'll elucidate how I replicated a GPT model. We will not be focusing on the user input aspect of GPT, this will be elaborated more later into the article. This article unravels the mysteries of how AI LLMs like GPT generate human-like text in just 8 steps:
1. Reading the Data
2. Tokenization
3. Loading the Data
4. Implementing Bigram Language Model
5. Training and Evaluating the Bigram Language Model
6. Implementing Scaled-Dot Product Attention
7. Implementing Layer Normalization
8. Wrapping up the code in a finished script
The essence of this article is to provide AI enthusiasts with a foundational understanding of models like GPT and their inner workings. Moreover, my aim is to inspire readers to harness this knowledge and embark on innovative projects and endeavors in the realm of AI, aimed at addressing real-world challenges.
After reading this article you should be able to have learned the following:
1. Understanding Transformer Architecture ✅
2. Importance of Attention Mechanism ✅
3. Cross-Attention for Complex Tasks ✅
4. Data Preparation and Tokenization ✅
5. Model Training and Fine-Tuning ✅
6. Foundation on developing language models ✅
However, in order to do so, a basic understanding is needed for the foundation of AI. The heart of these models is a neural network architecture called Transformer. Transformer was built by developers at Google and has become an essential topic to understand in the AI world.
Moving forward, this article is heavily influenced from Andrej Karpathy's tutorial on building GPT from scratch.
What exactly is a large language model?
Large language models is a type of artificial intelligence that is designed to understand and generate human-like text based on the input. When using these models it may seem like magic. However, it is all done through the model being trained on vast amounts of text data and are capable of performing various natural language processing (NLP) tasks. Here is a sum of the tasks AI performs:
- Text generation
- Translation
- Summarization
- Question answering
Large language models are characterized by their massive size of data. The data is measured in terms of the number of parameters/amount of training data they have been exposed to. Popular models like OpenAI's GPT-3.5/GPT-4 and Google's BERT (Bidirectional Encoder Representations from Transformers) are prime examples of large language models since they are able to generate coherent and contextually relevant text across an extremely wide range of topics.
These models rely on sophisticated neural networks, often based on transformer (which we will discuss next). In result, large language models showcase a remarkable representation for understanding and generating natural language text, making them valuable tools for various applications in natural language processing (NLP) and AI.
So, what on earth is a Transformer?
Although the name is quite intimidating, the concept behind transformers is not as complicated as it may seem.
A Transformer is neural network architecture model that was introduced in a research paper "Attention is All You Need" by Vaswani et al. in 2017. Transformer was designed primarily for natural language processes such as machine translation, text generation, and language understanding.
The key for the Transformer architecture is the attention mechanism. The attention mechanism allows the model to weigh the importance of different parts of the input data when making predictions. This attention mechanism enables the Transformer to capture long-range dependencies in the input sequence. This results in effective for tasks that involve understanding context over large distances.
If you still do not understand attention mechanism, don't worry! Let's break it down.
The attention mechanism is crucial component of the Transformer architecture. It was introduced to address limitations in the older sequence-to-sequence models, specifically in handling long-range dependencies. Here are 4 categories to break attention mechanism down.
Motivation
Older sequence-to-sequence models, like those based on recurrent neural networks (RNN), struggle with capturing long-range dependencies in sequences. They have fixed-length representations and process input sequences sequentially. Thereby making it challenging to relate distant tokens effectively.
Idea
The idea of the attention mechanism is to address the limitations by allowing the model to focus on different parts of the input sequence selectively. Instead of processing the entire input sequence all at the same time, the model dynamically assigns different weights, or attention scores, to each token in the sequence, indicating its importance concerning the current decoding step.
Self-Attention
In context of the Transformer, the attention mechanism used its self-attention, which allows the model to weigh the importance of different words in the input sequence concerning each other.
Benefits
Effectively capturing long-range dependencies.
Handling variable-length sequence without recurrence.
Parallelization of computation resulting to faster training.
Now that we understand the attention mechanism, we can discover the main advantages of the Transformer architecture
The advantages of the Transformer architecture is its parallelizability. this allows for more efficient training compared to RNN's. Thereby, Transformer's parallelizability combined with its ability to capture long-range dependencies, it contributes to the adoption of the Transformer architecture in various NLP tasks.
Overall, a Transformer is a type of neural network model architecture that is made to design for tasks involving sequences of data, like text or time series. It is known for its ability to understand and generate sequences by focusing on important parts of the input, making it great for tasks like language translation, text summarization, and generating natural language.
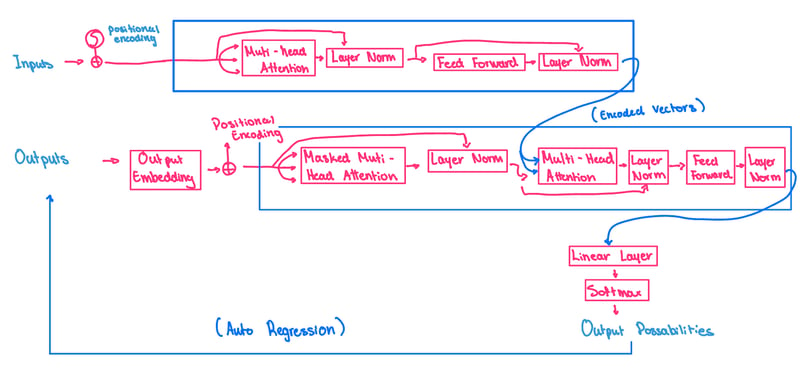
This is a visual representation of Transformer arcitechture
🚀 Lets get started coding!
Now that we are all caught up with the fundamentals for this project, we can begin building GPT from the ground up! Feel free to scroll all the way down to access the jupyter notebook for this project to take a look at the code itself.
Step 1) Reading the Data
To start this project off, we would want any dataset of your choice. Personally, I chose a piece of text from a medical cancer related research paper. This process is done through pasting the URL of the text you want to use. This is done through the following code:
!wget https://raw.githubusercontent.com/ebxdk/textfile/main/input2.txt
I was able to obtain the link for the dataset through github. If you are having trouble with obtaining a URL for your dataset, you can use this article
Next, since the file name for my file from the github link is "input2.txt", we want the code to open the file, read it, and store it to any variable. This is done through the following code:
with open('input2.txt', 'r', encoding='utf-8') as f:
    text = f.read()
In this case, the variable we are storing the file to is "text". This variable could be anything you want it to be.
Now, we will simply print the the length of the dataset in the structure and the first 1000 characters in the dataset just for clarity. This is done through the following code:
print("length of dataset in characters: ", len(text))
print(text[:1000]) #this will print the first 1000 characters from the dataset.
After that being done, we want the code to process the input2.txt file to identify all unique characters, sort them alphabetically, and to determine the vocabulary size (number of unique characters). This is done through the following code:
chars = sorted(list(set(text)))
vocab_size = len(chars)
print(''.join(chars))
print (vocab_size)
 #this will print out all the different characters within the text
To break this down...
For the line chars = sorted(list(set(text))):
-
set(text)is responsible for converting the text string into a set of unique characters, removing duplicates. -
list(...)converts the set of unique characters back into a list. -
sorted(...)sorts the list of unique characters alphabetically. -
charsstores the sorted list of unique characters. - Effectively, this line creates a sorted list of all unique characters present in the text string.
For the line vocab_size = len(chars):
-
len(chars)calculates the number of elements (unique characters) in the chars list. -
vocab_sizestores the number of unique characters in the vocabulary. - This line determines the size of the vocabulary, which is the total number of unique characters present in the text.
For the line print(''.join(chars)):
-
join(chars)concatenates all characters in the chars list into a single string. -
print(...)prints out the concatenated string. - This line prints out all the unique characters within the text, sorted alphabetically.
- It provides a visual representation of the characters present in the text.
The output of this this block of code should be as such (dependant on dataset:
>>> ()+,-.0245678ABCFHILMNOPRSTWYabcdefghijklmnopqrstuvwxyz
58
Step 2) Tokenization
Tokenization is the process of converting text data into smaller units called tokens, which are usually words or subwords. It helps in numerical representation of text for machine learning tasks, enabling the model to process and understand the text data effectively.
For the this project, the tokenization of the data is important steps for training and using the neural network model for the NLP tasks. From converting the text file data into numerical representations, the model can effectively process and learn from the input. Encoding numerically speeds up training, improves model's ability to generalize to new data, and enabling the model to generate meaningful text sequences during the text generation steps.
The code responsible for this step is as follows:
stoi = { ch:i for i,ch in enumerate(chars) }
itos = { i:ch for i,ch in enumerate(chars) }
encode = lambda s: [stoi[c] for c in s] # encoder: take a string, output a list of integers
decode = lambda l: ''.join([itos[i] for i in l]) # decoder: take a list of integers, output a string
print(encode("hii there"))
print(decode(encode("hii there")))
Let's now encode the entire text dataset and store it into a torch.Tensor:
import torch # we use PyTorch: https://pytorch.org
data = torch.tensor(encode(text), dtype=torch.long)
print(data.shape, data.dtype)
print(data[:1000]) # the 1000 characters we looked at earlier will to the GPT look like this
Let's now split up the data into train and validation sets n = int(0.9*len(data)) # first 90% will be train, rest val:
train_data = data[:n]

val_data = data[n:]
This step is crucial for this project, and will come back in a future step.
Step 3) Loading the Data
For this section we want to plug the text/integer sequences so it can train and learn those patterns. Now you would think that feeding the entire text into the Transformer would seem to be the next step, it did to me when I first thought of it. However, instead we will feed the Transformer small chunks of the dataset, otherwise it is going to be computationally expensive.
For these chunks of text, there needs to be a variable that represents the length of it, which is block_size. We then want to observe the first block size + 1 characters from train_data[:block_size+1]. The output of those two lines if code is as follows:
>>> tensor([28, 38, 35, 1, 48, 31, 46, 39, 34])
This output represents the predictions at each numeric positions. The reason in the code we typed block_size + 1, was because in the chunk of 9 characters, there are actually 8 individual examples packed in.
To word out this output in english, what it is saying is that in the example of 28, 38 likely comes next. In the example of 28 and 38, 35 comes next. In the example of 28, 38, and 1, 48 comes next, and so on.
Now to implement this into the Transformer, you want to make two variables x and y, where x is the input to the Transformer, and y is the next block_size characters. However it is offsetted by one since y is the target for each position in the input. Then implement a for loop to iterate over the block_size. This is done through this block of code:
x = train_data[:block_size]
y = train_data[1:block_size+1]
for t in range(block_size):
    context = x[:t+1]
    target = y[t]
    print(f"when input is {context} the target: {target}")
Remember when we were wording out the last output? Well look at the ouput for this block of code. It is outputted exactly how we worded it out.:
>>> when input is tensor([28]) the target: 38
>>> when input is tensor([28, 38]) the target: 35
>>> when input is tensor([28, 38, 35]) the target: 1
>>> when input is tensor([28, 38, 35,  1]) the target: 48
>>> when input is tensor([28, 38, 35,  1, 48]) the target: 31
>>> when input is tensor([28, 38, 35,  1, 48, 31]) the target: 46
>>> when input is tensor([28, 38, 35,  1, 48, 31, 46]) the target: 39
>>> when input is tensor([28, 38, 35,  1, 48, 31, 46, 39]) the target: 34
It is important to ask, why do we train in the context of 1 all the way to block_size? This is because we want the Transformer to see a context of something as small as 1, all the way to block_size, and as well as everything in between. This will help with the Transformer to predict what comes next even after a context of just 1!
In this block of code, it is going to be responsible for preparing the batches for input and output pairs for training a Transformer based language model.
We do this by firstly setting the random seed for reproducibility. Then we introduce new variables like batch_size and block_size. Respectively, they control how many independent sequences will process in parallel and what the maximum context length for the predictions will be.
Then we define a get_batch function that generates batches by selecting random indices within the data, constructing input sequences x, and corresponding target sequences y. It prints information about the generated batches, including their shapes and contents. Then, it iterates over each batch and time step, printing the context (input sequence up to the current time step) along with the corresponding target, aiding in understanding the structure of input-output pairs for training the language model. The code for the following process is as follows:
torch.manual_seed(1337)
batch_size = 4 # how many independent sequences will we process in parallel?
block_size = 8 # what is the maximum context length for predictions?

def get_batch(split):
    # generate a small batch of data of inputs x and targets y
    data = train_data if split == 'train' else val_data
    ix = torch.randint(len(data) - block_size, (batch_size,))
    x = torch.stack([data[i:i+block_size] for i in ix])
    y = torch.stack([data[i+1:i+block_size+1] for i in ix])
    return x, y

xb, yb = get_batch('train')
print('inputs:')
print(xb.shape)
print(xb)
print('targets:')
print(yb.shape)
print(yb)

print('----')

for b in range(batch_size): # batch dimension
    for t in range(block_size): # time dimension
        context = xb[b, :t+1]
        target = yb[b,t]
        print(f"when input is {context.tolist()} the target: {target}")
print(xb) # our input to the transformer
Step 4) Implementing Bigram Language Model
Why use a Bigram Language Model in the first place?
We want to use a Bigram language model because it allows simple yet effective approach to language modeling. Specifically, by considering only pairs of adjacent tokens, the model captured some level of context dependency without the computational complexity of higher-order n-gram models. This simplicity made it easier to implement and understand, especially for beginners learning about language modeling and neural networks.
- This code block encompasses the implementation of a language model, specifically a Bigram Language Model, using PyTorch. The model is designed to predict the next token in a sequence given the previous tokens.
- The
BigramLanguageModelclass defines the architecture, utilizing an embedding layer to map tokens to their corresponding logits. During training, the model computes the cross-entropy loss between predicted logits and actual targets. - For text generation, the generate method samples tokens from the model's output distribution iteratively to construct a sequence of desired length.
- The decode_output function decodes the output tensor into human-readable text, handling special tokens and formatting. The final section demonstrates model usage by generating text and post-processing it for readability, removing start and end tokens, fixing punctuation spacing, and adding paragraph breaks.
Overall, this code showcases the process of training and
using a language model for text generation tasks.The code block for this process is as follows:
import torch
import torch.nn as nn
from torch.nn import functional as F

torch.manual_seed(1337)

# Function to decode the output tensor into text
def decode_output(output_tensor):
    decoded_text = ''.join([itos[i] for i in output_tensor])
    decoded_text = decoded_text.replace('<', '').replace('>', '')  # Remove special tokens
    decoded_text = decoded_text.replace('  ', ' ')  # Remove extra spaces
    decoded_text = decoded_text.replace('\n ', '\n')  # Remove leading space after newline
    return decoded_text

class BigramLanguageModel(nn.Module):

    def __init__(self, vocab_size):
        super().__init__()
        # each token directly reads off the logits for the next token from a lookup table
        self.token_embedding_table = nn.Embedding(vocab_size, vocab_size)

    def forward(self, idx, targets=None):
        # idx and targets are both (B,T) tensor of integers
        logits = self.token_embedding_table(idx) # (B,T,C)

        if targets is None:
            loss = None
        else:
            B, T, C = logits.shape
            logits = logits.view(B*T, C)
            targets = targets.view(B*T)
            loss = F.cross_entropy(logits, targets)

        return logits, loss

    def generate(self, idx, max_new_tokens):
        # idx is (B, T) array of indices in the current context
        for _ in range(max_new_tokens):
            # get the predictions
            logits, loss = self(idx)
            # focus only on the last time step
            logits = logits[:, -1, :] # becomes (B, C)
            # apply softmax to get probabilities
            probs = F.softmax(logits, dim=-1) # (B, C)
            # sample from the distribution
            idx_next = torch.multinomial(probs, num_samples=1) # (B, 1)
            # append sampled index to the running sequence
            idx = torch.cat((idx, idx_next), dim=1) # (B, T+1)
        return idx

m = BigramLanguageModel(vocab_size)
logits, loss = m(xb, yb)
print(logits.shape)
print(loss)

generated_text = decode_output(m.generate(idx=torch.zeros((1, 1), dtype=torch.long), max_new_tokens=100)[0].tolist())

# Add proper punctuation and formatting
generated_text = generated_text.replace('<START>', '').replace('<END>', '')  # Remove start and end tokens
generated_text = generated_text.replace(' .', '.').replace(' ,', ',')  # Fix spacing before punctuation
generated_text = generated_text.replace('\n ', '\n\n')  # Add double newline for paragraphs

print(generated_text)
Step 5) Training and Evaluating the Bigram Language Model
- This next snippet below is all about training and evaluating the language model. It begins by setting up an optimizer (AdamW) to update the model's parameters based on the computed gradients. Then, it iterates over a predefined number of steps, each time fetching a batch of training data and computing the loss.
- The optimizer then adjusts the model's parameters to minimize this loss through backpropagation. Finally, it prints out the loss value to gauge the model's performance.
- Additionally, it generates text using the trained model to showcase its language generation capabilities, providing insight into its effectiveness in generating coherent and contextually relevant text.
- The code for this process is as follows:
# create a PyTorch optimizer
optimizer = torch.optim.AdamW(m.parameters(), lr=1e-3)


batch_size = 32
for steps in range(100): # increase number of steps for good results...

    # sample a batch of data
    xb, yb = get_batch('train')

    # evaluate the loss
    logits, loss = m(xb, yb)
    optimizer.zero_grad(set_to_none=True)
    loss.backward()
    optimizer.step()

print(loss.item())

print(decode(m.generate(idx = torch.zeros((1, 1), dtype=torch.long), max_new_tokens=500)[0].tolist()))
Step 6) Familiarizing with the Mathematical Trick for implementing self-attention
The idea for this section is to use a mathematical trick to develop the self-attention block. I recommend to review what self-attention is and why it is needed for this project.
To begin with the base of the mathematical trick used for this project, we will begin with a toy example to cover the basic idea of the trick.
We will begin with coding a block of code that sets the random seed to ensure reproducibility, then initializes a 3-dimensional tensor x with dimensions (4, 8, 2).
The first value, 4, represents the batch size, which is the number of sequences processed simultaneously.
The second value, 8, represents the sequence length, which is the number of elements (or time steps) in each sequence.
The third value, 2, represents the number of channels, which is the number of features or dimensions associated with each element in the sequence.
These values can vary depending on the nature of your data and the requirements of your model. For example, if you are processing a larger dataset, you might increase the batch size to improve efficiency. Similarly, if your sequences are longer or have more complex features, you might adjust the sequence length or number of channels accordingly.
The block of code that represents this will be as follows:
torch.manual_seed(42)
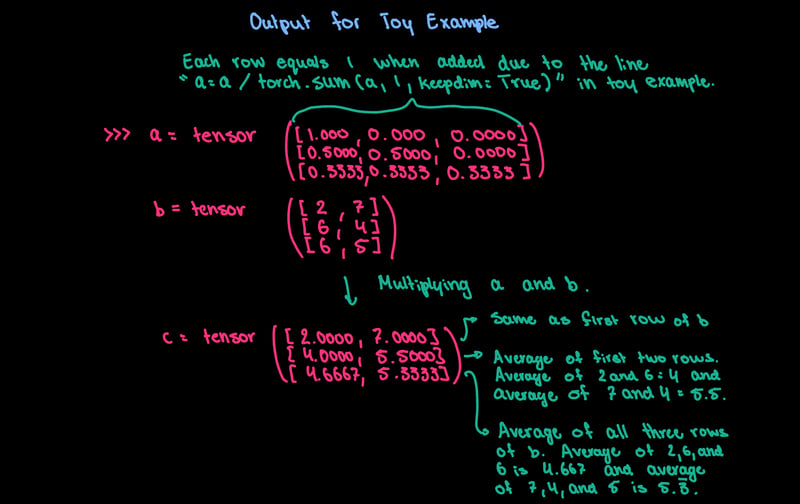
a = torch.tril(torch.ones(3,3))
a = a / torch.sum(a, 1, keepdim=True)
b = torch.randint(0,10,(3,2)).float()
c = a@b
print('a=')
print (a)
print('--')
print('b=')
print (b)
print('--')
print('c=')
print (c)
torch.manual_seed(1337)
B,T,C = 4,8,2 # batch, time, channels
x = torch.randn(B,T,C)
x.shape
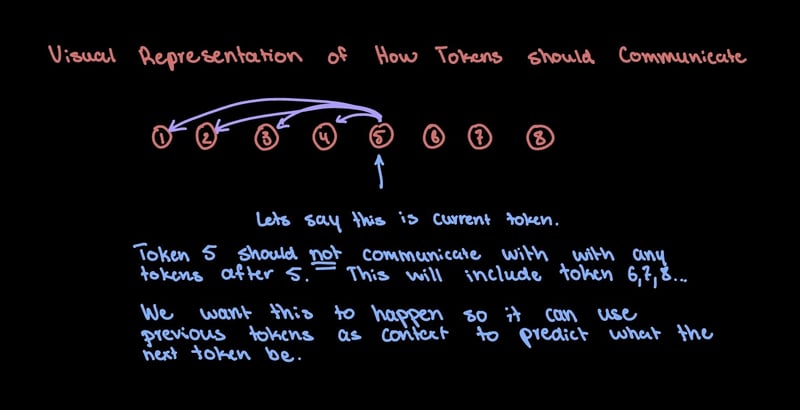
Now the idea here is that we have the number 8 representing the number of tokens in the batch, and want them to "talk" to each other. To elaborate, I want the tokens to "talk" or communicate in a specific way. I want the tokens to communicate with only the previous tokens and not the next ones, since we are predicting the future tokens in the sequence.
Here is a visual representation on how the tokes's should communicate with each other:
- To obtain this, we will go over 2 versions that will do the same thing. First version will cover the easiest way to obtain this task, however it is not efficient. Second version will cover a more complex way to obtain this task using matrix multiplication, which will be efficient.
- The reason to show you two different versions, even though obviously the second version is the preferred one, is to familiarize you with my thinking process during this project. Personally, I like to do the task the easiest way possible, then gradually make it more efficient.
Version 1
- So the easiest way to obtain the task above is to average up all the previous tokens, and including the current token. This means that if we are on the 3rd token, it will take the channel for the 3rd token, 2nd, and 1st and average it up. This will provide a summarization of the context and including to the current token.
- This can be shown in the following block of code:
xbow = torch.zeros((B,T,C))
for b in range(B):
    for t in range(T):
        xprev = x[b,:t+1] # (t,C)
        xbow[b,t] = torch.mean(xprev, 0)
- The output and brief explanation of the math behind the matrix multiplications and averaging all of the previous tokens is shown here:
Version 2
- The goal with version 2 is to vectorize and increase efficiency from what we have in version 1.
- In version 1 we had an array 'a', in this case in version 2 we will represent the array in 'wei'.
- We will show this matrix with the following code:
wei = torch.tril(torch.ones(T, T))
wei = wei/wei.sum(1, keepdim=True)
wei
- The output will show the 'a' matrix.
- Now to showcase the 'b' in this version, we will do that by making 'x' represent for 'b'.
- This can happen through modifying the code above to the following:
wei = torch.tril(torch.ones(T, T))
wei = wei/wei.sum(1, keepdim=True)
xbow2 = wei @ x
torch.allclose(xbow, xbow2)
- In the line
xbow2 = wei @ x, whats happening is that initially,weiis (T,T) and we are multiplying it byxwhich is (B,T,C). Py-Torch will then tell the code that "hey these two are not the same" so it will modifyweiby creating a batch dimension. Thereby makingweiinto (B,T,T). The equation will look like this:
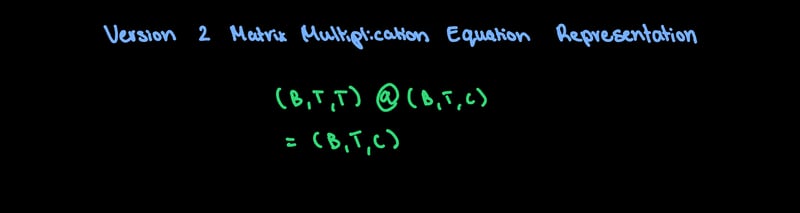
- The result from this determines that
xbowandxbow2are the same. - From doing this, we were able to get information previous to the token at the "Tth" dimension.
Version 3
- In this third version, it is still identical to the first two versions, however it is going to be with the use of softmax.
- This block of code is implementing the self-attention mechanism in a Transformer model, where the attention weights are computed based on the input x and then applied to the input tokens to compute the weighted sum:
tril = torch.tril(torch.ones(T, T))
wei = torch.zeros((T,T))
wei = wei.masked_fill(tril == 0, float('-inf'))
wei = F.softmax(wei, dim=-1)
xbow3 = wei @ x
torch.allclose(xbow, xbow3)
tril = torch.tril(torch.ones(T, T)): This line creates a lower triangular matrix of ones with dimensions T by T usingtorch.ones(), and then extracts the lower triangular part usingtorch.tril(). This matrix is typically used to mask out future tokens during the self-attention computation.wei = torch.zeros((T,T)): Here, a square matrix of zeros with dimensions T by T is created.wei = wei.masked_fill(tril == 0, float('-inf')): This line replaces the values in the wei matrix with negative infinity(float('-inf'))where the corresponding values in the tril matrix are zero. This effectively masks out the upper triangular part of the wei matrix, ensuring that during self-attention, tokens cannot attend to future tokens.wei = F.softmax(wei, dim=-1): The wei matrix is then passed through a softmax function along the last dimension. This operation converts the values in the wei matrix to probabilities, ensuring that the attention weights sum up to 1 across each row.xbow3 = wei @ x: Finally, the inputxis multiplied by the attention weightswei. This step computes the weighted sum of the input tokens based on the attention weights, effectively performing the self-attention operation.torch.allclose(xbow, xbow3): This line checks if the result of the previous operationxbow3is close to a reference value xbow within a certain tolerance. This is typically used for testing purposes to ensure that the implementation is correct.
Final Version - Self-Attention
- We want to now piece everything together by implementing a small self-attention for an individual head. We will begin this through the following code:
torch.manual_seed(1337)
B,T,C = 4,8,32 # batch, time, channels
x = torch.randn(B,T,C)

head_size = 16
key = nn.Linear(C, head_size, bias=False)
query = nn.Linear(C, head_size, bias=False)
value = nn.Linear(C, head_size, bias=False)
k = key(x)   # (B, T, 16)
q = query(x) # (B, T, 16)
wei =  q @ k.transpose(-2, -1) # (B, T, 16) @ (B, 16, T) = (B, T, T)

tril = torch.tril(torch.ones(T, T))

wei = wei.masked_fill(tril == 0, float('-inf'))
wei = F.softmax(wei, dim=-1)

v = value(x)
out = wei @ v

out.shape
This code block implements a self-attention mechanism with a single attention head. Here's a brief explanation:
- Random input tensor
xof shape(B, T, C)is created whereBis batch size,Tis the sequence length, andCis the number of channels. - Linear transformations (
key,query, andvalue) are applied toxto obtain key (k), query (q), and value (v) tensors respectively. Each linear transformation reduces the channel dimension (C) tohead_sizeusing linear layers. - Dot product of query and key tensors is computed and scaled. This produces the attention weights (
wei), indicating the importance of each time step. - Lower triangular mask is applied to the attention weights to prevent attending to future tokens in the sequence.
- Softmax activation is applied along the last dimension to obtain normalized attention weights.
- Weighted sum of value tensor (
v) using the attention weights (wei) is computed to get the final output (out). - The shape of the output tensor is returned.
Step 6) Implementing Scaled-Dot Product Attention
The main idea behind this block of code is to implement and experiment with the self-attention mechanism, a crucial component in Transformer models used for various natural language processing tasks:
k = torch.randn(B,T,head_size)
q = torch.randn(B,T,head_size)
wei = q @ k.transpose(-2, -1) * head_size**-0.5
k.var()
q.var()
wei.var()
torch.softmax(torch.tensor([0.1, -0.2, 0.3, -0.2, 0.5]), dim=-1)
torch.softmax(torch.tensor([0.1, -0.2, 0.3, -0.2, 0.5])*8, dim=-1) # when gets too peaky
Here's a breakdown of what each line does:
k = torch.randn(B, T, head_size): This line generates random key vectors with shape (B, T, head_size), where B is the batch size, T is the sequence length, and head_size is the size of each attention head.
q = torch.randn(B, T, head_size): Similar to the previous line, this generates random query vectors with the same shape as the key vectors.
wei = q @ k.transpose(-2, -1) * head_size*-0.5: This computes the scaled dot-product attention between the query and key vectors. It first performs a dot product between the query and key tensors, then scales the resulting attention scores by head_size*-0.5. The output, wei, is the attention matrix with shape (B, T, T).
k.var(), q.var(), wei.var(): These lines calculate the variance of the key vectors (k), query vectors (q), and the attention weights (wei). This could be used for analyzing the distribution and stability of the attention mechanism.
torch.softmax(torch.tensor([0.1, -0.2, 0.3, -0.2, 0.5]), dim=-1): This applies softmax function along the last dimension of the input tensor. It's applied to a simple tensor [0.1, -0.2, 0.3, -0.2, 0.5].
torch.softmax(torch.tensor([0.1, -0.2, 0.3, -0.2, 0.5])*8, dim=-1): Similar to the previous line, but the input tensor is multiplied by 8 before applying softmax. This is an experimental manipulation.
Step 7) Implementing Layer Normalization
Layer normalization is needed for this project to stabilize and accelerate the training of the neural network by normalizing the activations of each layer, ensuring consistent and efficient learning across different parts of the network.
To implement this into our project we must code the following:
class LayerNorm1d:
  def __init__(self, dim, eps=1e-5, momentum=0.1):
    self.eps = eps
    self.gamma = torch.ones(dim)
    self.beta = torch.zeros(dim)

  def __call__(self, x):
    # calculate the forward pass
    xmean = x.mean(1, keepdim=True) # batch mean
    xvar = x.var(1, keepdim=True) # batch variance
    xhat = (x - xmean) / torch.sqrt(xvar + self.eps) # normalize to unit variance
    self.out = self.gamma * xhat + self.beta
    return self.out

  def parameters(self):
    return [self.gamma, self.beta]

torch.manual_seed(1337)
module = LayerNorm1d(100)
x = torch.randn(32, 100) # batch, channels
x = module(x)
x.shape
Here is a breakdown of what is going on in this block of code:
- The
LayerNorm1dclass is designed to normalize the activations of a layer along the feature dimension. - It calculates the mean and variance of the input tensor
xalong the feature dimension and normalizes the input to have zero mean and unit variance. It applies learnable scaling
(gamma)and shifting(beta)parameters to the normalized input to maintain the representational power of the network.Layer normalization helps stabilize the training of deep neural networks by reducing internal covariate shift.
The
gammaandbetaparameters are learnable, allowing the model to adapt the normalization based on the task and the characteristics of the data.By defining the normalization as a class, it offers flexibility in terms of customization and integration into different parts of the network architecture.
After initializing the LayerNorm1d module with the desired dimensions, it can be called like a function
(module(x))to normalize the input tensorx.The normalized output is stored in self.out within the class instance and returned to the caller.
The
parameters()method returns a list containing the learnable parameters (gamma and beta) of the layer, which are typically updated during the training process.
Step 8) Wrapping up the code in a finished script
To Finish up this project, I will include a finished block of code of basically cleaning up with everything we have done so far, so most of the code in this block will be recognizable. Implement the following in a new cell:
import torch
import torch.nn as nn
from torch.nn import functional as F

# hyperparameters
batch_size = 16 # how many independent sequences will we process in parallel?
block_size = 32 # what is the maximum context length for predictions?
max_iters = 5000
eval_interval = 100
learning_rate = 1e-3
device = 'cuda' if torch.cuda.is_available() else 'cpu'
eval_iters = 200
n_embd = 64
n_head = 4
n_layer = 4
dropout = 0.0
# ------------

torch.manual_seed(1337)

# !wget https://raw.githubusercontent.com/ebxdk/textfile/main/input2.txt
with open('input2.txt', 'r', encoding='utf-8') as f:
    text = f.read()

# here are all the unique characters that occur in this text
chars = sorted(list(set(text)))
vocab_size = len(chars)
# create a mapping from characters to integers
stoi = { ch:i for i,ch in enumerate(chars) }
itos = { i:ch for i,ch in enumerate(chars) }
encode = lambda s: [stoi[c] for c in s] # encoder: take a string, output a list of integers
decode = lambda l: ''.join([itos[i] for i in l]) # decoder: take a list of integers, output a string

# Train and test splits
data = torch.tensor(encode(text), dtype=torch.long)
n = int(0.9*len(data)) # first 90% will be train, rest val
train_data = data[:n]
val_data = data[n:]

# data loading
def get_batch(split):
    # generate a small batch of data of inputs x and targets y
    data = train_data if split == 'train' else val_data
    ix = torch.randint(len(data) - block_size, (batch_size,))
    x = torch.stack([data[i:i+block_size] for i in ix])
    y = torch.stack([data[i+1:i+block_size+1] for i in ix])
    x, y = x.to(device), y.to(device)
    return x, y

@torch.no_grad()
def estimate_loss():
    out = {}
    model.eval()
    for split in ['train', 'val']:
        losses = torch.zeros(eval_iters)
        for k in range(eval_iters):
            X, Y = get_batch(split)
            logits, loss = model(X, Y)
            losses[k] = loss.item()
        out[split] = losses.mean()
    model.train()
    return out

class Head(nn.Module):
    """ one head of self-attention """

    def __init__(self, head_size):
        super().__init__()
        self.key = nn.Linear(n_embd, head_size, bias=False)
        self.query = nn.Linear(n_embd, head_size, bias=False)
        self.value = nn.Linear(n_embd, head_size, bias=False)
        self.register_buffer('tril', torch.tril(torch.ones(block_size, block_size)))

        self.dropout = nn.Dropout(dropout)

    def forward(self, x):
        B,T,C = x.shape
        k = self.key(x)   # (B,T,C)
        q = self.query(x) # (B,T,C)
        # compute attention scores ("affinities")
        wei = q @ k.transpose(-2,-1) * C**-0.5 # (B, T, C) @ (B, C, T) -> (B, T, T)
        wei = wei.masked_fill(self.tril[:T, :T] == 0, float('-inf')) # (B, T, T)
        wei = F.softmax(wei, dim=-1) # (B, T, T)
        wei = self.dropout(wei)
        # perform the weighted aggregation of the values
        v = self.value(x) # (B,T,C)
        out = wei @ v # (B, T, T) @ (B, T, C) -> (B, T, C)
        return out

class MultiHeadAttention(nn.Module):
    """ multiple heads of self-attention in parallel """

    def __init__(self, num_heads, head_size):
        super().__init__()
        self.heads = nn.ModuleList([Head(head_size) for _ in range(num_heads)])
        self.proj = nn.Linear(n_embd, n_embd)
        self.dropout = nn.Dropout(dropout)

    def forward(self, x):
        out = torch.cat([h(x) for h in self.heads], dim=-1)
        out = self.dropout(self.proj(out))
        return out

class FeedFoward(nn.Module):
    """ a simple linear layer followed by a non-linearity """

    def __init__(self, n_embd):
        super().__init__()
        self.net = nn.Sequential(
            nn.Linear(n_embd, 4 * n_embd),
            nn.ReLU(),
            nn.Linear(4 * n_embd, n_embd),
            nn.Dropout(dropout),
        )

    def forward(self, x):
        return self.net(x)

class Block(nn.Module):
    """ Transformer block: communication followed by computation """

    def __init__(self, n_embd, n_head):
        # n_embd: embedding dimension, n_head: the number of heads we'd like
        super().__init__()
        head_size = n_embd // n_head
        self.sa = MultiHeadAttention(n_head, head_size)
        self.ffwd = FeedFoward(n_embd)
        self.ln1 = nn.LayerNorm(n_embd)
        self.ln2 = nn.LayerNorm(n_embd)

    def forward(self, x):
        x = x + self.sa(self.ln1(x))
        x = x + self.ffwd(self.ln2(x))
        return x

# super simple bigram model
class BigramLanguageModel(nn.Module):

    def __init__(self):
        super().__init__()
        # each token directly reads off the logits for the next token from a lookup table
        self.token_embedding_table = nn.Embedding(vocab_size, n_embd)
        self.position_embedding_table = nn.Embedding(block_size, n_embd)
        self.blocks = nn.Sequential(*[Block(n_embd, n_head=n_head) for _ in range(n_layer)])
        self.ln_f = nn.LayerNorm(n_embd) # final layer norm
        self.lm_head = nn.Linear(n_embd, vocab_size)

    def forward(self, idx, targets=None):
        B, T = idx.shape

        # idx and targets are both (B,T) tensor of integers
        tok_emb = self.token_embedding_table(idx) # (B,T,C)
        pos_emb = self.position_embedding_table(torch.arange(T, device=device)) # (T,C)
        x = tok_emb + pos_emb # (B,T,C)
        x = self.blocks(x) # (B,T,C)
        x = self.ln_f(x) # (B,T,C)
        logits = self.lm_head(x) # (B,T,vocab_size)

        if targets is None:
            loss = None
        else:
            B, T, C = logits.shape
            logits = logits.view(B*T, C)
            targets = targets.view(B*T)
            loss = F.cross_entropy(logits, targets)

        return logits, loss

    def generate(self, idx, max_new_tokens):
        # idx is (B, T) array of indices in the current context
        for _ in range(max_new_tokens):
            # crop idx to the last block_size tokens
            idx_cond = idx[:, -block_size:]
            # get the predictions
            logits, loss = self(idx_cond)
            # focus only on the last time step
            logits = logits[:, -1, :] # becomes (B, C)
            # apply softmax to get probabilities
            probs = F.softmax(logits, dim=-1) # (B, C)
            # sample from the distribution
            idx_next = torch.multinomial(probs, num_samples=1) # (B, 1)
            # append sampled index to the running sequence
            idx = torch.cat((idx, idx_next), dim=1) # (B, T+1)
        return idx

model = BigramLanguageModel()
m = model.to(device)
# print the number of parameters in the model
print(sum(p.numel() for p in m.parameters())/1e6, 'M parameters')

# create a PyTorch optimizer
optimizer = torch.optim.AdamW(model.parameters(), lr=learning_rate)

for iter in range(max_iters):

    # every once in a while evaluate the loss on train and val sets
    if iter % eval_interval == 0 or iter == max_iters - 1:
        losses = estimate_loss()
        print(f"step {iter}: train loss {losses['train']:.4f}, val loss {losses['val']:.4f}")

    # sample a batch of data
    xb, yb = get_batch('train')

    # evaluate the loss
    logits, loss = model(xb, yb)
    optimizer.zero_grad(set_to_none=True)
    loss.backward()
    optimizer.step()

# generate from the model
context = torch.zeros((1, 1), dtype=torch.long, device=device)
print(decode(m.generate(context, max_new_tokens=2000)[0].tolist()))
- If you were to un-comment the line
!wget https://raw.githubusercontent.com/ebxdk/textfile/main/input2.txtyou will be able to run this block of code alone and it will output a piece of text based on the dataset provided through the githubusercontent link.
Here is a super quick breakdown of this block of code:
Model Architecture:
- Head: Implements a single head of self-attention, including key, query, and value linear transformations, attention computation, and dropout.
MultiHeadAttention: Combines multiple heads of self-attention in parallel. - FeedForward: Defines a feed-forward layer with linear transformation, ReLU activation, and dropout.
ReLU activation: ReLU is a simple but powerful trick used in neural networks to make them learn better. It works by letting positive numbers stay the same and turning negative numbers into zero. This helps the network understand patterns in data more easily and speeds up the learning process. Plus, it helps solve a problem that can slow down learning in deep networks. Here is a great article to read to understand the concepts of ReLU activation in a neural network: An Introduction to the ReLU Activation Function Written by: Bharath Krishnamurthy
To visually see where ReLU is being used in this code, here is the updated Transformer diagram:
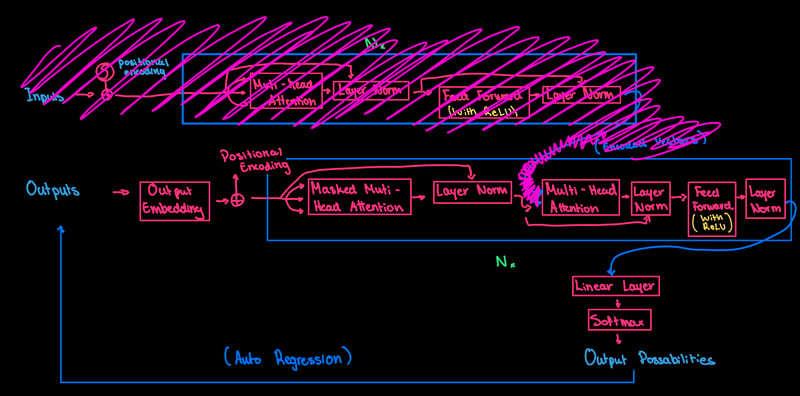
- No, the input part of the Transformer being crossed out is not a mistake. I will elaborate on it in the Summary part of this article. However, you can see in the feed-forward layer ReLU is being used.
- Block: Represents a Transformer block consisting of multi-head attention and feed-forward layers, along with layer normalization.
-
BigramLanguageModel: Defines the overall Transformer model architecture, including token and position embeddings, multiple Transformer blocks, layer normalization, and linear output layer for language modeling.
Training Loop:
- Training loop that iterates for a specified number of
max_iters. - Periodically evaluates the loss on both training and validation sets every
eval_intervaliterations. - Uses the
AdamWoptimizer for parameter updates.
Text Generation:
-
generatemethod in theBigramLanguageModelclass for generating text based on the trained model. - Generates text given a starting context and maximum number of new tokens to generate
(max_new_tokens).
Output and Observations
Finally, now that we have finished the code aspect we can run it with all the different aspects of a Transformer model implemented. Here is the text output:
Output 2: gmentechning (MRI) is a crucial tool. However, detecting brain tumors manually is a difficult and timime-con asught minketho fficherently glean useful insights from a wide variety of data. In addition, a Bi-directional Feature Pyramid Network (BiFPN) is used to speed up multi-scale feature fusion and to better collect features associated with tumors. The outcomes verify the efficiency of of our suggested method, which achieves a higher over of the MRI scans is enhanced by the use of image enhancement methods that apply different filters to the original pictures. To further improve the model’s sensitivity, we have added a Spatial Pyramid Pooulteater Pyramid NidiFPoal F+om (CBi) ayetention Yiquevont modetwork igmes a wide variety of cases, such as 2548 images of gliomas, 2658 images of pituitary, 2582 images of meningioma, and 2500 images of non-tumors. We included the Convolutional Block Attention Module (Moma wigmes of nordetection of brain tumors system. The visual representation of the MRI) iscanroce iand to better collect features associated with tumors. We included the Convolutional Block Attention Module (Cochen itumo work’s core it glean useful insights from a wide variety of data. In addition, a Bi-directional Feature Pyramid Network (BiFPN) is used to speed up multi-scale feature fusion and to better collect features associated with tumors. The outcomes verify the efficiency of our suggested method, which achieves a higher over acherixtrumode outection of meningioma, glioma, and pituitary gland tumors within an improved detection of brain tumors system. The visual representation of the MRI The cutcomes verify the efficiency of our suggested method, which achieves a higher of image enhancement methods that apply different filters to the original pictures. To further improve the model’s sensitivity, we have added a Spatial Pyramid Poouel However, detecting brain tumors manually is a difficult and timime-consuming activity that might lead to inaccuracies. In or
Observations
- I instantly realized that the words outputted is not the best. There are many errors that occur and many typos. This is a mainly because of the dataset we provided the model with. Since the dataset is not as large, it does not give the model enough context to output accurate text as humans are used to reading. Therefore, to fix this issue all I would really have to do is use a larger dataset so the output looks more refined. I will leave that up to you guys!
Summary
In this project we were able to create a replica GPT. We were able to familiarize ourselves with how artificial intelligence models and neural network architectures like Transformer works. We went through the process of a Transformer model and implemented it with Python code using Google Colab. We then were able to do so through mathematical tricks by using matrix multiplication which allowed more finer results of output text.
However, the main part of the Transformer model that we did not include was the input and cross attention part of the Transformer model. This is obvious because when we run the code we only get a block of text. This shows that we were not prompted to input any text and get any response according to that just how ChatGPT works.
I want to point out that with our model, we have no sort of alignment. What I mean by this is that when we train the model based on the githubusercontent link, the output of this project is a random text based off of that data. Comparing this to ChatGPT, it has a pre-training and fine-tuning aspects, where the fine-tuning aspects comes into play from the input from the user. Since ChatGPT is trained on such a large chunk of the internet, the input from the user is used to make the model go through a fine-tuning process and only shows selects chunks of data that is relevant to the user's input.
Chat-GPT Fine-Tuning Process
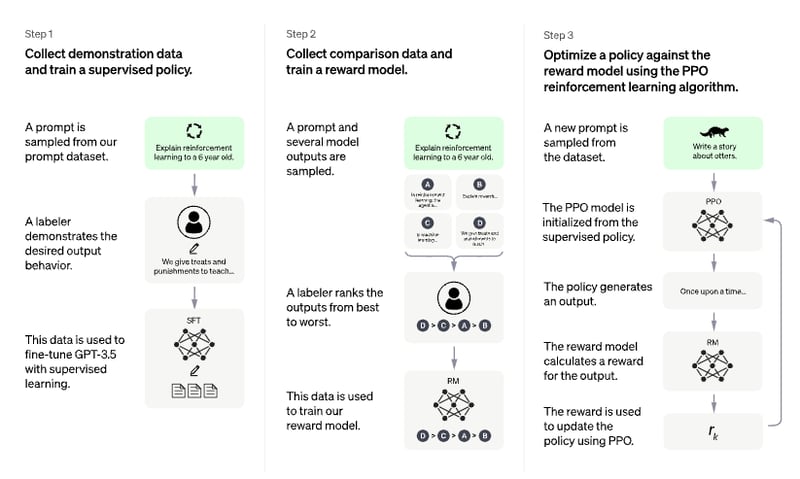
- In this image it explains the process of how Chat-GPT uses the user input for the fine-tuning process for its accurate results.
- Additionally, the data that OpenAI uses for this process is private, making it difficult to replicate this stage.
Therefore, from completing this project you were able to learn the following:
1. Understanding Transformer Architecture ✅
2. Importance of Attention Mechanism ✅
3. Cross-Attention for Complex Tasks ✅
4. Data Preparation and Tokenization ✅
5. Model Training and Fine-Tuning ✅
6. Foundation on developing language models ✅
This project is an excellent way to dip yourself into the artificial intelligence realm to kick-start future more complex and innovative ideas utilizing artificial intelligence.
I highly suggest beginners in the aspiring AI enthusiasts to leverage from this article to build more complex projects or startups that can impact society positively! 🚀
Links and Files
Here is the jupyter notebook file:
https://colab.research.google.com/drive/1nsQkVusMebDD1uJbSxrKvXd0sXqjPLQ7?usp=sharing
Here are the papers that are useful for context to this project:


Top comments (0)